Nissan Pathfinder: Brake System - Periodic Maintenance
- Brake Pedal
- Brake Fluid
- Brake Piping
- Brake Master Cylinder
- Brake Booster
- Vacuum Lines
- Front Brake Pad
- Front Disc Brake Rotor
- Brake System
Brake Pedal Nissan Pathfinder
Inspection
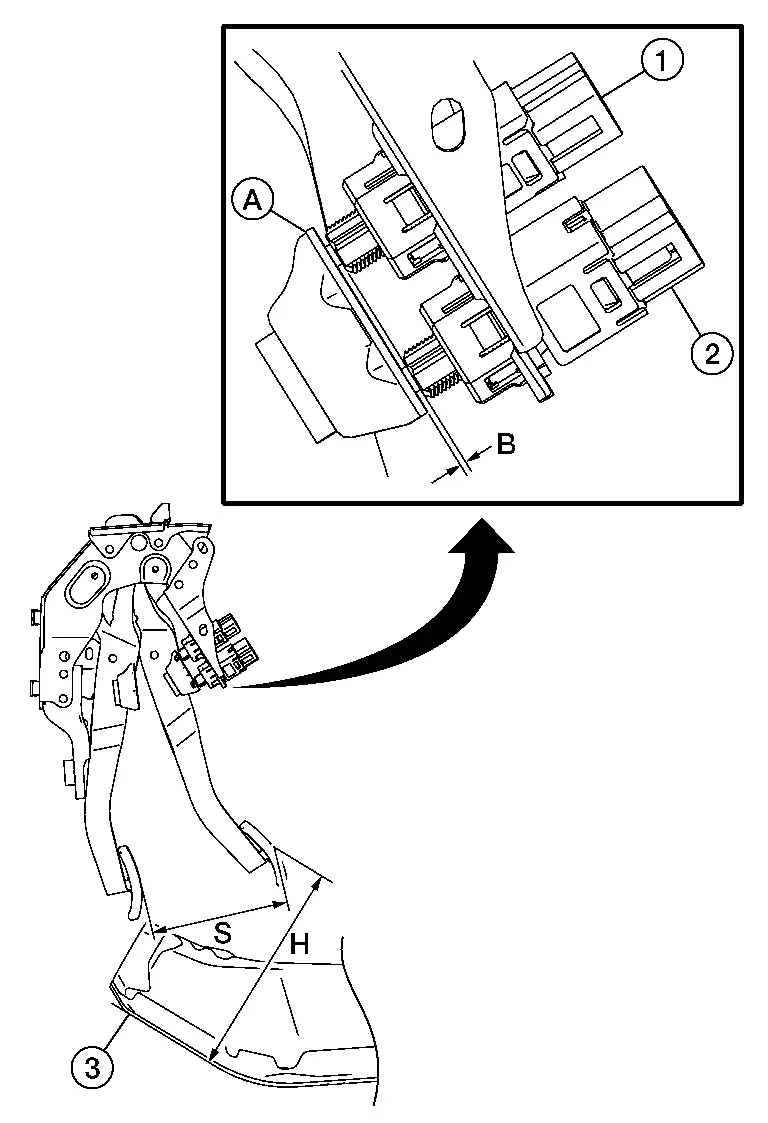
Check the brake pedal height with the floor trim removed.
Check the brake pedal height (H) between the dash lower panel (3) and the brake pedal upper surface.
|
|
||
| Brake pedal height (H) from dash lower panel (3) | Refer to Brake Pedal. | |
| Clearance (B) between brake pedal bracket (A), stop lamp switch (2) and brake pedal position switch (1) contact ends | Refer to Brake Pedal. | |
| Brake pedal full stroke (S) | Refer to Brake Pedal. | |
If the brake pedal height is not the standard, inspect the brake pedal for damage. If the brake pedal is damaged, replace the brake pedal. Refer to Removal and Installation.
If the brake pedal height is not the standard and the brake pedal is not damaged, perform the following steps to inspect the brake booster:Remove the brake booster. Refer to Removal and installation. Measure the input rod (A) length (B).
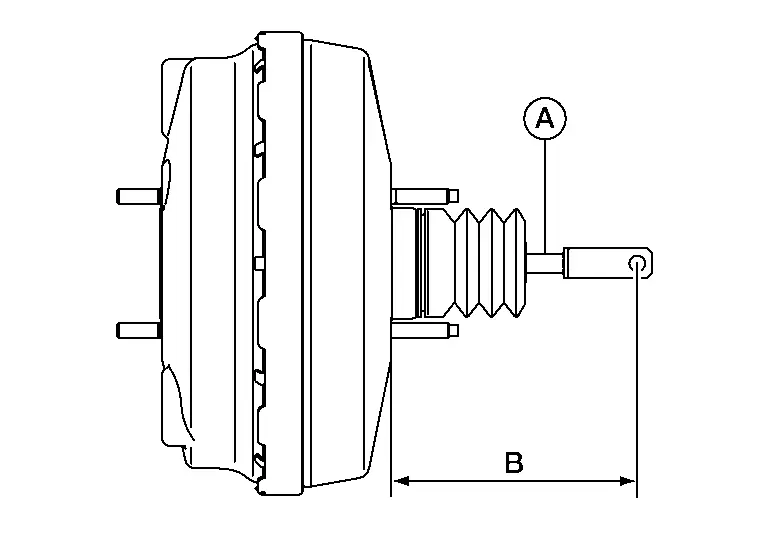
| Input rod (A) length (B) | : Refer to Brake Booster. |
 NOTE:
NOTE:
The input rod length is not adjustable.
Adjustment
BRAKE PEDAL HEIGHT
Inspect the brake pedal height. Replace parts as necessary. Refer to Inspection.
 NOTE:
NOTE:
The input rod length is not adjustable.
STOP LAMP SWITCH
Disconnect the negative terminal from the battery. Refer to Battery Disconnect.
Disconnect the harness connector from the stop lamp switch.
Turn the stop lamp switch 45° counterclockwise.
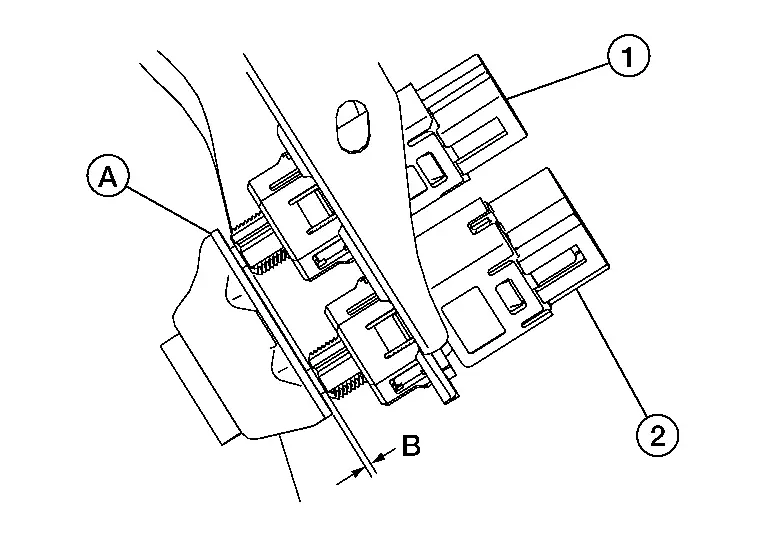
With the threaded end of the stop lamp switch (2) contacting the pedal bracket (A), turn the stop lamp switch 45° clockwise to lock in place. Check that the stop lamp switch contact end to brake pedal bracket clearance (B) is within specification.
CAUTION:
-
Make sure that the clearance between the brake pedal bracket and the stop lamp switch contact end is within specification.
-
The stop lamp must turn off when the brake pedal is released.
| Clearance (B) | : Refer to Brake Pedal. |
Connect the harness connector to the stop lamp switch.
Connect the negative terminal to the battery. Refer to Battery Disconnect.
BRAKE PEDAL POSITION SWITCH
Disconnect the harness connector from the brake pedal position switch.
Turn the brake pedal position switch 45° counterclockwise.
With the threaded end of the brake pedal position switch (1) contacting the pedal bracket (A), turn the brake pedal position switch 45° clockwise to lock in place. Check that the brake pedal position switch contact end to brake pedal bracket clearance (B) is within specification.

CAUTION:
Make sure that the clearance between the brake pedal bracket and the brake pedal position switch contact end is within specification.
| Clearance (B) | : Refer to Brake Pedal. |
Connect the harness connector to the brake pedal position switch.
Brake Fluid Nissan Pathfinder 2026
Inspection
BRAKE FLUID LEVEL
-
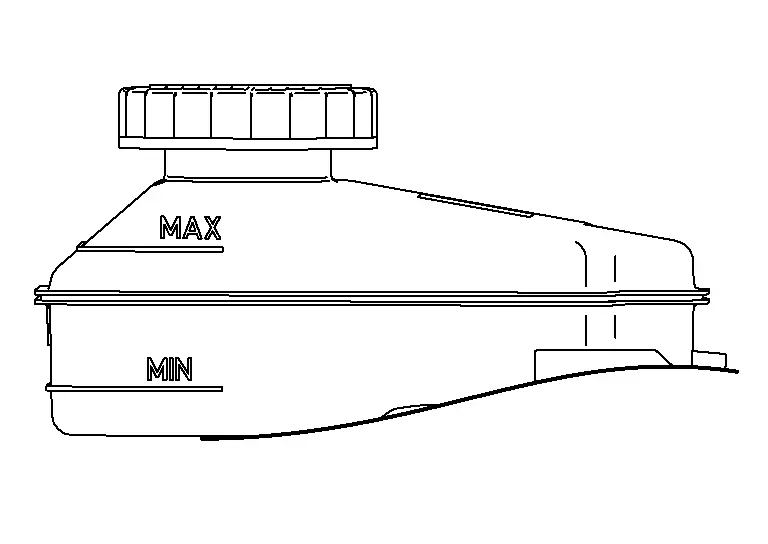
Make sure that the brake fluid level in the reservoir tank is between the MAX and MIN lines.
-
Visually check around the reservoir tank and the sub tank for brake fluid leaks.
-
If the brake fluid level is excessively low, check the brake system for leaks.
-
If the brake warning lamp remains illuminated after the parking brake is released, check the brake system for brake fluid leaks.
Draining
CAUTION:
-
Do not spill or splash brake fluid on painted surfaces. Brake fluid may damage paint. If brake fluid is splashed on painted areas, wash it away with water immediately.
-
Do not operate the brake pedal with the reservoir tank cap removed. Failure to do this may cause a discharge of brake fluid from the reservoir tank cap opening.
-
Check that there is no foreign material in the reservoir tank or in the sub tank.
-
Do not allow oils other than brake fluid to enter the reservoir tank.
-
Do not reuse drained brake fluid.
-
Do not operate the brake pedal excessively during the work procedure.
DRAINING
Connect a vinyl tube to the bleeder valve.
Depress the brake pedal and loosen the bleeder valve.
Depress the brake pedal several times and gradually discharge brake fluid.
CAUTION:
Do not allow the reservoir tank and the sub tank to empty as this may cause damage to the master cylinder internal components.
Refilling
CAUTION:
-
Do not spill or splash brake fluid on painted surfaces. Brake fluid may damage paint. If brake fluid is splashed on painted areas, wash it away with water immediately.
-
Do not operate the brake pedal with the reservoir tank cap removed. Failure to do this may cause a discharge of brake fluid from the reservoir tank cap opening.
-
Check that there is no foreign material in the reservoir tank or in the sub tank.
-
Do not allow oils other than brake fluid to enter the reservoir tank.
-
Do not reuse drained brake fluid.
-
Monitor the brake fluid level in the reservoir tank while performing the air bleeding.
-
Refill the brake system with new brake fluid. Refer to Fluids and Lubricants (FOR USA AND CANADA) or to Fluids and Lubricants (FOR MEXICO).
-
Do not operate the brake pedal excessively during the work procedure.
REFILLING
Make sure that there is no foreign material in the reservoir tank or in the sub tank, and refill with new brake fluid. Refer to Fluids and Lubricants (FOR USA AND CANADA) or to Fluids and Lubricants (FOR MEXICO).
Connect a vinyl tube to the bleeder valve.
Depress the brake pedal.
Loosen the bleeder valve.
Slowly depress the brake pedal to 2/3 of the brake pedal full stroke.
Tighten the bleeder valve with the brake pedal depressed.
Repeat this procedure at intervals of two or three seconds until all old brake fluid is discharged. Add new brake fluid to the reservoir tank frequently.
CAUTION:
Do not allow the reservoir tank and the sub tank to empty as this may cause damage to the master cylinder internal components.
Bleed the air out of the brake system. Refer to Bleeding Brake System.
Bleeding Brake System
CAUTION:
-
Do not spill or splash brake fluid on painted surfaces. Brake fluid may damage paint. If brake fluid is splashed on painted areas, wash it away with water immediately.
-
Do not operate the brake pedal with the reservoir tank cap removed. Failure to do this may cause a discharge of brake fluid from the reservoir tank cap opening.
-
Check that there is no foreign material in the reservoir tank or in the sub tank.
-
Do not allow oils other than brake fluid to enter the reservoir tank.
-
Do not reuse drained brake fluid.
-
Monitor the brake fluid level in the reservoir tank while performing the air bleeding.
-
Refill the brake system with new brake fluid. Refer to Fluids and Lubricants (FOR USA AND CANADA) or to Fluids and Lubricants (FOR MEXICO).
-
Do not operate the brake pedal excessively during the work procedure.
BLEEDING BRAKE SYSTEM
Connect a vinyl tube to the front (RH) brake caliper bleeder valve.
Depress the brake pedal 4 or 5 times.
With the brake pedal depressed, loosen the bleeder valve to bleed air in the brake line, and then tighten it immediately.
Repeat steps 3 and 4 until all of the air is out of the brake line.
Tighten the bleeder valve to the specified torque. Refer to Exploded View for the front brake caliper bleeder valve, or to Exploded View for the rear brake caliper bleeder valve.
Repeat steps 2 through 6 with the reservoir tank filled at least halfway. Bleed the air in the following order: front (RH) —> front (LH) —> rear (RH) —> rear (LH).
Brake Piping Nissan Pathfinder
Inspection
BRAKE LINE
Check brake line (tubes and hoses) for cracks, deterioration or other damage. Replace any damaged parts.
Check for brake fluid leaks by fully depressing brake pedal while engine is running.
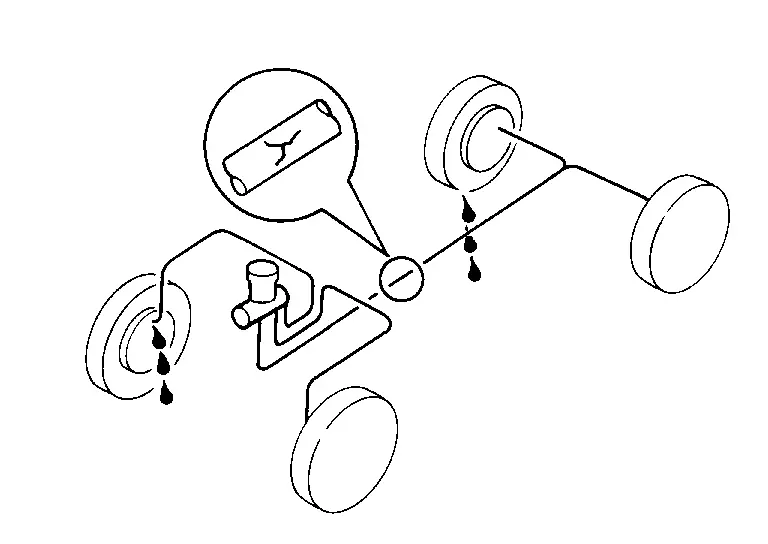
CAUTION:
If a brake fluid leak occurs around joints, retighten or replace damaged parts as necessary.
Brake Master Cylinder Nissan Pathfinder 2026
Inspection
Check for brake fluid leaks at the following areas:
Master cylinder body mounting surface
Reservoir tank mounting surface
Sub tank mounting surface
Brake tube and brake tube connections
Brake hose and brake hose connections
If a brake fluid leak is found, repair as necessary.
Brake Booster Nissan Pathfinder 5th Gen
Inspection
BRAKE BOOSTER
Operation
Depress the brake pedal several times at five second intervals with the engine stopped. Start the engine with the brake pedal fully depressed. Check that the clearance between brake pedal and dash lower panel decreases.

 NOTE:
NOTE:
A slight impact with a small click may be felt on the pedal when the brake pedal is fully depressed. This is normal brake system operation.
Vacuum Inspection
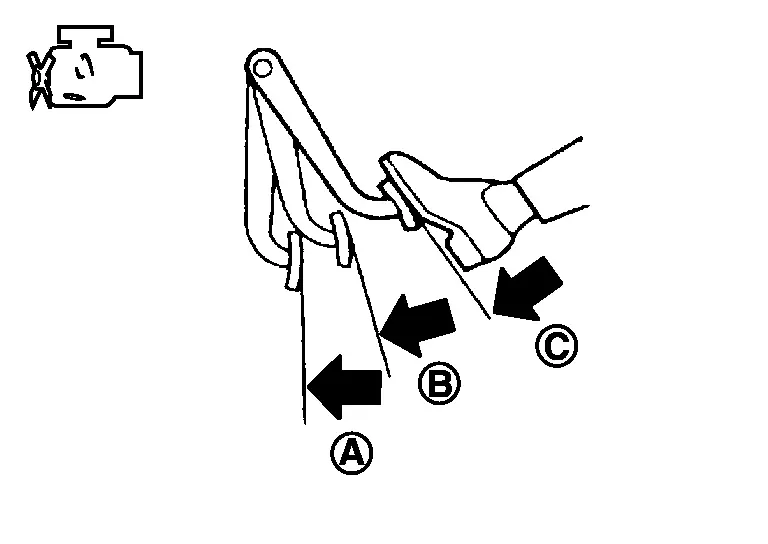
Idle the engine for one minute to apply vacuum to the brake booster. Stop the engine. Depress the brake pedal several times at five second intervals until the accumulated vacuum is released to atmospheric pressure. Check that the clearance between brake pedal and dash lower panel gradually increases (A –>B –>C) each time the brake pedal is depressed during this operation.
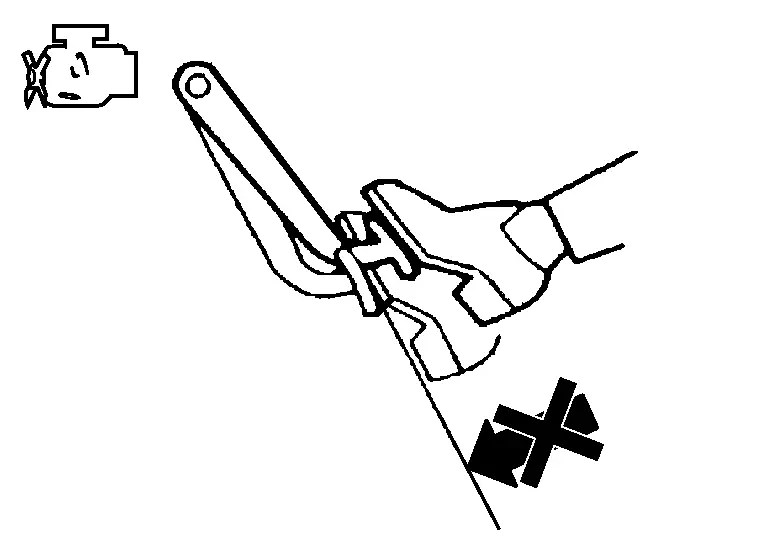
Depress the brake pedal with the engine running. Then stop the engine while holding down the brake pedal. Check that the brake pedal stroke does not change after holding down the brake pedal for 30 seconds or more.
 NOTE:
NOTE:
A slight impact with a small click may be felt on the pedal when the brake pedal is fully depressed. This is normal brake system operation.
Vacuum Lines Nissan Pathfinder SUV
Inspection
Check the vacuum hoses for damage, deterioration, and foreign matter.
Check the vacuum tubes for damage, deterioration, and foreign matter.
Front Brake Pad Nissan Pathfinder Fifth generation
Inspection
INSPECTION
Check brake pad wear thickness from inspection holes (A) on cylinder body.
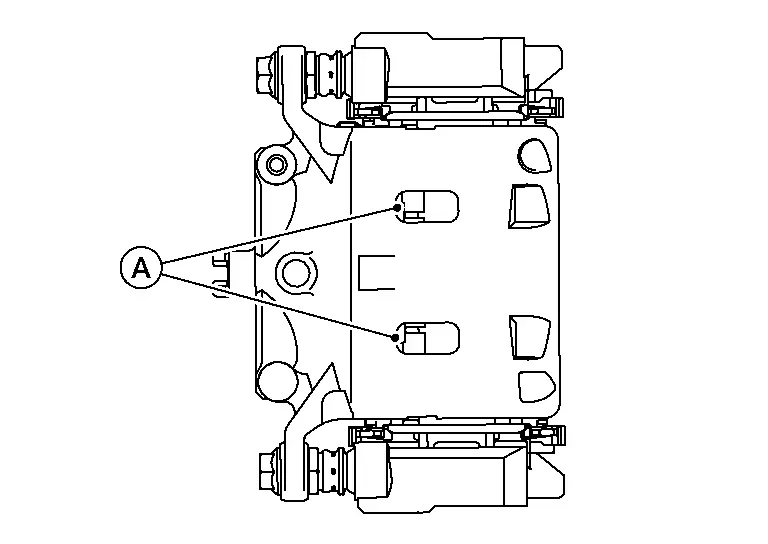
| Wear thickness | : Refer to Front Disc Brake. |
Front Disc Brake Rotor Nissan Pathfinder 2026
Inspection
APPEARANCE
Check the surface of the disc brake rotor for uneven wear, cracks, or damage. Replace the disc brake rotor if any abnormal conditions exist. Refer to Removal and Installation.
RUNOUT
Check the wheel bearing axial end play before the inspection. Refer to Inspection.
Secure the disc brake rotor to the wheel hub with wheel nuts at two wheel nut locations.
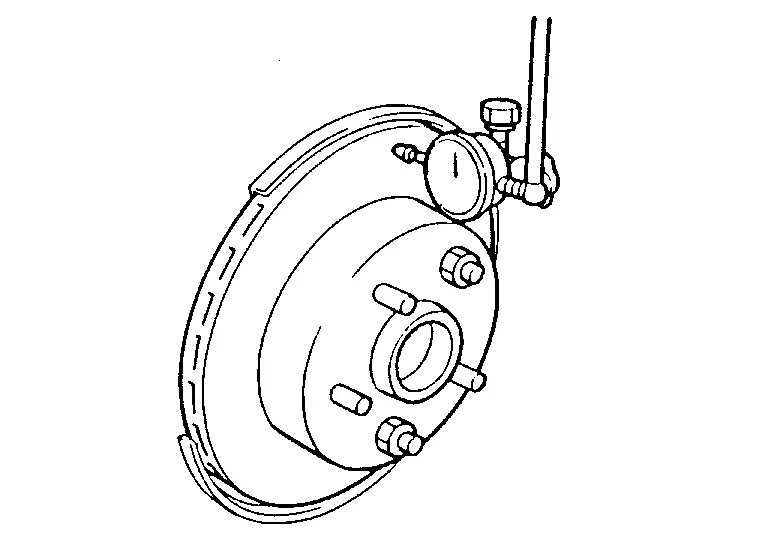
Measure the runout using a dial indicator to 10 mm (0.39 in) from the disc brake rotor edge.
| Runout (with it attached to the Nissan Pathfinder vehicle) | : Refer to Front Disc Brake. |
Find the installation position with the minimum runout by shifting the disc brake rotor-to-wheel hub installation position by one hole at a time if the runout exceeds the limit value.
Refinish the disc brake rotor if the runout is outside the limit even after performing the above operation. When refinishing, use Tool.
| Tool number | : 38-PFM92 ( — ) |
CAUTION:
-
Check in advance that the thickness of the disc brake rotor is wear thickness + 0.3 mm (0.012 in) or more.
-
If the thickness is less than wear thickness + 0.3 mm (0.012 in), replace the disc brake rotor. Refer to Removal and Installation.
| Wear thickness | : Refer to Front Disc Brake. |
THICKNESS
Check the thickness of the disc brake rotor using a micrometer. Replace the disc brake rotor if the thickness is below the wear limit. Refer to Removal and Installation.
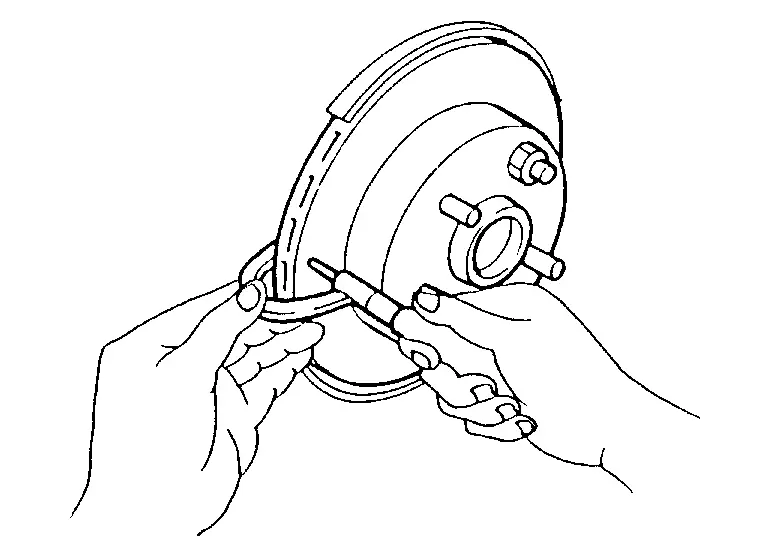
| Wear thickness | : Refer to Front Disc Brake. |
Brake System Nissan Pathfinder 5th Gen
Periodic Maintenance Operation
ADJUSTMENT
CAUTION:
-
Burnish the brake contact surfaces after refinishing or replacing rotors, after replacing pads, or if a soft pedal occurs at very low mileage.
-
Be careful of Nissan Pathfinder vehicle speed. Brakes do not operate firmly/securely until the pads are securely seated with the rotors.
-
Only perform this procedure under safe road and traffic conditions. Use extreme caution.
Drive the vehicle on a straight, flat road.
Depress the brake pedal until the vehicle stops.
Release the brake pedal for a few minutes to allow the brake components to cool.
Repeat steps 1 to 3 until the pads are securely seated with the rotors.

Nissan Pathfinder (R53) 2022-2026 Service Manual
Periodic Maintenance
- Brake Pedal
- Brake Fluid
- Brake Piping
- Brake Master Cylinder
- Brake Booster
- Vacuum Lines
- Front Brake Pad
- Front Disc Brake Rotor
- Brake System
Contact Us
Nissan Pathfinder Info Center
Email: info@nipathfinder.com
Phone: +1 (800) 123-4567
Address: 123 Pathfinder Blvd, Nashville, TN 37214, USA
Working Hours: Mon–Fri, 9:00 AM – 5:00 PM (EST)
