Nissan Pathfinder: Driver Assistance System - Basic Inspection
- Diagnosis and Repair Work Flow
- Additional Service When Replacing Distance Sensor
- Distance Sensor Alignment ➤
- Configuration (distance Sensor)
- Additional Service When Replacing Front Camera Unit
- Pre-Inspection for Diagnosis
- Camera Aiming Adjustment ➤
- Additional Service When Replacing Side Radar
- Side Radar Alignment
- Action Test ➤
Diagnosis and Repair Work Flow Nissan Pathfinder
Work Flow
OVERALL SEQUENCE
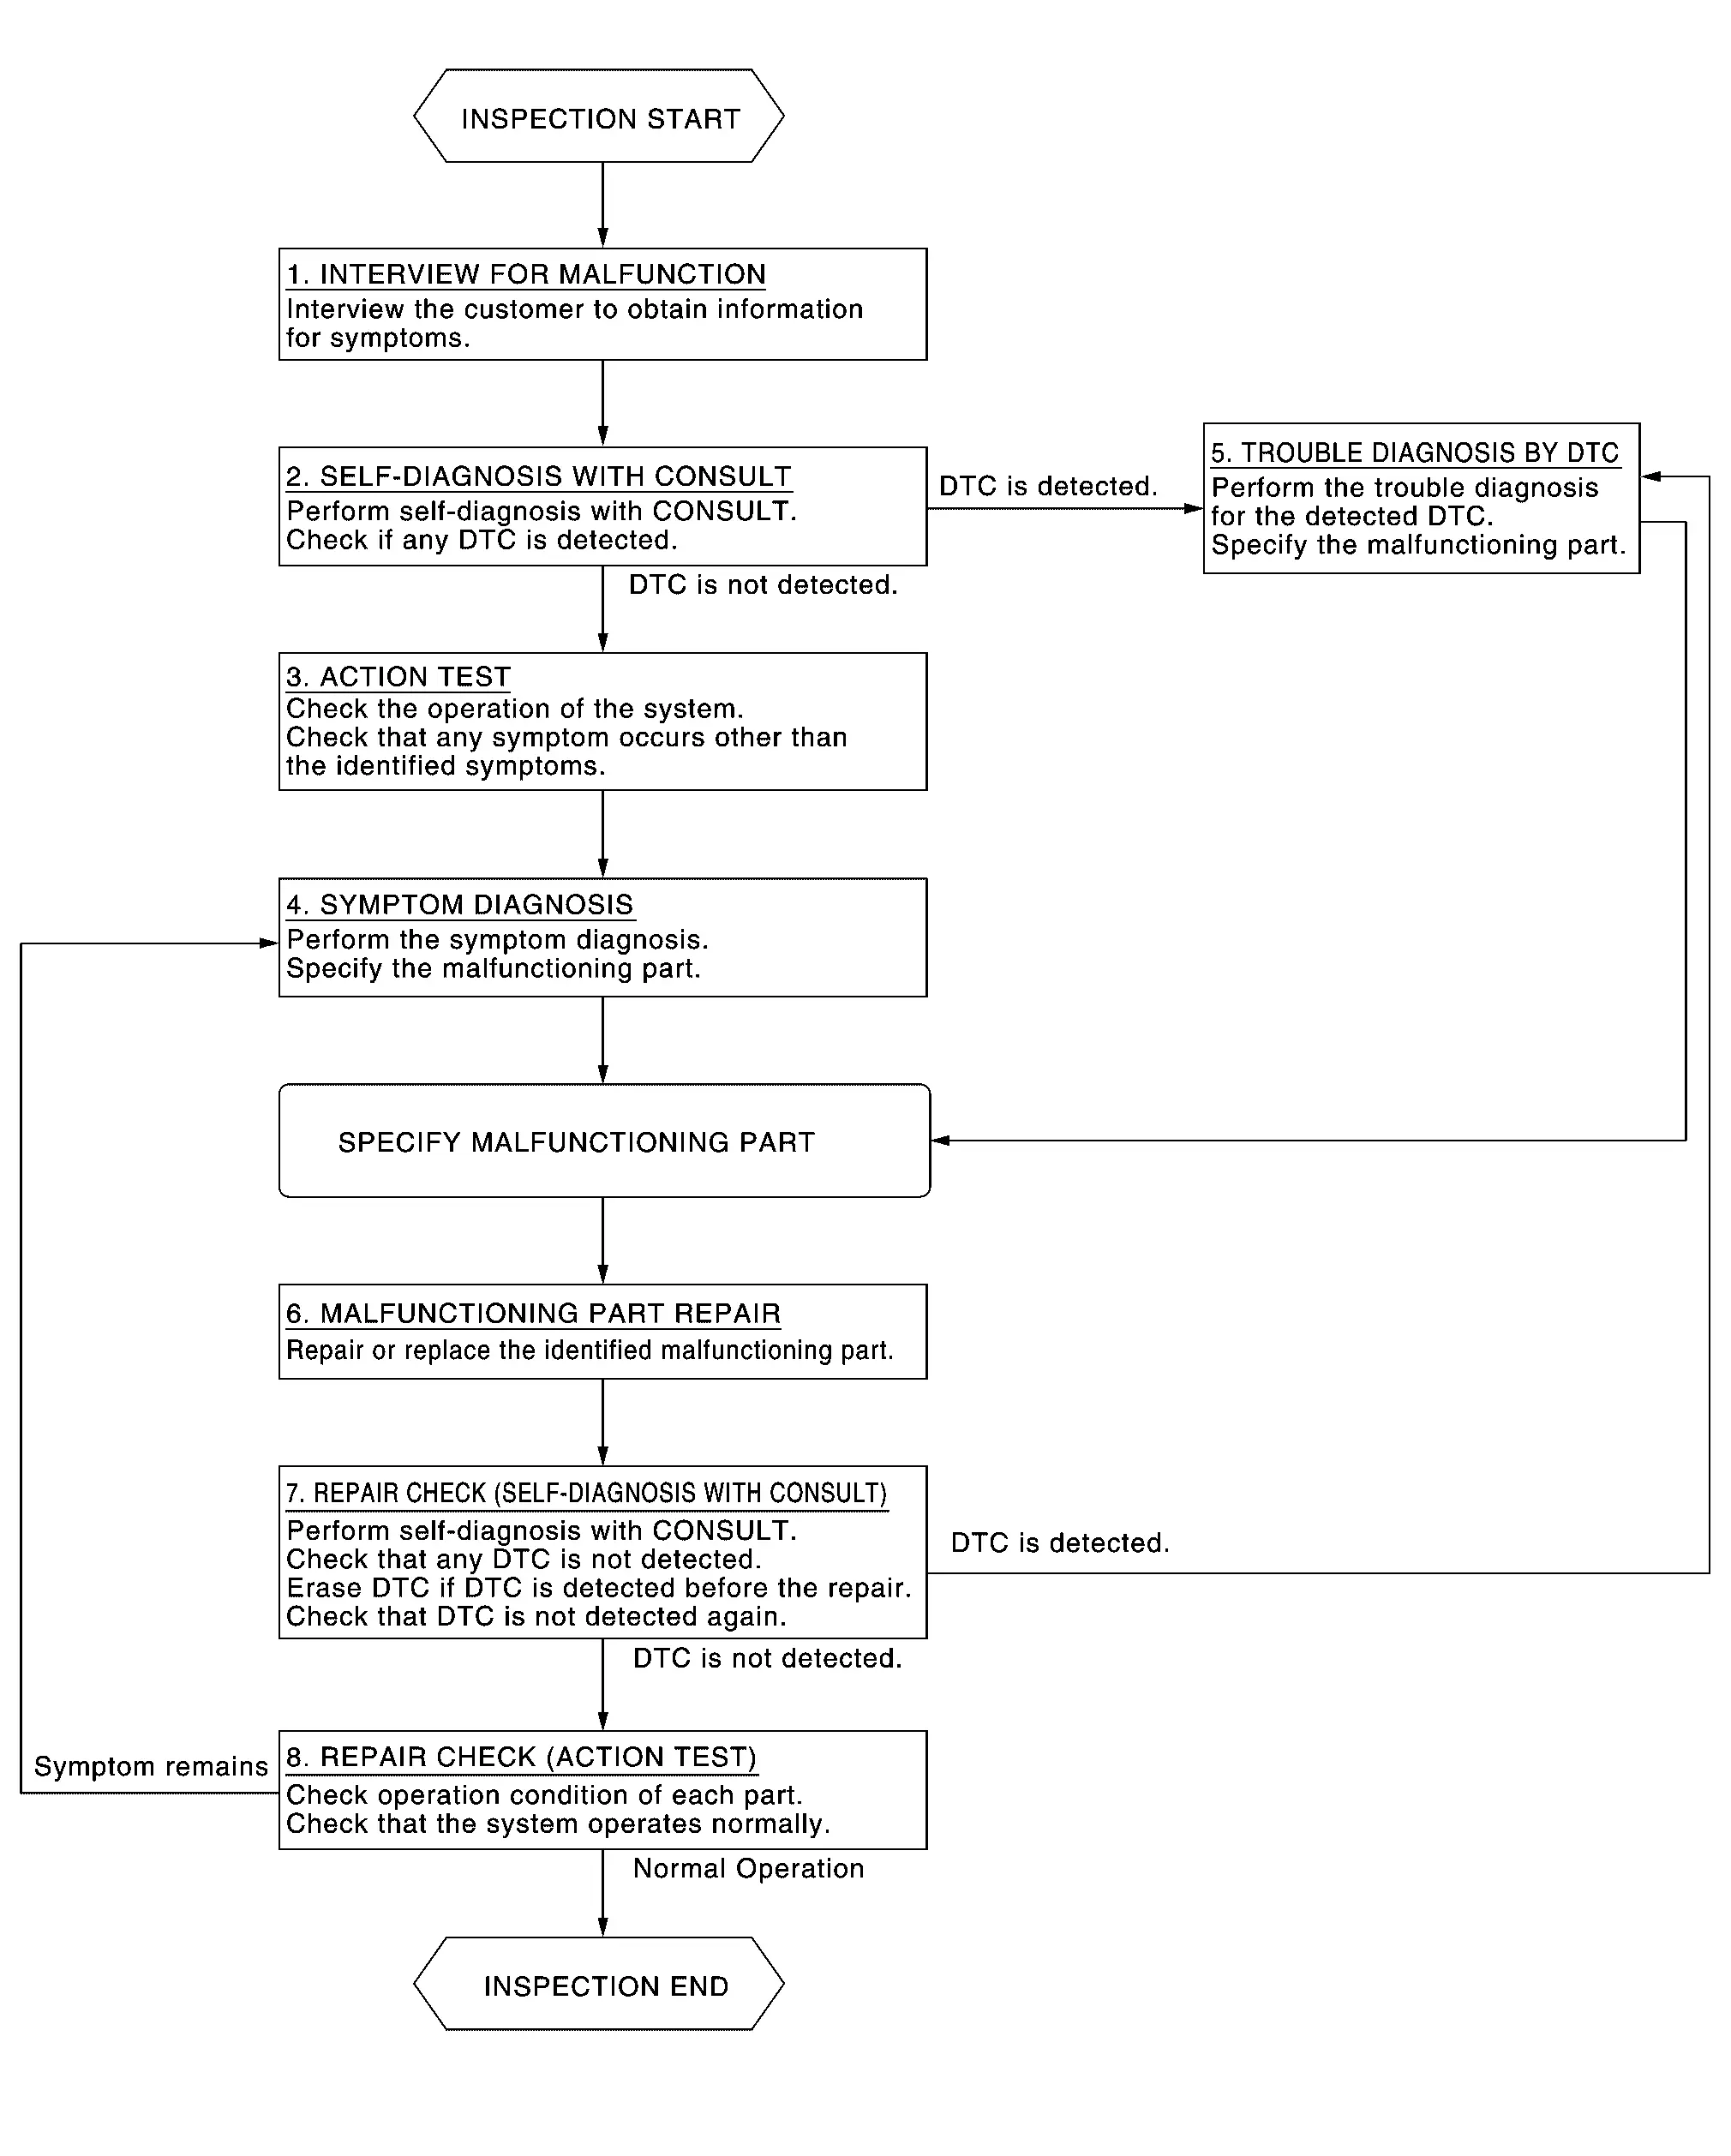
DETAILED FLOW
INTERVIEW FOR MALFUNCTION
It is important to clarify the customer’s concerns before starting the inspection. Interview the customer about the concerns carefully and understand the symptoms fully.
 NOTE:
NOTE:
The customers are not professionals. Never assume that “maybe the customer means...” or “maybe the customer mentioned this symptom”.
>>
GO TO 2.
SELF-DIAGNOSIS WITH CONSULT
 CONSULT
-
Perform “All DTC Reading” mode.
-
Check if the DTC is detected in the “Self Diagnostic Result” of the following:
-
“ICC/ADAS 2”
-
“LASER/RADAR”
-
“LANE CAMERA”
-
“Side radar (Rear left)”
-
“Side radar (Rear right)”
-
Is any DTC detected?
YES>>Record or print self-diagnosis results and freeze frame data (FFD). GO TO 5.
NO>>GO TO 3.
ACTION TEST
-
Perform the system action test to check the operation status of the following:
-
LDW: Refer to Work Procedure.
-
I-LI: Refer to Work Procedure.
-
BSW: Refer to Work Procedure.
-
I-BSI: Refer to Work Procedure.
-
TSR: Refer to Work Procedure.
-
RCTA: Refer to Work Procedure.
-
I-DA: Refer to Work Procedure.
-
-
Check if any other malfunctions occur.
>>
GO TO 4.
SYMPTOM DIAGNOSIS
Perform the applicable diagnosis according to the diagnosis chart by symptom. Refer to Symptom Table.
>>
GO TO 6.
TROUBLE DIAGNOSIS BY DTC
 CONSULT
-
Erase self-diagnostic results.
-
Ignition switch OFF → ON.
CAUTION:
Be sure to wait of 10 seconds after turning ignition switch OFF or ON.
-
Check the DTC in the “Self Diagnostic Result”.
-
Perform trouble diagnosis for the following detected DTC:
-
“ICC/ADAS 2”: Refer to DTC Index.
-
“LASER/RADAR”: Refer to DTC Index.
-
“LANE CAMERA”: Refer to DTC Index.
-
“Side radar (Rear left)”: Refer to DTC Index.
-
“Side radar (Rear right)”: Refer to DTC Index.
-
 NOTE:
NOTE:
If Network-DTC is detected, first diagnose the CAN communication system.
>>
GO TO 6.
MALFUNCTIONING PART REPAIR
Repair or replace the identified malfunctioning parts.
>>
GO TO 7.
REPAIR CHECK (SELF-DIAGNOSIS WITH CONSULT)
-
Erase “Self Diagnostic Result”.
-
Perform “All DTC Reading” mode after repairing or replacing the specific items.
-
Check if any DTC is detected in self-diagnosis results of the following:
-
“ICC/ADAS 2”
-
“LASER/RADAR”
-
“LANE CAMERA”
-
“Side radar (Rear left)”
-
“Side radar (Rear right)”
-
Is any DTC detected?
YES>>GO TO 5.
NO>>GO TO 8.
REPAIR CHECK (ACTION TEST)
Perform the following system action test. Check that the malfunction symptom is solved or no other symptoms occur.
-
LDW: Refer to Work Procedure.
-
I-LI: Refer to Work Procedure.
-
BSW: Refer to Work Procedure.
-
I-BSI: Refer to Work Procedure.
-
TSR: Refer to Work Procedure.
-
RCTA: Refer to Work Procedure.
-
I-DA: Refer to Work Procedure.
Is there a malfunction symptom?
YES>>GO TO 4.
NO>>Inspection End.
Additional Service When Replacing Distance Sensor Nissan Pathfinder 2026
Work Procedure
-
Always perform the distance sensor configuration after replacing the distance sensor.
-
Always perform the radar alignment after removing and installing or replacing the distance sensor.
CAUTION:
The system does not operate normally unless the distance sensor configuration and the radar alignment are performed. Always perform them.
-
Perform the AEB system action test to check that the AEB system operates normally.
DISTANCE SENSOR CONFIGURATION
Perform the distance sensor configuration with CONSULT. Refer to Work Procedure.
>>
GO TO 2.
PERFORM RADAR ALIGNMENT
Perform the radar alignment. Refer to Work Procedure.
>>
GO TO 3.
AEB SYSTEM ACTION TEST
-
Perform the following system action test.
-
LDW: Refer to Work Procedure.
-
I-LI: Refer to Work Procedure.
-
BSW: Refer to Work Procedure.
-
I-BSI: Refer to Work Procedure.
-
TSR: Refer to Work Procedure.
-
RCTA: Refer to Work Procedure.
-
I-DA: Refer to Work Procedure.
-
ICC: Refer to Work Procedure.
-
-
Check that the each system operates normally.
>>
INSPECTION END
Distance Sensor Alignment ➤ Nissan Pathfinder 2022
Configuration (distance Sensor) Nissan Pathfinder SUV
Work Procedure
Vehicle specification needs to be written with CONSULT because it is not written after replacing the distance sensor.
The configuration requires network connection. CONSULT connects to network and then it downloads the configuration data from the server. Then CONSULT writes the Nissan Pathfinder vehicle specification to the distance sensor.
 NOTE:
NOTE:
For details the network connection and operation, refer to “CONSULT Operation Manual”.
The configuration no need to “save” configuration data from the distance sensor. The configuration data is always generated freshly at the server and then downloaded to the CONSULT.
CAUTION:
-
Complete the procedure of “Configuration” in order.
-
If incorrect “Configuration”, incidents might occur.
WRITING VEHICLE SPECIFICATION
 With CONSULT
Perform writing Nissan Pathfinder vehicle specification to distance sensor following "Automatic Configuration" procedure of "Configuration" according to CONSULT Operation Manual.
 NOTE:
NOTE:
-
Log in the network according to CONSULT guidance.
-
For details the network connection and operation, refer to “CONSULT Operation Manual”.
>>
WORK END
Additional Service When Replacing Front Camera Unit Nissan Pathfinder
Work Procedure
-
Always perform the front camera unit configuration after replacing the front camera unit.
-
Always perform the camera aiming after removing and installing or replacing the front camera unit.
CAUTION:
The system does not operate normally unless the front camera unit configuration and the camera aiming adjustment are performed. Always perform them.
FRONT CAMERA UNIT CONFIGURATION
Perform the front camera unit configuration with CONSULT. Refer to Work Procedure.
>>
GO TO 2.
CAMERA AIMING ADJUSTMENT
Perform the camera aiming adjustment with CONSULT. Refer to Work Procedure.
>>
GO TO 3.
PERFORM SELF-DIAGNOSIS
Perform the self-diagnosis of front camera unit with CONSULT. Check if any DTC is detected.
Is any DTC detected?
YES>>Perform the trouble diagnosis for the detected DTC. Refer to DTC Index.
NO>>GO TO 4.
ACTION TEST
-
Perform the following system action test.
-
LDW: Refer to Work Procedure.
-
I-LI: Refer to Work Procedure.
-
I-BSI: Refer to Work Procedure.
-
TSR: Refer to Work Procedure.
-
ProPILOT Assist: Refer to Work Procedure(7 inch information display) or Work Procedure(FULL TFT METER).
-
-
Check that the each system operates normally.
>>
WORK END
Pre-Inspection for Diagnosis Nissan Pathfinder 2022
Work Procedure
CHECK CAMERA LENS AND WINDSHIELD
Are camera lens and windshield contaminated with foreign materials?
YES (When the camera lens is contaminated with foreign materials.)>>Replace front camera unit (Refer to Removal and Installation.) and GO TO 2.
YES (When the windshield is contaminated with foreign materials.)>>Clean windshield.
NO>>GO TO 2.
CHECK FRONT CAMERA UNIT INSTALLATION CONDITION
Check front camera unit installation condition (installation position, properly tightened, a bent bracket).
Is it properly installed?
YES>>GO TO 3.
NO>>Install front camera unit properly, and perform camera aiming.
CHECK Nissan Pathfinder Vehicle HEIGHT
Check vehicle height. Refer to Wheelarch Height.
Is vehicle height appropriate?
YES>>INSPECTION END
NO>>Repair Nissan Pathfinder vehicle to appropriate height.
Camera Aiming Adjustment ➤ Nissan Pathfinder 2022
Additional Service When Replacing Side Radar Nissan Pathfinder Fifth generation
Work Procedure
Always perform the side radar configuration after replacing the side radar.
SIDE RADAR CONFIGURATION
Perform the side radar configuration with CONSULT. Refer to Work Procedure.
>>
GO TO 2.
SIDE RADAR ALIGNMENT
Perform the side radar alignment with CONSULT. Refer to Work Procedure.
YES>>
GO TO 3.
PERFORM SELF-DIAGNOSIS
Perform the self-diagnosis of side radar with CONSULT. Check if any DTC is detected.
Is any DTC detected?
YES>>Perform the trouble diagnosis for the detected DTC.
-
Side radar LH: Refer to DTC Index
-
Side radar RH: Refer to DTC Index
INSPECTION END
Side Radar Alignment Nissan Pathfinder
Work Procedure
-
Always perform the side radar alignment after performing the following work.
-
After removing and installing or replacing the side radar.
-
After removing and installing, replacing or repainting the rear bumper.
-
-
Side radar alignment conditions are following;
-
The Nissan Pathfinder vehicle speed is 30 km/h (19 MPH) or higher.
-
The objects which reflect the wave of radar is located 8 m or more away from the Nissan Pathfinder vehicle.
-
The steering wheel is straight.
-
 NOTE:
NOTE:
-
The side radar alignment process is reset (back to 0%) when ignition switch is OFF before completing.
-
The side radar alignment process stops when the Nissan Pathfinder vehicle speed is 0 km/h (vehicle parked) and restarts when the alignment conditions are satisfied.
-
Timeout occurs, if the side radar alignment conditions are not satisfied for 1 hour after the side radar alignment is started.
-
The side radar irradiates radar and performs the alignment by receiving its reflected wave for certain fixed time.
-
Because of not receiving the reflected wave, the side radar alignment may stop making progress under the following environment.
-
When driving on a road with high snow banks on both sides.
-
When driving on a road that has no objects to reflect the radar waves, such as a coastline road.
-
When driving on the road that sits above the surrounding level surface, such as a road on top of a levee or on top of an earthen dam.
-
-
It is necessary to be connected to the internet when starting the side radar alignment, but the alignment can continue even if the connection is lost during the alignment.
-
Since CONSULT is used for side radar alignment, bring CONSULT into the Nissan Pathfinder vehicle during side radar alignment to check the progress.
SELECT WORK SUPPORT ITEM
-
Stop the vehicle.
-
Select “Work support” of “Side radar (Rear left)” or “Side radar (Rear right)”.
 NOTE:
NOTE:
Whichever “Side radar (Rear left)” or “Side radar (Rear right)” is selected, the installation information can be written to both side radar LH/RH.
-
Select “Side radar alignment”.
Is the screen to select the target side radar displayed?
YES>>GO TO 2.
NO>>When error message is displayed: GO TO 4.
START SIDE RADAR ALIGNMENT
Select “Start”.
Is “Ready to start the side radar alignment.” displayed?
YES>>GO TO 3.
NO-1>>When “Abnormal side radar installation.” is displayed: GO TO 5.
NO-2>>When “Detecting DTC.” is displayed: GO TO 6.
NO-3>>When “Stopped” is displayed: Perform side radar alignment again.
PERFORM SIDE RADAR ALIGNMENT
-
Drive the Nissan Pathfinder vehicle.
CAUTION:
-
Always drive safely.
-
Side radar alignment cannot be performed under the following conditions;
-
Heavy rain or snow
-
The bumper around the radar is contaminated.
-
-
-
Confirm that “Side radars alignment are completed.” is displayed and select "End".
>>
WORK END.
CONFIRMATION OF UNDETECTED RADAR
-
Confirm undetected radar and repair the defective part.
-
Perform the side radar alignment again.
>>
WORK END.
CHECK THE CONNECTORS OF SIDE RADAR LH/RH
-
Confirm the description on CONSULT, check the concerned radar installing condition (installed location, tightening torque, bend of bracket etc.) and repair the defective part.
-
Perform the side radar alignment again.
>>
WORK END.
CHECK SELF-DIAGNOSIS RESULTS OF SIDE RADAR
-
Perform "All DTC Reading".
-
Check if the DTC is detected on the self-diagnosis results of following.
-
“Side radar (Rear left)”: Refer to DTC Index.
-
“Side radar (Rear right)”: Refer to DTC Index.
-
-
Perform trouble diagnosis for the detected DTC, and repair or replace the identified malfunctioning parts.
-
Ignition switch OFF to ON, and perform the side radar alignment again.
>>
WORK END.
Action Test ➤ Nissan Pathfinder 5th Gen

Nissan Pathfinder (R53) 2022-2026 Service Manual
Basic Inspection
- Diagnosis and Repair Work Flow
- Additional Service When Replacing Distance Sensor
- Distance Sensor Alignment ➤
- Configuration (distance Sensor)
- Additional Service When Replacing Front Camera Unit
- Pre-Inspection for Diagnosis
- Camera Aiming Adjustment ➤
- Additional Service When Replacing Side Radar
- Side Radar Alignment
- Action Test ➤
Contact Us
Nissan Pathfinder Info Center
Email: info@nipathfinder.com
Phone: +1 (800) 123-4567
Address: 123 Pathfinder Blvd, Nashville, TN 37214, USA
Working Hours: Mon–Fri, 9:00 AM – 5:00 PM (EST)
