Nissan Pathfinder: Road Wheels & Tires - Symptom Diagnosis
- Tire Pressure Monitoring System Symptom
- Low Tire Pressure Warning Lamp Does Not Turn on
- Low Tire Pressure Warning Lamp Does Not Turn Off
- Low Tire Pressure Warning Lamp Blinks
- Low Tire Pressure Location Indicator Does Not Display
- Low Tire Pressure Location Indicator Continues Displaying
- Id Registration Cannot Be Completed
- Easy Fill Tire Alert Does Not Activate
- Noise, Vibration and Harshness (nvh) Troubleshooting
Tire Pressure Monitoring System Symptom Nissan Pathfinder R53
Symptom Table
LOW TIRE PRESSURE WARNING LAMP SYMPTOM CHART
| Diagnosis items |
Symptom (Ignition switch ON) | Low tire pressure warning lamp | Cause | Action |
|---|---|---|---|---|
|
Low tire pressure warning lamp |
The low tire pressure warning lamp illuminates for 1 second, then turns OFF. |
|
Wake-up operation for all tire pressure sensors at wheels is completed. | No system malfunctions |
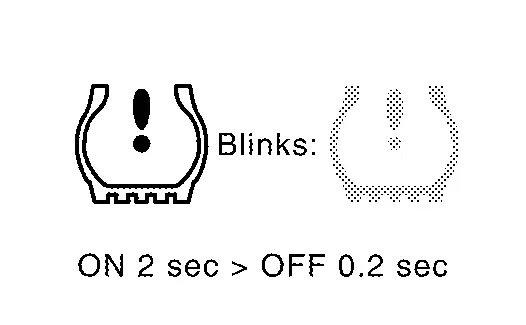
| The low tire pressure warning lamp repeats blinking ON for 2 seconds and OFF for 0.2 seconds. |
|
The all tire pressure sensor is not activated. | Perform the ID registration for all tire pressure sensors at wheels. Refer to Work Procedure. | |
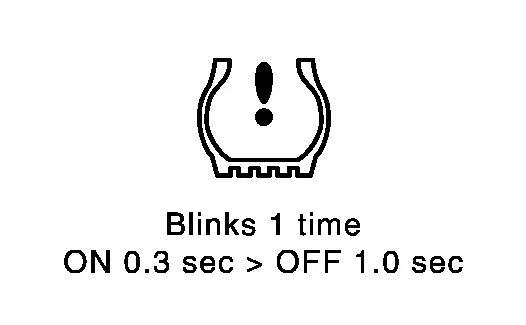
| The low tire pressure warning lamp blinks once. |
|
The front left tire pressure sensor is not activated. | Perform the ID registration for the tire pressure sensor at front left wheel. Refer to Work Procedure. | |
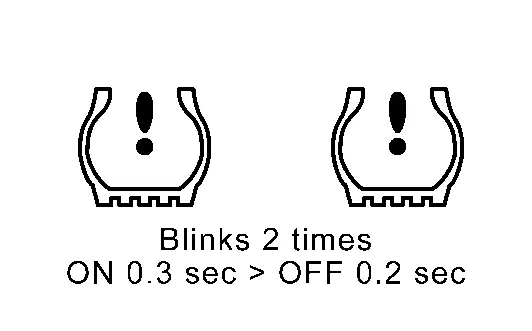
| The low tire pressure warning lamp repeats blinking twice. |
|
The front right tire pressure sensor is not activated. | Perform the ID registration for the tire pressure sensor at front right wheel. Refer to Work Procedure. | |
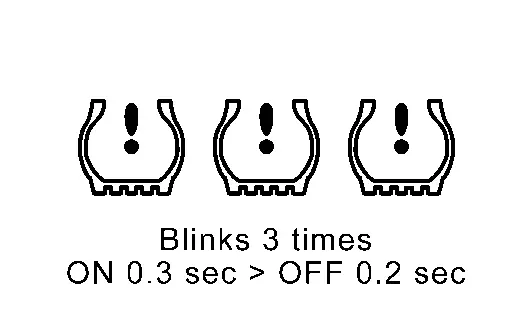
| The low tire pressure warning lamp repeats blinking for 3 times. |
|
The rear right tire pressure sensor is not activated. | Perform the ID registration for the tire pressure sensor at rear right wheel. Refer to Work Procedure. | |
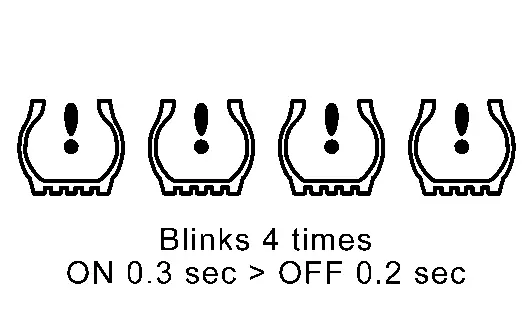
| The low tire pressure warning lamp repeats blinking for 4 times. |
|
The rear left tire pressure sensor is not activated. | Perform the ID registration for the tire pressure sensor at rear left wheel. Refer to Work Procedure | |
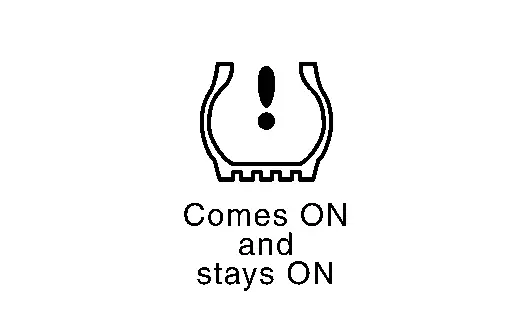
| The low tire pressure warning lamp turns ON and stays illuminated. |
|
Low tire pressure | Check the tire pressure for all wheels and adjust to the specified value. Refer to Tire Air Pressure. | |
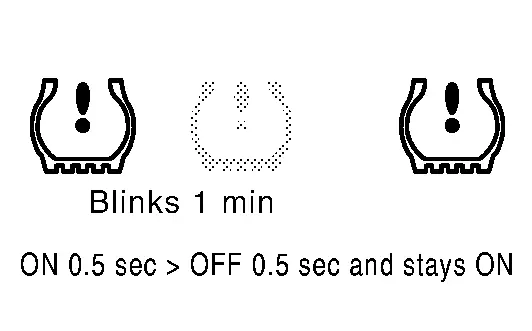
| Low tire pressure warning lamp | The low tire pressure warning lamp repeats blinking at 0.5-second intervals for 1 minute, and then stays illuminated. |
|
The combination meter fuse is open or removed (or pulled out). | Check and install the combination meter fuse. If necessary, replace the fuse. |
| The BCM harness connector is removed. | Check the connection conditions of the BCM harness connector, and repair if necessary. | |||
| TPMS malfunction. |
|

Low Tire Pressure Warning Lamp Does Not Turn on Nissan Pathfinder
Description
The low tire pressure warning lamp does not turn ON when the ignition switch is placed ON.
 NOTE:
NOTE:
The low tire pressure warning lamp turn ON for approximately 1 second and then turns OFF when the ignition switch is placed ON. This is to check that no abnormal condition is present in the TPMS system.
The combination meter may be malfunctioning or the TPMS system may be malfunctioning if the low tire pressure warning lamp does not turn ON when the ignition switch is placed ON.
Diagnosis Procedure
CHECK TIRE PRESSURE
-
Ignition switch ON.
CAUTION:
Never start the engine.
-
Check the tire pressure for all wheels and adjust to the specified value. Refer to Tire Air Pressure.
-
Recheck the tire pressure for all wheels. Refer to Tire Air Pressure.
Is the inspection result normal?
YES>>GO TO 2.
NO>>Inspect or repair the tires or wheels.
CHECK LOW TIRE PRESSURE WARNING LAMP OPERATION
Check low tire pressure warning lamp display.
Is the inspection result normal?
YES>>Inspection End.
NO>>GO TO 3.
PERFORM SELF DIAGNOSTIC RESULT
 CONSULT
Select “Self Diagnostic Result” mode of “BCM(AIR PRESSURE MONITOR)”.
Is DTC detected?
YES>>Perform DTC diagnosis procedure. Refer to DTC Index.
NO>>GO TO 4.
CHECK BCM POWER SUPPLY AND GROUND CIRCUIT
Perform the trouble diagnosis for power supply and ground circuit. Refer to Diagnosis Procedure.
Is the inspection result normal?
YES>>Replace BCM. Refer to Removal and Installation.
NO>>Repair or replace error-detected parts.
Low Tire Pressure Warning Lamp Does Not Turn Off Nissan Pathfinder SUV
Description
The low tire pressure warning lamp does not turn OFF after several seconds is passed after engine starts.
Diagnosis Procedure
CHECK TIRE PRESSURE
-
Ignition switch ON.
CAUTION:
Never start the engine.
-
Check the tire pressure for all wheels and adjust to the specified value. Refer to Tire Air Pressure.
-
Recheck the tire pressure for all wheels. Refer to Tire Air Pressure.
Is the inspection result normal?
YES>>GO TO 2.
NO>>Inspect or repair the tires or wheels.
CHECK LOW TIRE PRESSURE WARNING LAMP OPERATION
Check low tire pressure warning lamp display.
Is the inspection result normal?
YES>>Inspection End.
NO>>GO TO 3.
PERFORM SELF DIAGNOSTIC RESULT
 CONSULT
Select “Self Diagnostic Result” mode of “BCM(AIR PRESSURE MONITOR)”.
Is DTC detected?
YES>>Perform DTC diagnosis procedure. Refer to DTC Index.
NO>>GO TO 4.
CHECK BCM POWER SUPPLY AND GROUND CIRCUIT
Perform the trouble diagnosis for power supply and ground circuit. Refer to Diagnosis Procedure.
Is the inspection result normal?
YES>>Replace BCM. Refer to Removal and Installation.
NO>>Repair or replace error-detected parts.
Low Tire Pressure Warning Lamp Blinks Nissan Pathfinder
Description
When the ignition switch is placed ON, the low tire pressure warning lamp blinks. And then 1 minute later, low tire pressure warning lamp turns ON.
Diagnosis Procedure
CHECK TIRE PRESSURE SENSOR INSTALLATION
Check visually that tire pressure sensors are installed to each wheels correctly.
 NOTE:
NOTE:
In the following cases, the TPMS system will not function:
-
Tire pressure sensor(s) are not installed.
-
Tire pressure sensor(s) of other cars are installed.
Are the genuine NISSAN tire pressure sensors are installed correctly?
YES>>GO TO 2.
NO>>Replace and/or Install tire pressure sensor(s). Refer to Removal and Installation. GO TO 3.
PERFORM SELF DIAGNOSTIC RESULT
 CONSULT
Select “Self Diagnostic Result” mode of “BCM(AIR PRESSURE MONITOR)”.
Is DTC detected?
YES>>Perform DTC diagnosis procedure. Refer to DTC Index.
NO>>GO TO 4.
TIRE PRESSURE SENSOR ID REGISTRATION
 CONSULT
Perform tire pressure sensor ID registration. Refer to Work Procedure.
Is tire pressure sensor ID registration completed?
YES>>Adjust the tire pressure for all wheels specified to the value. Refer to Tire Air Pressure. Inspection End.
NO>>Perform diagnosis procedure of “ID REGISTRATION CANNOT BE COMPLETED”. Refer to Diagnosis Procedure.
CHECK BCM POWER SUPPLY AND GROUND CIRCUIT
Perform the trouble diagnosis for BCM power supply and ground circuit. Refer to Diagnosis Procedure.
Is the inspection result normal?
YES>>Repair or replace error-detected parts.
NO>>Replace BCM. Refer to Removal and Installation.
Low Tire Pressure Location Indicator Does Not Display Nissan Pathfinder SUV
Description
When low tire pressure, low tire location indicator does not display though low tire pressure warning lamp turns ON.
Diagnosis Procedure
CHECK COMBINATION METER
Check combination meter. Refer to the following:
-
Full TFT meter: Work flow
-
7 inch information display: Work flow
Is the inspection result normal?
YES>>GO TO 2.
NO>>Repair or replace error-detected parts.
CHECK LOW TIRE PRESSURE WHEEL LOCATION INDICATOR OPERATION
Check that the low tire pressure location indicator is turned OFF after turns ON for approximately 1 second, when the ignition switch is placed ON.
Is the inspection result normal?
YES>>Check intermittent incident. Refer to Intermittent Incident.
NO>>Replace the BCM. Refer to Removal and Installation.
Low Tire Pressure Location Indicator Continues Displaying Nissan Pathfinder 5th Gen
Description
The low tire pressure location indicator continues displaying though low tire pressure warning lamp turns/stays OFF.
Diagnosis Procedure
CHECK TIRE PRESSURE
-
Ignition switch ON.
CAUTION:
Never start the engine.
-
Check the tire pressure for all wheels and adjust to the specified value. Refer to Tire Air Pressure.
Is the inspection result normal?
YES>>GO TO 2.
NO>>Inspect or repair the tires or wheels.
CHECK LOW TIRE PRESSURE LOCATION INDICATOR
Check low tire pressure location indicator.
Does low tire pressure location indicator continues displaying?
YES>>GO TO 3.
NO>>Inspection End.
PERFORM SELF DIAGNOSTIC RESULT
 CONSULT
Select “Self Diagnostic Result” mode of “BCM(AIR PRESSURE MONITOR)”.
Is DTC detected?
YES>>Perform DTC diagnosis procedure. Refer to DTC Index.
NO>>GO TO 4.
CHECK BCM POWER SUPPLY AND GROUND CIRCUIT
Perform the trouble diagnosis for power supply and ground circuit. Refer to Diagnosis Procedure.
Is the inspection result normal?
YES>>Replace BCM. Refer to Removal and Installation.
NO>>Repair or replace error-detected parts.
Id Registration Cannot Be Completed Nissan Pathfinder R53
Description
The ID of the tire pressure sensor installed in each wheel cannot be registered in the TPMS system. Inspect the tire pressure sensor or the TPMS system circuit.
Diagnosis Procedure
CHECK TIRE PRESSURE SENSOR INSTALLATION
Check visually that tire pressure sensors are installed to each wheels correctly.
 NOTE:
NOTE:
In the following case, TPMS system will not function:
-
Tire pressure sensor(s) are not installed.
-
Tire pressure sensor(s) of other cars are installed.
Are the genuine NISSAN tire pressure sensors are installed correctly?
YES>>GO TO 2.
NO>>Replace and/or Install tire pressure sensor(s). Refer to Removal and Installation. GO TO 3.
CHECK TIRE PRESSURE SENSOR ACTIVATION TOOL
Check tire pressure sensor activation tool.
Is the inspection result normal?
YES>>GO TO 3.
NO>>Replace the battery of tire pressure sensor activation tool or repair/replace the tire pressure sensor activation tool.
TIRE PRESSURE SENSOR ID REGISTRATION
 CONSULT
Perform tire pressure sensor ID registration. Refer to Work Procedure.
CAUTION:
To perform ID registration, observe the following points:
-
Never register ID in a place where radio waves are interfered (e.g. radio tower).
-
Never register ID in a place close to Nissan Pathfinder vehicles including TPMS.
Is tire pressure sensor ID registration completed?
YES>>Inspection End.
NO>>GO TO 4.
CHECK TIRE PRESSURE SIGNAL
Change the work location and perform ID registration again.
 NOTE:
NOTE:
Depending on the tire pressure sensor position*, a blind spot exists, and the tire pressure receiver gets a poor reception. If an ID registration is performed under this condition, the registration may not be completed. In such case, follow the instructions below to improve the radio wave receiving environment.
-
Rotate tire by 90°, 180°, or 270°. (This step is to change tire pressure sensor position).
-
Open the door close to the tire of which ID registration is ongoing.
*: Radio wave reception condition depends on Nissan Pathfinder vehicle architecture (e.g. body harness layout, tire wheel design) or environment.
When ID registration is performed, which wheels do not react?
All wheels react and ID registration is possible.>>Inspection End.
Only certain wheel(s) do not react.>>Replace applicable tire pressure sensor. Refer to Removal and Installation.
All wheels do not react.>>Replace the BCM. Refer to Removal and Installation.
Easy Fill Tire Alert Does Not Activate Nissan Pathfinder
Description
The easy fill tire alert does not function while inflating a tire when the A/T shift selector position is in P-range with the ignition switch ON or with the engine started.
 NOTE:
NOTE:
-
After starting to inflate the tire, it takes a few seconds for the easy fill tire alert to function.
-
If there is no response for approximately 15 seconds or more after inflating the tires, cancel the use of the easy fill tire alert function or move the Nissan Pathfinder vehicle approximately 3.2 ft (1 m) backward or forward to try again. The air filler pressure may be weak or out of service area.
-
For easy fill tire alert, Refer to Easy Fill Tire Alert Function.
Diagnosis Procedure
LOCATION CHANGE
Move the vehicle to other area and repeat the procedure of the easy fill tire alert function. Refer to Easy Fill Tire Alert Function.
Is the function normal?
YES>>Normal (the tire inflation indicator may not operate, depending on reception condition).
NO>>GO TO 2.
PERFORM LOW TIRE PRESSURE MONITORING SYSTEM SELF DIAGNOSTIC RESULT
 CONSULT
-
Drive for 10 minutes at a speed of 25 MPH (40 km/h) or more.
-
Stop the Nissan Pathfinder vehicle.
-
Select “Self Diagnostic Result“ mode of “BCM(AIR PRESSURE MONITOR)“.
Is any DTCs detected?
YES>>Check the DTC. Refer to DTC Index.
NO>>GO TO 3.
CHECK HAZARD WARNING LAMP OPERATION
Check hazard warning lamp operation with hazard switch.
Does the hazard warning lamp blink?
YES>>GO TO 4.
NO>>Perform trouble diagnosis for the hazard warning lamp. Refer to Symptom Table.
PERFORM TCM SELF DIAGNOSTIC RESULT
 CONSULT
Select “Self Diagnostic Result“ mode of “TRANSMISSION”.
Is any DTCs detected?
YES>>Check the DTC. Refer to DTC Index.
NO>>GO TO 5.
CHECK HORN OPERATION
Check horn operation.
Is the operation normal?
YES>>GO TO 6.
NO>>Repair or replace error-detected parts.
PERFORM BCM SELF DIAGNOSTIC RESULT
 CONSULT
Select “Self Diagnostic Result” mode of “BCM”.
Is any DTCs detected?
YES>>Check the DTC. Refer to DTC Index.
NO>>Replace BCM. Refer to Removal and Installation.
Noise, Vibration and Harshness (nvh) Troubleshooting Nissan Pathfinder 5th Gen
NVH Troubleshooting Chart
Use the chart below to find the cause of the symptom. If necessary, repair or replace these parts.
| Possible cause and SUSPECTED PARTS | Symptom | Reference | |||||||||
| TIRE | WHEEL | ||||||||||
| Noise | Shake | Vibration | Shimmy | Shudder | Poor quality ride or handling | Noise | Shake | Shimmy, Shudder | Poor quality ride or handling | — | |
| Improper installation, looseness | × | × | — | × | × | × | × | × | × | × | Refer to Removal and Installation |
| Out of round | × | × | — | × | × | × | × | × | × | × | Refer to Inspection |
| Imbalance | × | × | — | × | × | × | × | × | × | × | Refer to Adjustment |
| Incorrect tire pressure | × | × | × | × | × | × | — | — | — | — | Refer to Tire Air Pressure |
| Uneven tire wear | × | × | — | × | × | × | — | — | — | — | Refer to Adjustment |
| Deformation or damage | × | × | — | × | × | × | × | × | × | × | — |
| Non uniformity | × | — | — | × | — | — | — | — | — | — | — |
| Incorrect tire size | — | × | × | × | × | × | — | — | — | — | Refer to Tire Air Pressure |
| PROPELLER SHAFT (4WD) | × | × | × | — | — | — | × | × | — | — | Refer to NVH Troubleshooting Chart |
| REAR FINAL DRIVE (4WD) | × | × | × | — | — | — | × | × | — | — | Refer to NVH Troubleshooting Chart |
| FRONT AXLE AND FRONT SUSPENSION | × | × | × | × | × | × | × | × | × | × |
Refer to NVH Troubleshooting Chart or Refer to NVH Troubleshooting Chart |
| REAR AXLE AND REAR SUSPENSION | × | × | × | × | × | — | × | × | × | × |
Refer to NVH Troubleshooting Chart or Refer to NVH Troubleshooting Chart |
| TIRES | — | — | — | — | — | × | × | × | × | × | — |
| WHEELS | × | × | — | × | × | × | — | — | — | — | — |
| DRIVE SHAFT | × | × | × | — | — | — | × | × | — | — |
Refer to NVH Troubleshooting Chart or Refer to NVH Troubleshooting Chart (4WD) |
| Brake | × | × | — | × | × | — | × | × | × | — | Refer to NVH Troubleshooting Chart |
| Steering | × | × | × | × | × | — | × | × | × | — | Refer to NVH Troubleshooting Chart |
×: Applicable

Nissan Pathfinder (R53) 2022-2026 Service Manual
Symptom Diagnosis
- Tire Pressure Monitoring System Symptom
- Low Tire Pressure Warning Lamp Does Not Turn on
- Low Tire Pressure Warning Lamp Does Not Turn Off
- Low Tire Pressure Warning Lamp Blinks
- Low Tire Pressure Location Indicator Does Not Display
- Low Tire Pressure Location Indicator Continues Displaying
- Id Registration Cannot Be Completed
- Easy Fill Tire Alert Does Not Activate
- Noise, Vibration and Harshness (nvh) Troubleshooting
Contact Us
Nissan Pathfinder Info Center
Email: info@nipathfinder.com
Phone: +1 (800) 123-4567
Address: 123 Pathfinder Blvd, Nashville, TN 37214, USA
Working Hours: Mon–Fri, 9:00 AM – 5:00 PM (EST)
