Nissan Pathfinder: Power Supply, Ground & Circuit Elements - Removal and Installation
Battery Nissan Pathfinder SUV
Exploded view
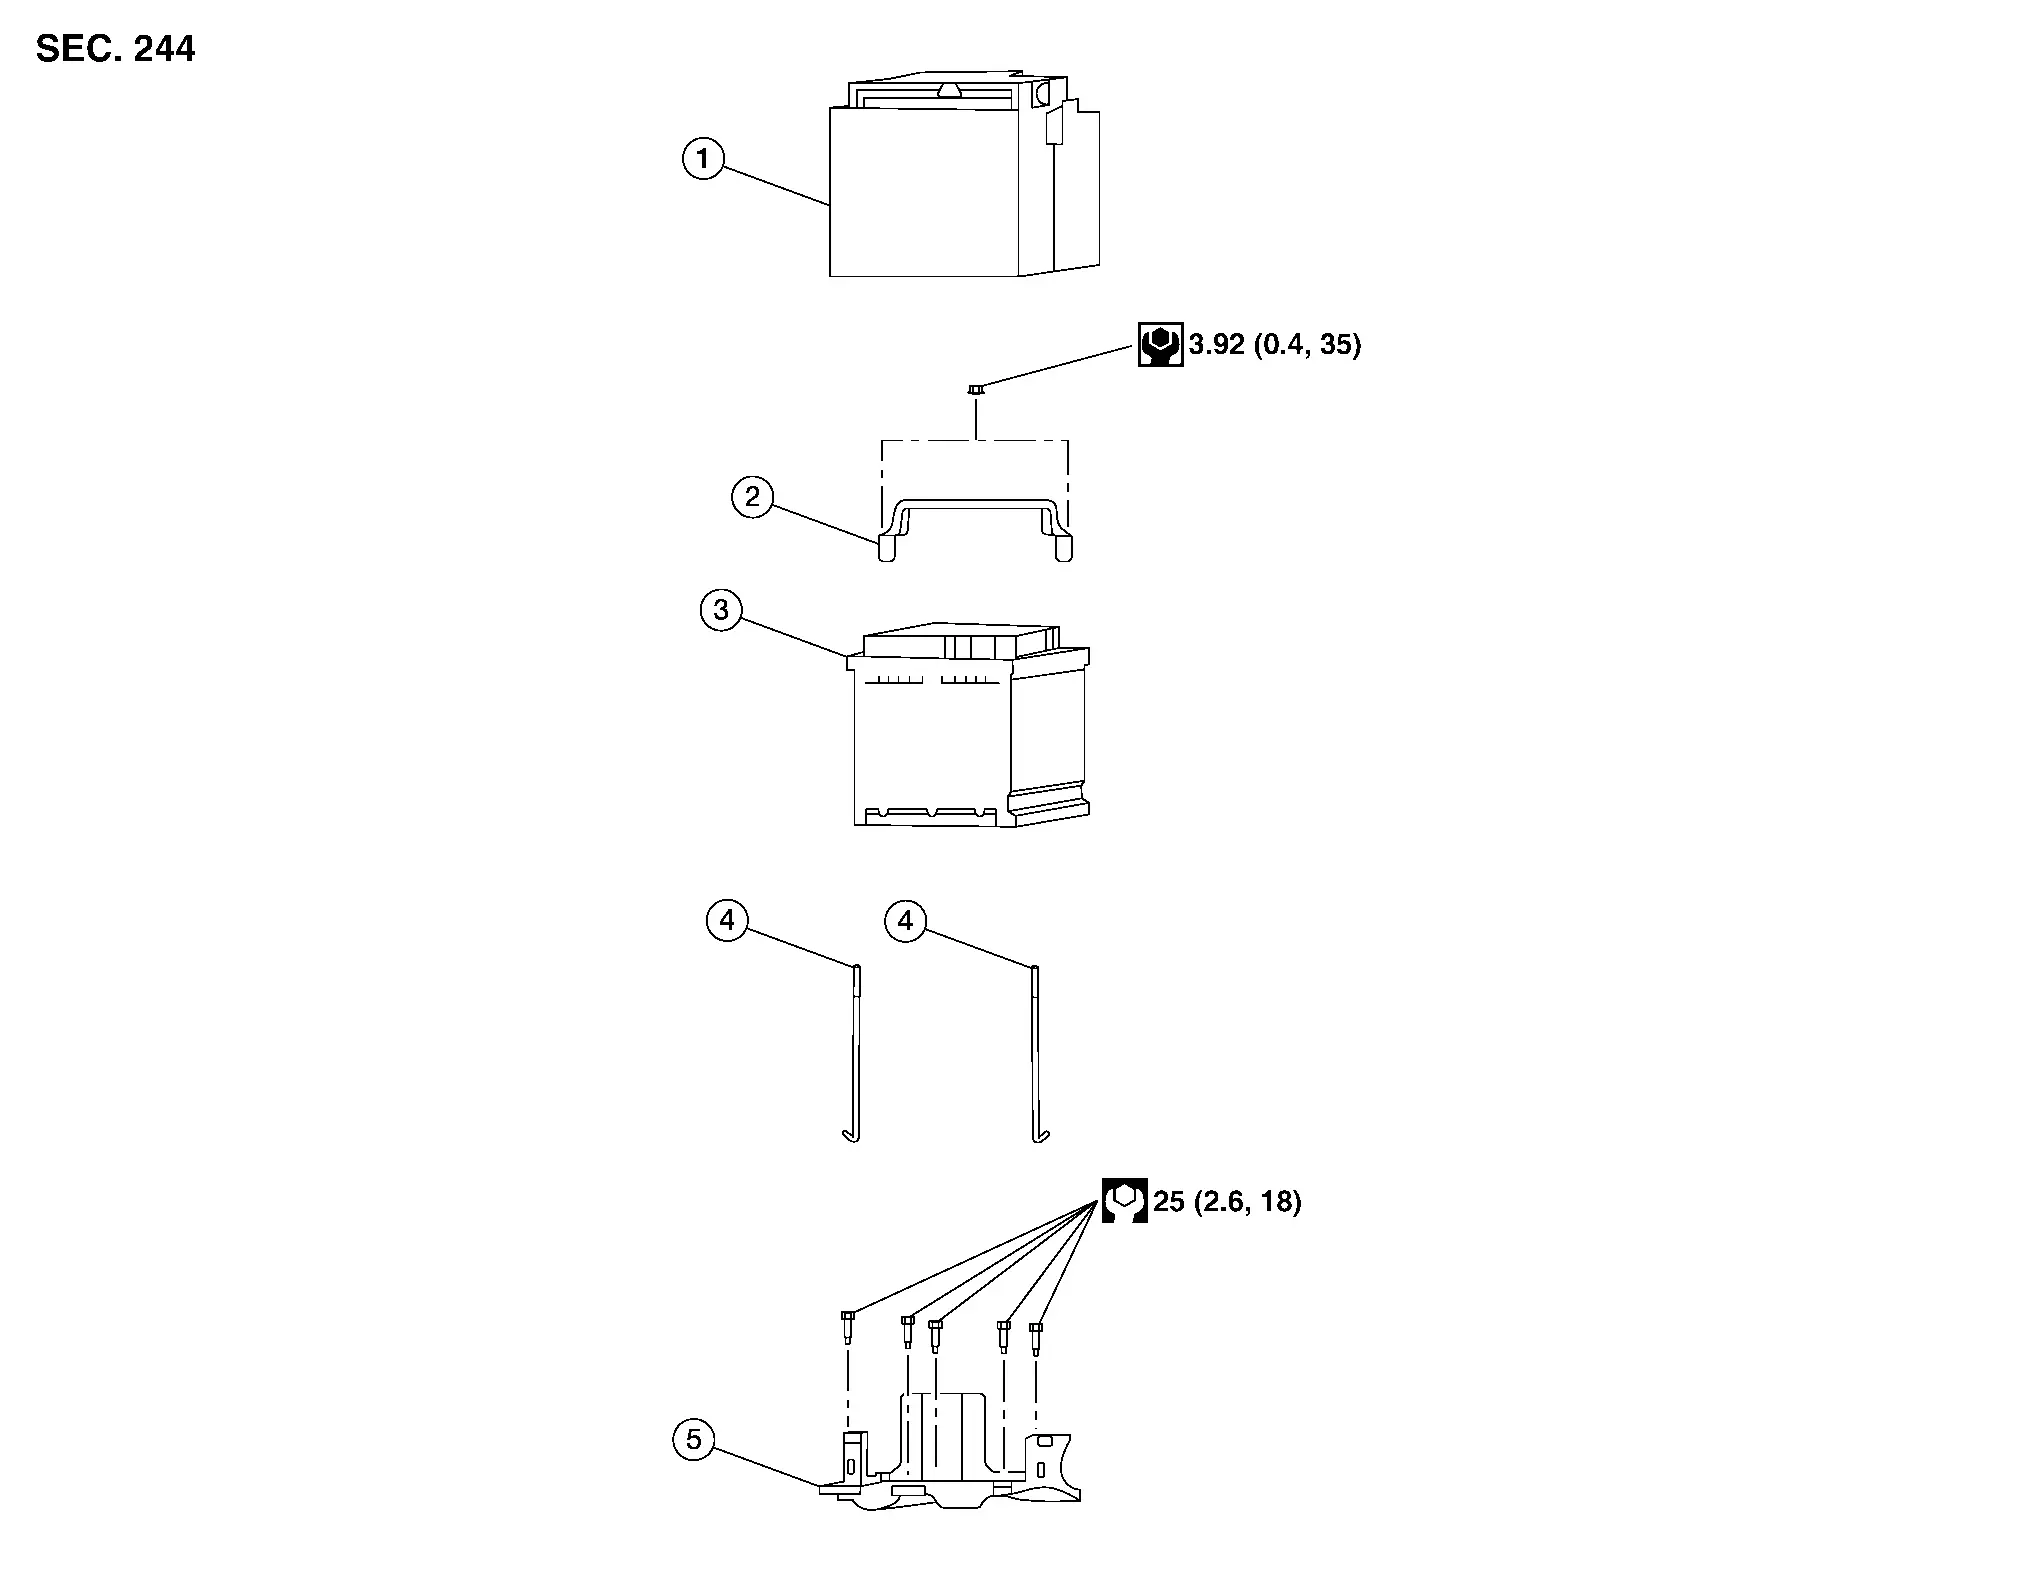
| 1. | Battery cover | 2. | Battery frame | 3. | Battery |
| 4. | Battery rods | 5. | Battery tray |
Battery Disconnect
WARNING:
Battery acid and battery acid fumes are extremely dangerous and can cause severe burns and an explosion. To help reduce the risk of personal injury:
-
Wear appropriate goggles and protective clothing.
-
Always properly ventilate the area where the service is being performed.
-
Do not allow battery fluid to come in contact with skin, eyes, fabrics, or painted surfaces.
-
To avoid arcing, remove the negative (-) battery cable first and attach the (-) negative battery cable last.
-
If acid contacts eyes, skin, or clothing, immediately flush with water for 15 minutes and seek medical attention.
REMOVAL
Loosen the battery negative terminal nut and disconnect the negative terminal from the battery. Refer to Exploded View.
If necessary, lift up the battery positive terminal cover, loosen the battery positive terminal nut and disconnect the battery positive terminal from the battery. Refer to Exploded View.
CAUTION:
To prevent damage to the parts, disconnect the battery negative terminal first.
INSTALLATION
Installation is in the reverse order of removal.
CAUTION:
-
Replace the fusible link box (battery) if it has been dropped or sustained an impact.
-
Perform "ADDITIONAL SERVICE WHEN REMOVING BATTERY NEGATIVE TERMINAL". Refer to Special Repair Requirement.
Removal and Installation
REMOVAL
Disconnect both negative and positive terminals from the battery. Refer to Battery Disconnect.
CAUTION:
When disconnecting, disconnect the battery negative terminal first.
Remove battery frame nuts, battery frame and battery rods.
Remove battery cover.
Remove the battery.
INSTALLATION
Installation is in the reverse order of removal.
CAUTION:
Replace the battery if it has been dropped or sustained and impact.
To install the battery, carefully read the following instructions:
-
To prevent damage to the parts, connect the battery cable to the positive terminal first.
-
After connecting battery cables, to securely supply battery voltage, ensure that they are tightly clamped to battery terminals for good contact.
-
To securely supply battery voltage, check battery terminal for poor connection caused by corrosion.
Reset electronic systems as necessary. Refer to Special Repair Requirement.
Battery Tray Nissan Pathfinder 2026
Removal and Installation
REMOVAL
Remove battery. Refer to Removal and Installation.
Remove air cleaner assembly. Refer to Removal and Installation.
Remove the harness retainer from the battery tray.
Remove the battery tray bolts and battery tray.
Remove the battery tray support bolts and battery tray support.
INSTALLATION
Installation is in the reverse order of removal.
Reset electronic systems as necessary. Refer to Special Repair Requirement .
Battery Current Sensor Nissan Pathfinder 2026
Exploded View
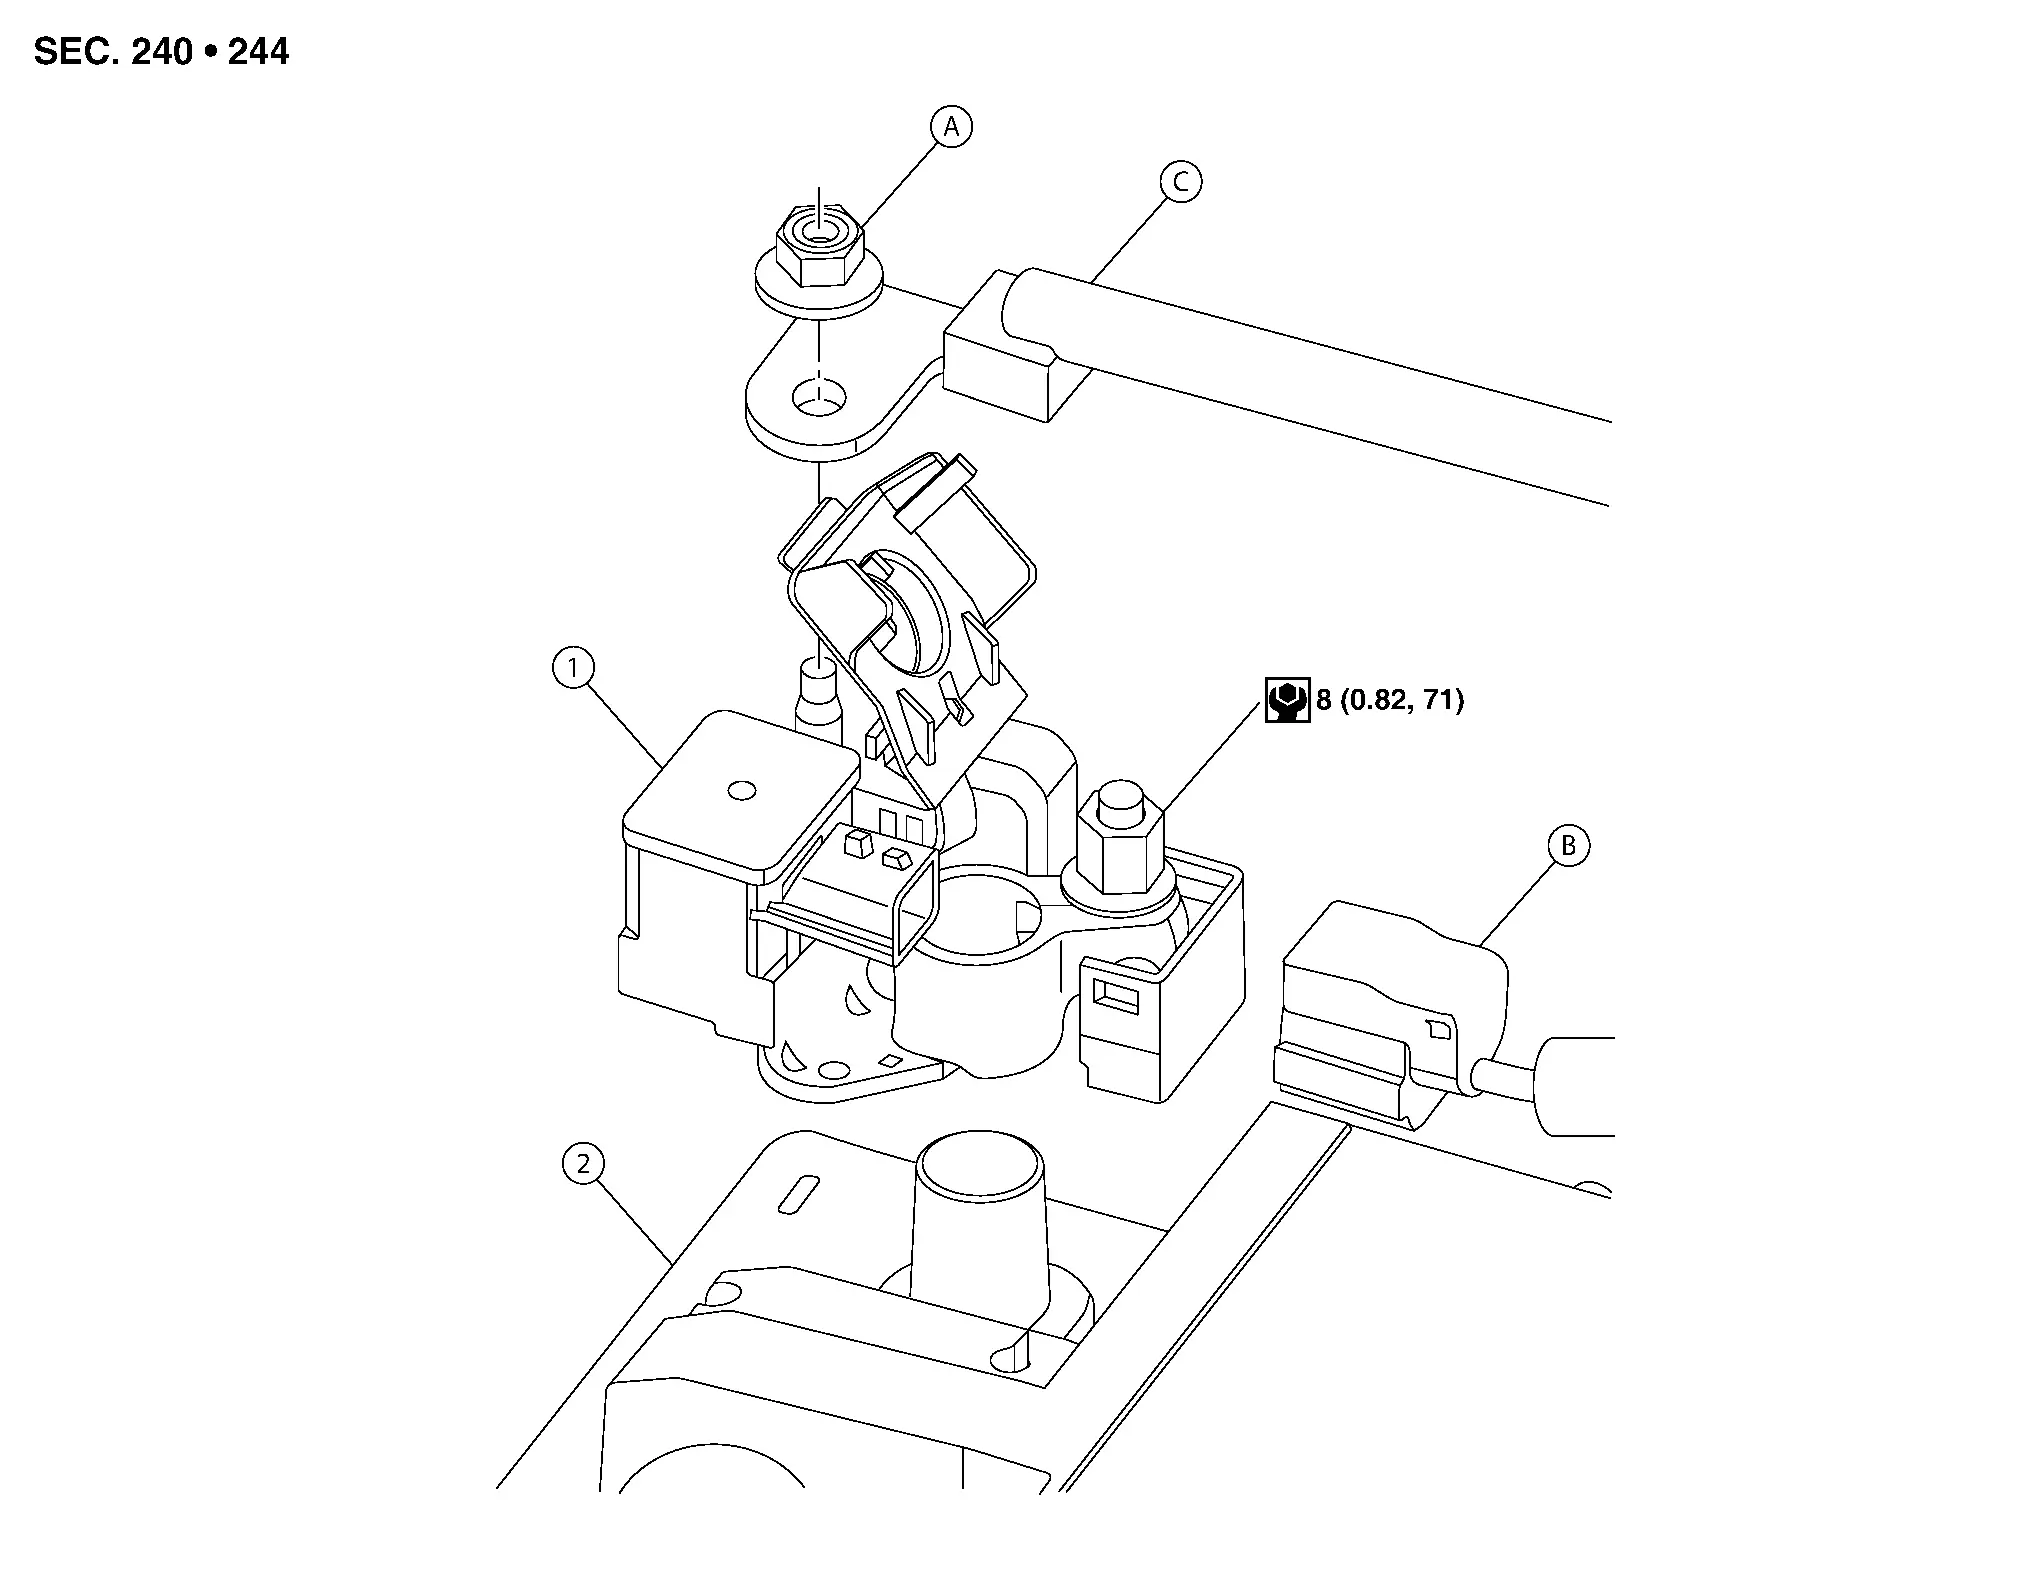
| 1. | Battery current sensor | 2. | Battery | A. | Battery negative cable nut |
| B. | Harness connector | C. | Battery negative cable |
Removal and Installation
REMOVAL
Disconnect the battery negative terminal from the battery. Refer to Battery Disconnect.
Disconnect harness connector from the battery current sensor.
Remove nut and separate battery negative cable from the battery current sensor. Remove the battery current sensor. Refer to Exploded View.
INSTALLATION
Installation is in the reverse order of removal.
CAUTION:
Replace the battery current sensor if it has been dropped or sustained and impact.
To install the battery, carefully read the following instructions:
-
To prevent damage to the parts, connect the battery cable to the positive terminal first.
-
After connecting battery cables, to securely supply battery voltage, ensure that they are tightly clamped to battery terminals for good contact.
-
To securely supply battery voltage, check battery terminal for poor connection caused by corrosion.
Reset electronic systems as necessary. Refer to Special Repair Requirement .
Battery Terminal with Fusible Link Nissan Pathfinder 2022
Exploded View

| 1. | Fusible link box (battery) | 2. | Battery positive terminal | 3. | Battery |
| 4. | Harness connectors | 5. | Battery positive cable | 6. | Battery positive terminal cover |
| A. | Fusible link box (battery) nut | B. | Battery positive cable nut |
 |
Front |
Removal and Installation
REMOVAL
Disconnect both the negative and positive terminals from the battery. Refer to Battery Disconnect.
CAUTION:
To prevent damage to the parts, disconnect the battery negative terminal first.
Remove the battery positive terminal cover from the fusible link box (battery). Refer to Exploded view.
Disconnect harness connectors from fusible link box (battery).
Remove the nut and separate the battery positive cable from the fusible link box (battery).
Remove the nut and separate the battery positive terminal from the fusible link box (battery).
INSTALLATION
Installation is in the reverse order of removal.
CAUTION:
Replace the fusible link box battery if it has been dropped or sustained and impact.
To install the battery, carefully read the following instructions:
-
To prevent damage to the parts, connect the battery cable to the positive terminal first.
-
After connecting battery cables, to securely supply battery voltage, ensure that they are tightly clamped to battery terminals for good contact.
-
To securely supply battery voltage, check battery terminal for poor connection caused by corrosion.
Reset electronic systems as necessary. Refer to Special Repair Requirement .

Nissan Pathfinder (R53) 2022-2026 Service Manual
Removal and Installation
Contact Us
Nissan Pathfinder Info Center
Email: info@nipathfinder.com
Phone: +1 (800) 123-4567
Address: 123 Pathfinder Blvd, Nashville, TN 37214, USA
Working Hours: Mon–Fri, 9:00 AM – 5:00 PM (EST)
