Nissan Pathfinder: Wiper & Washer - Removal and Installation
- Washer Tank
- Front Washer Motor
- Front Washer Nozzle and Tube
- Front Wiper Arm
- Front Wiper Blade
- Front Wiper Drive Assembly
- Wiper and Washer Switch
- Rain Sensor
- Rear Wiper Arm
- Rear Wiper Motor
- Rear Washer Nozzle and Tube
Washer Tank Nissan Pathfinder SUV
Exploded View
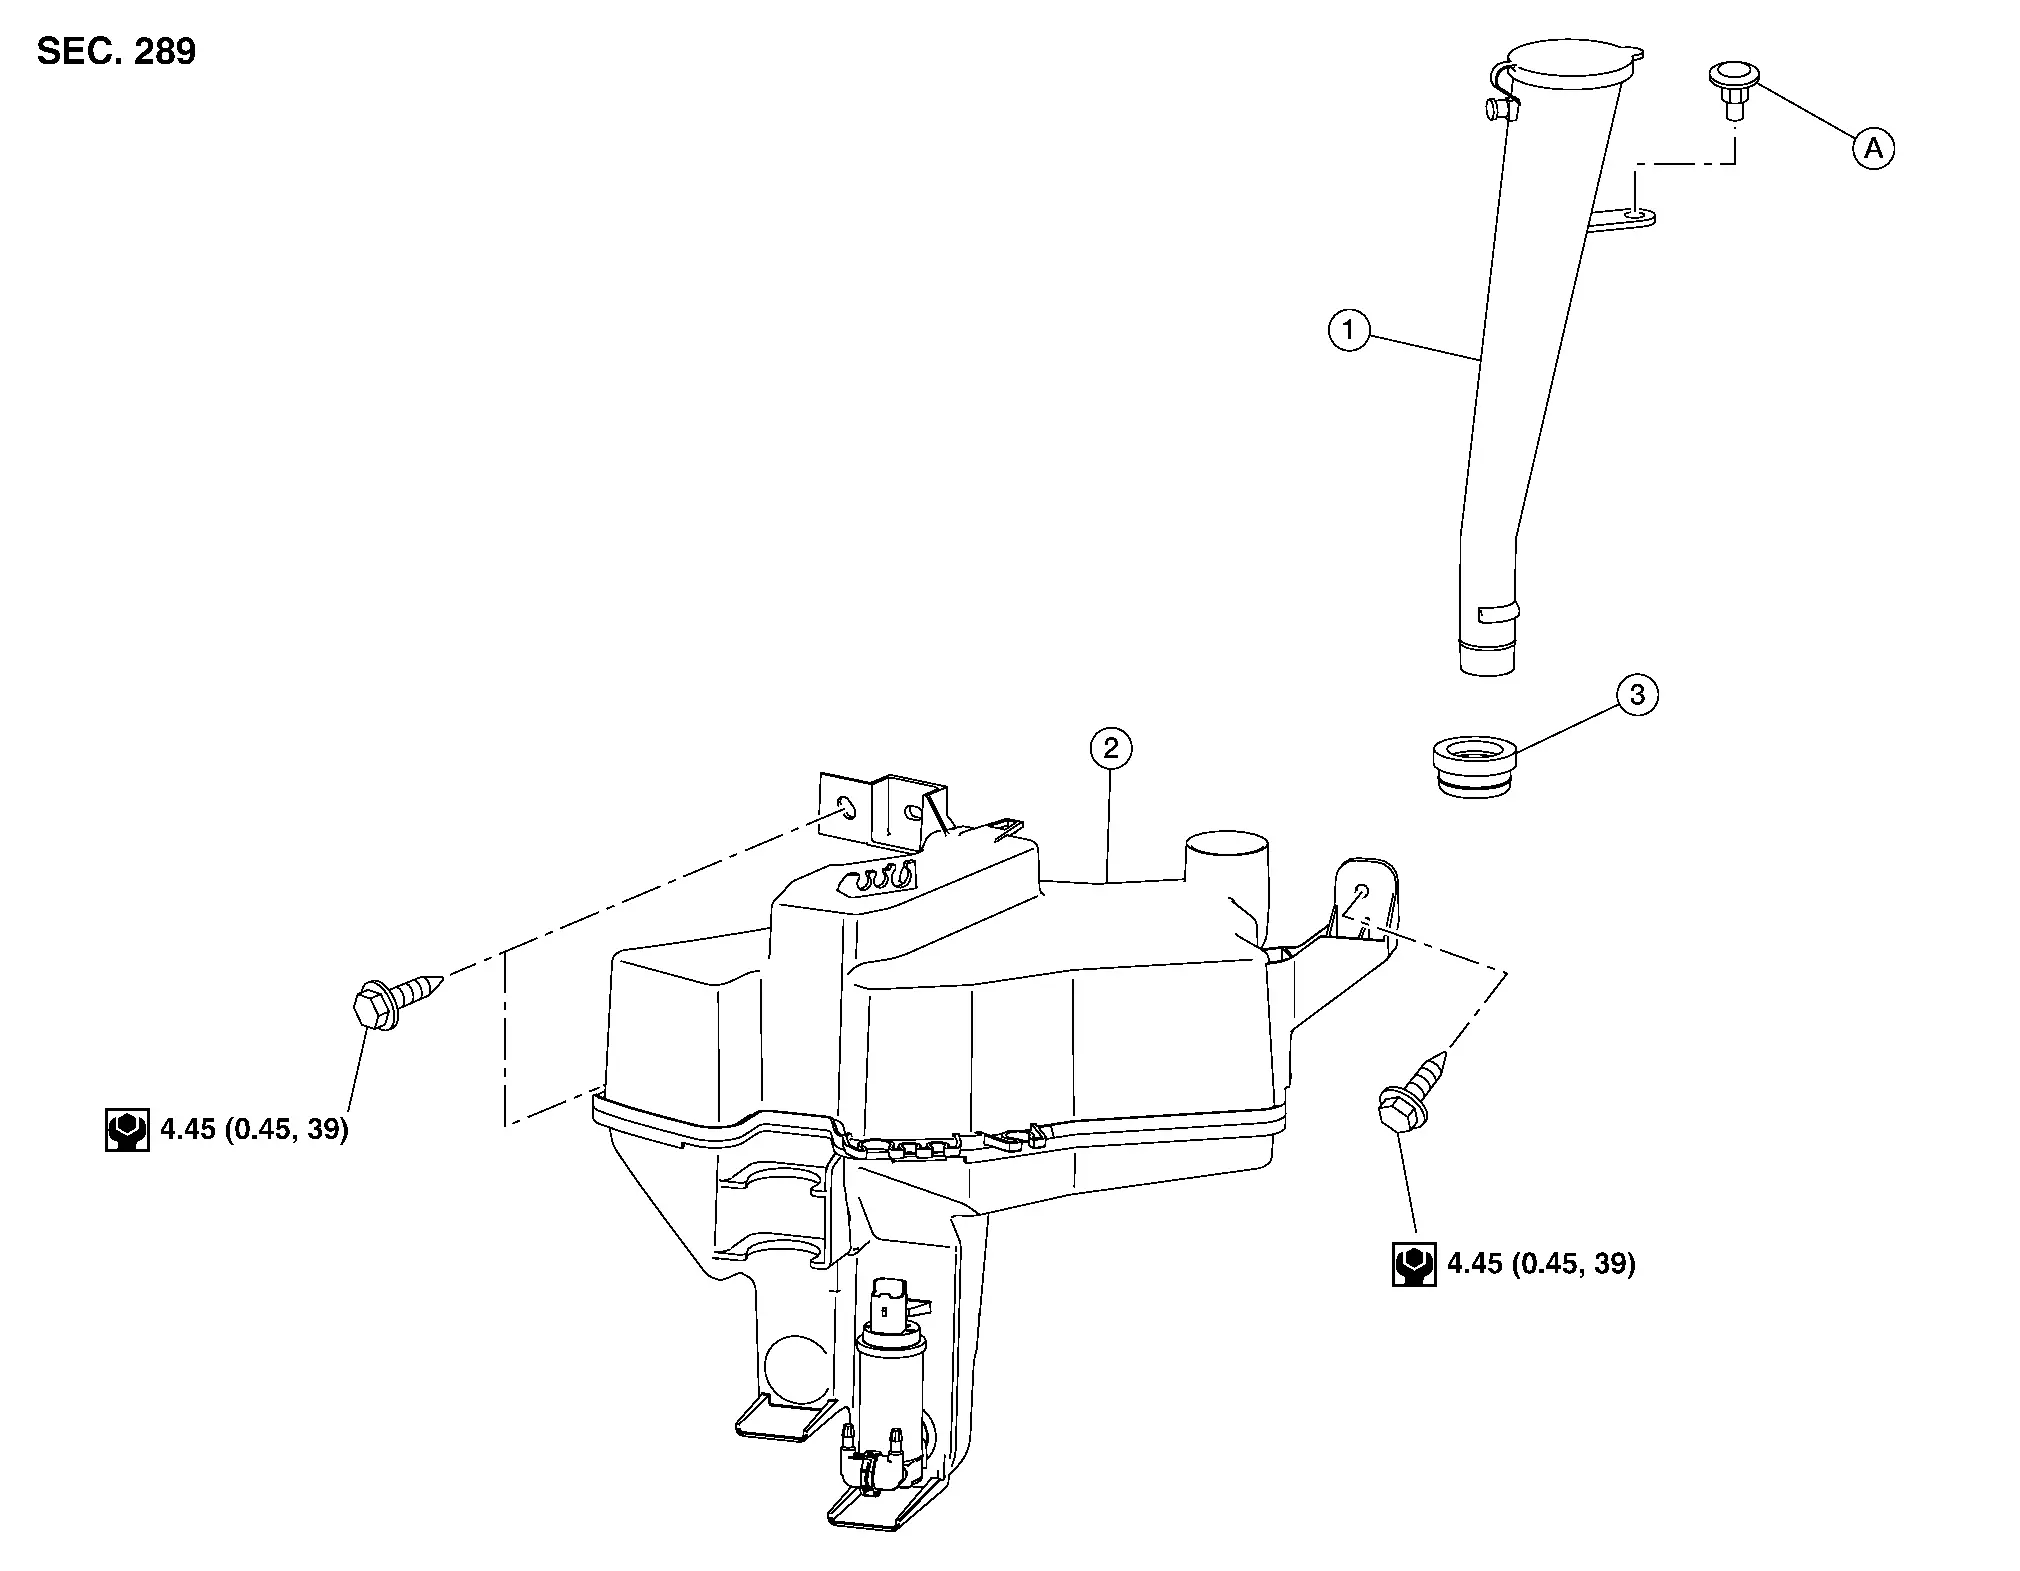
| 1. | Washer tank inlet | 2. | Washer tank | 3. | Grommet |
| A. | Clip |
Removal and Installation
REMOVAL
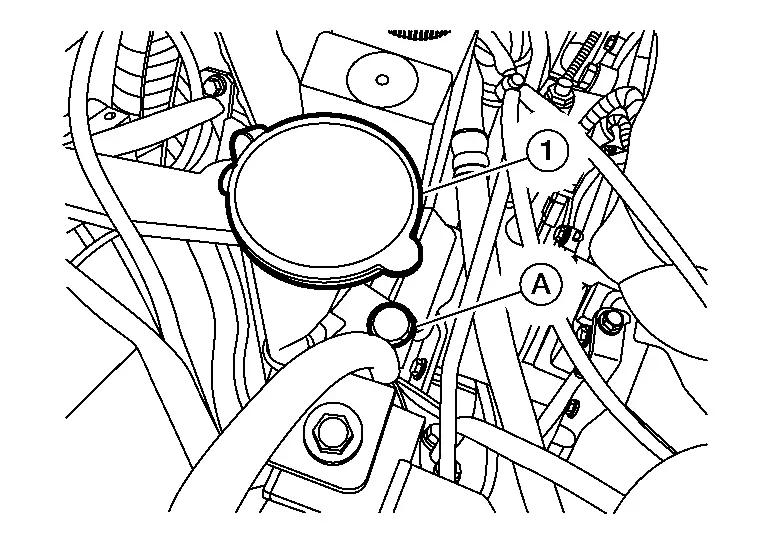
Remove the washer tank inlet clip (A) from the coolant reservoir and remove the washer tank inlet tube (1), and grommet from the washer tank.
Remove the front bumper. Refer to Removal and Installation.
Disconnect the harness connector from the washer pump.
Disconnect the harness connector from the washer level switch.
Disconnect the front washer tube and rear washer tube.
Remove the washer tank bolts.
Remove the washer tank.
INSTALLATION
Installation is in the reverse order of removal.
CAUTION:
Add water to the top of washer tank inlet after installing. Check that no leaks exist.
Front Washer Motor Nissan Pathfinder 5th Gen
Removal and Installation
The front washer motor serviced as an assembly with the washer tank. Refer to Removal and Installation.
Front Washer Nozzle and Tube Nissan Pathfinder R53
Exploded View
Without Heated Washer Nozzle
| 1. | Front washer nozzle (LH) | 2. | Front washer nozzle (RH) |
With Heated Washer Nozzle
| 1. | Heated front washer nozzle (LH) | 2. | Heated front washer nozzle (RH) |
Removal and Installation - Front Washer Nozzle
REMOVAL
Remove hood insulator. Refer to Exploded View.
Disconnect the front washer tube from the front washer nozzle.
Disconnect the harness connector from the heated washer nozzle (if equipped).
Using a suitable tool, release the pawl on the front washer nozzle and remove front washer nozzle from hood.
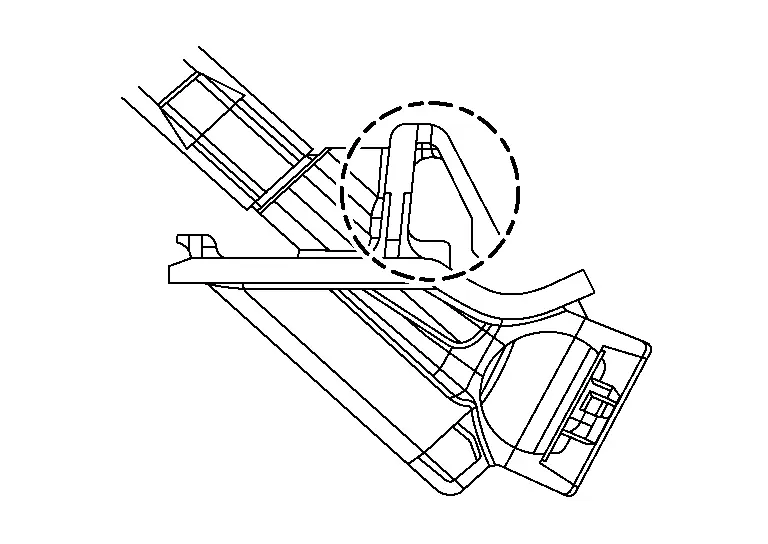
 |
: Pawl |
INSTALLATION
Installation is in the reverse order of removal.
CAUTION:
Adjust the nozzles to their proper position. Refer to Adjustment.
Adjustment
WASHER NOZZLE SPRAY PATTERN
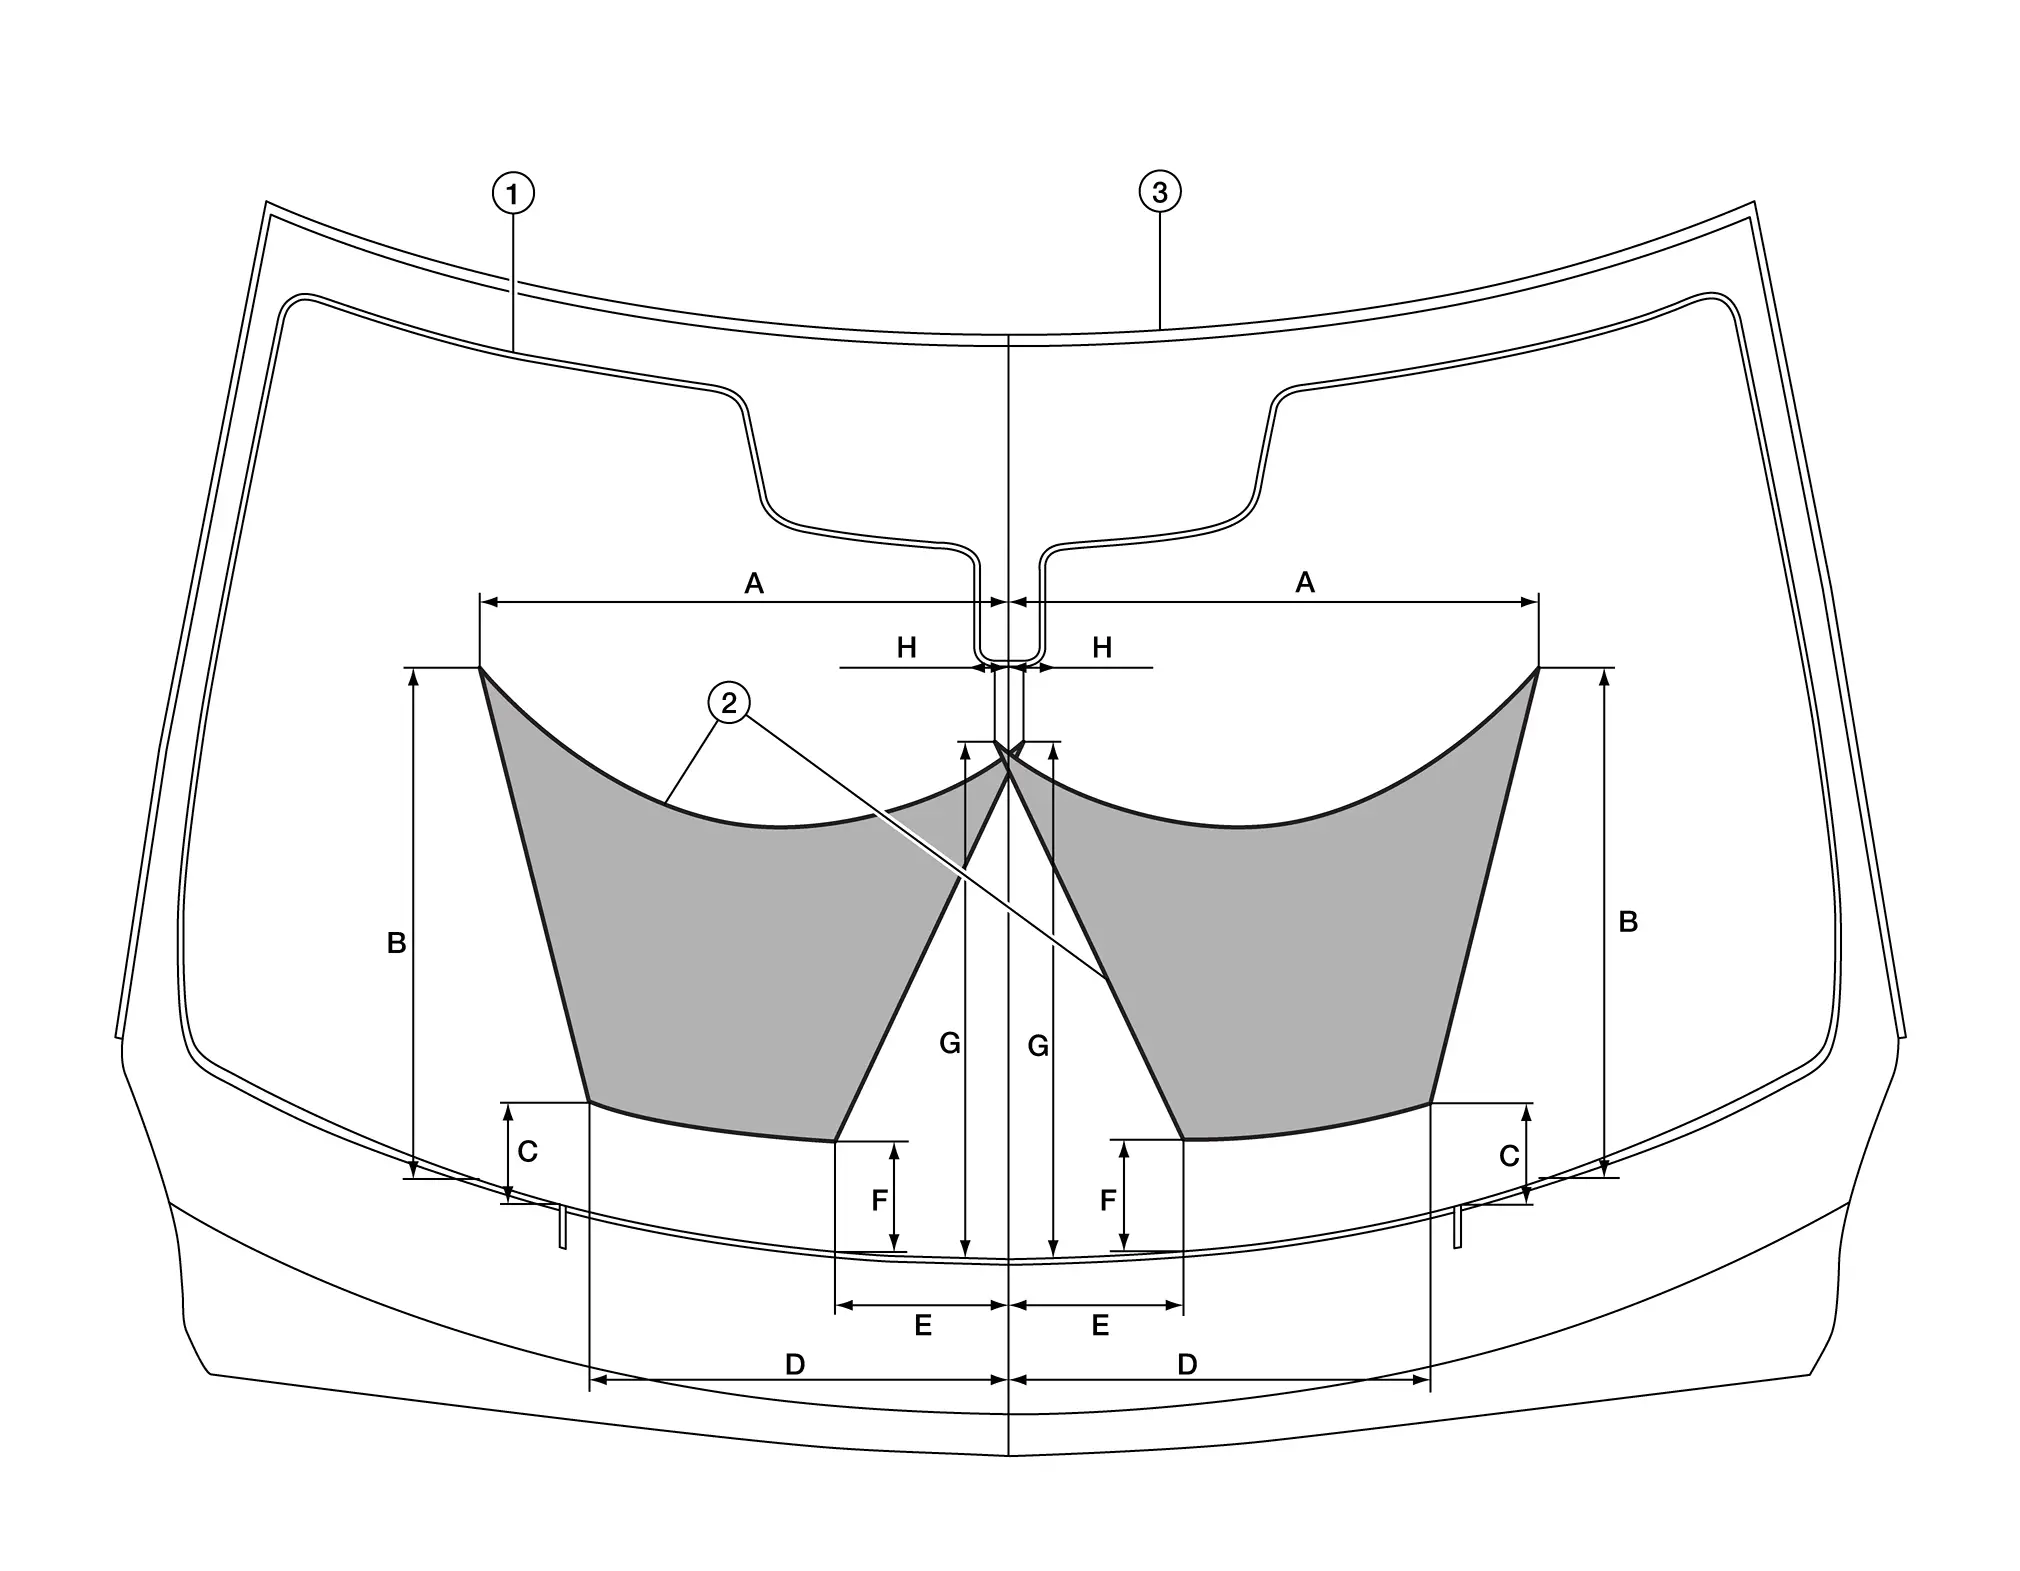
| 1. | Black print area | 2. | Washer fluid spray pattern | 3. | Windshield glass |
| A. | 480.2 mm (18.91 in) | B. | 465.7 mm (18.33 in) | C. | 97.7 mm (3.84 in) |
| D. | 380.0 mm (14.96 in) | E. | 156.9 mm (6.18 in) | F. | 102.0 mm (4.02 in) |
| G. | 469.4 mm (18.48 in) | H. | 13.3 mm (0.52 in) |
WASHER NOZZLE ADJUSTMENT
Insert a suitable tool (A) into the spray opening (1) and move up/down and left/right to adjust the spray position.
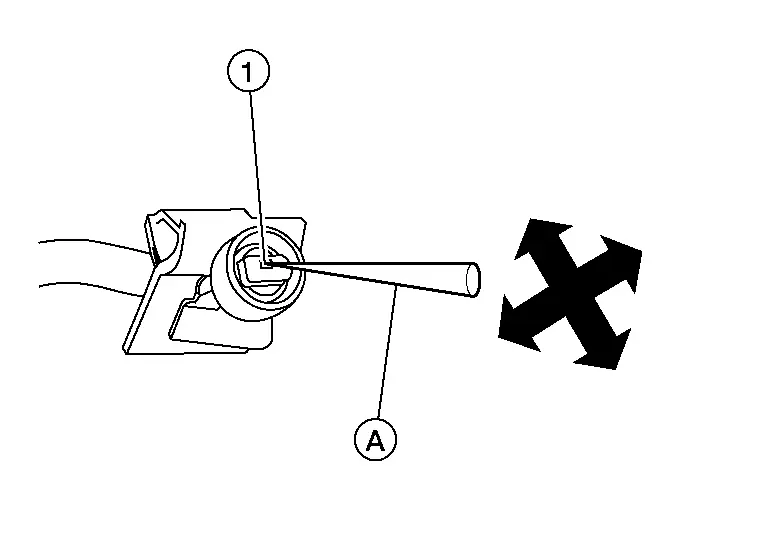
 NOTE:
NOTE:
If wax or dust gets into the nozzle, remove wax or dust with a suitable tool (A).
Washer Tube Layout
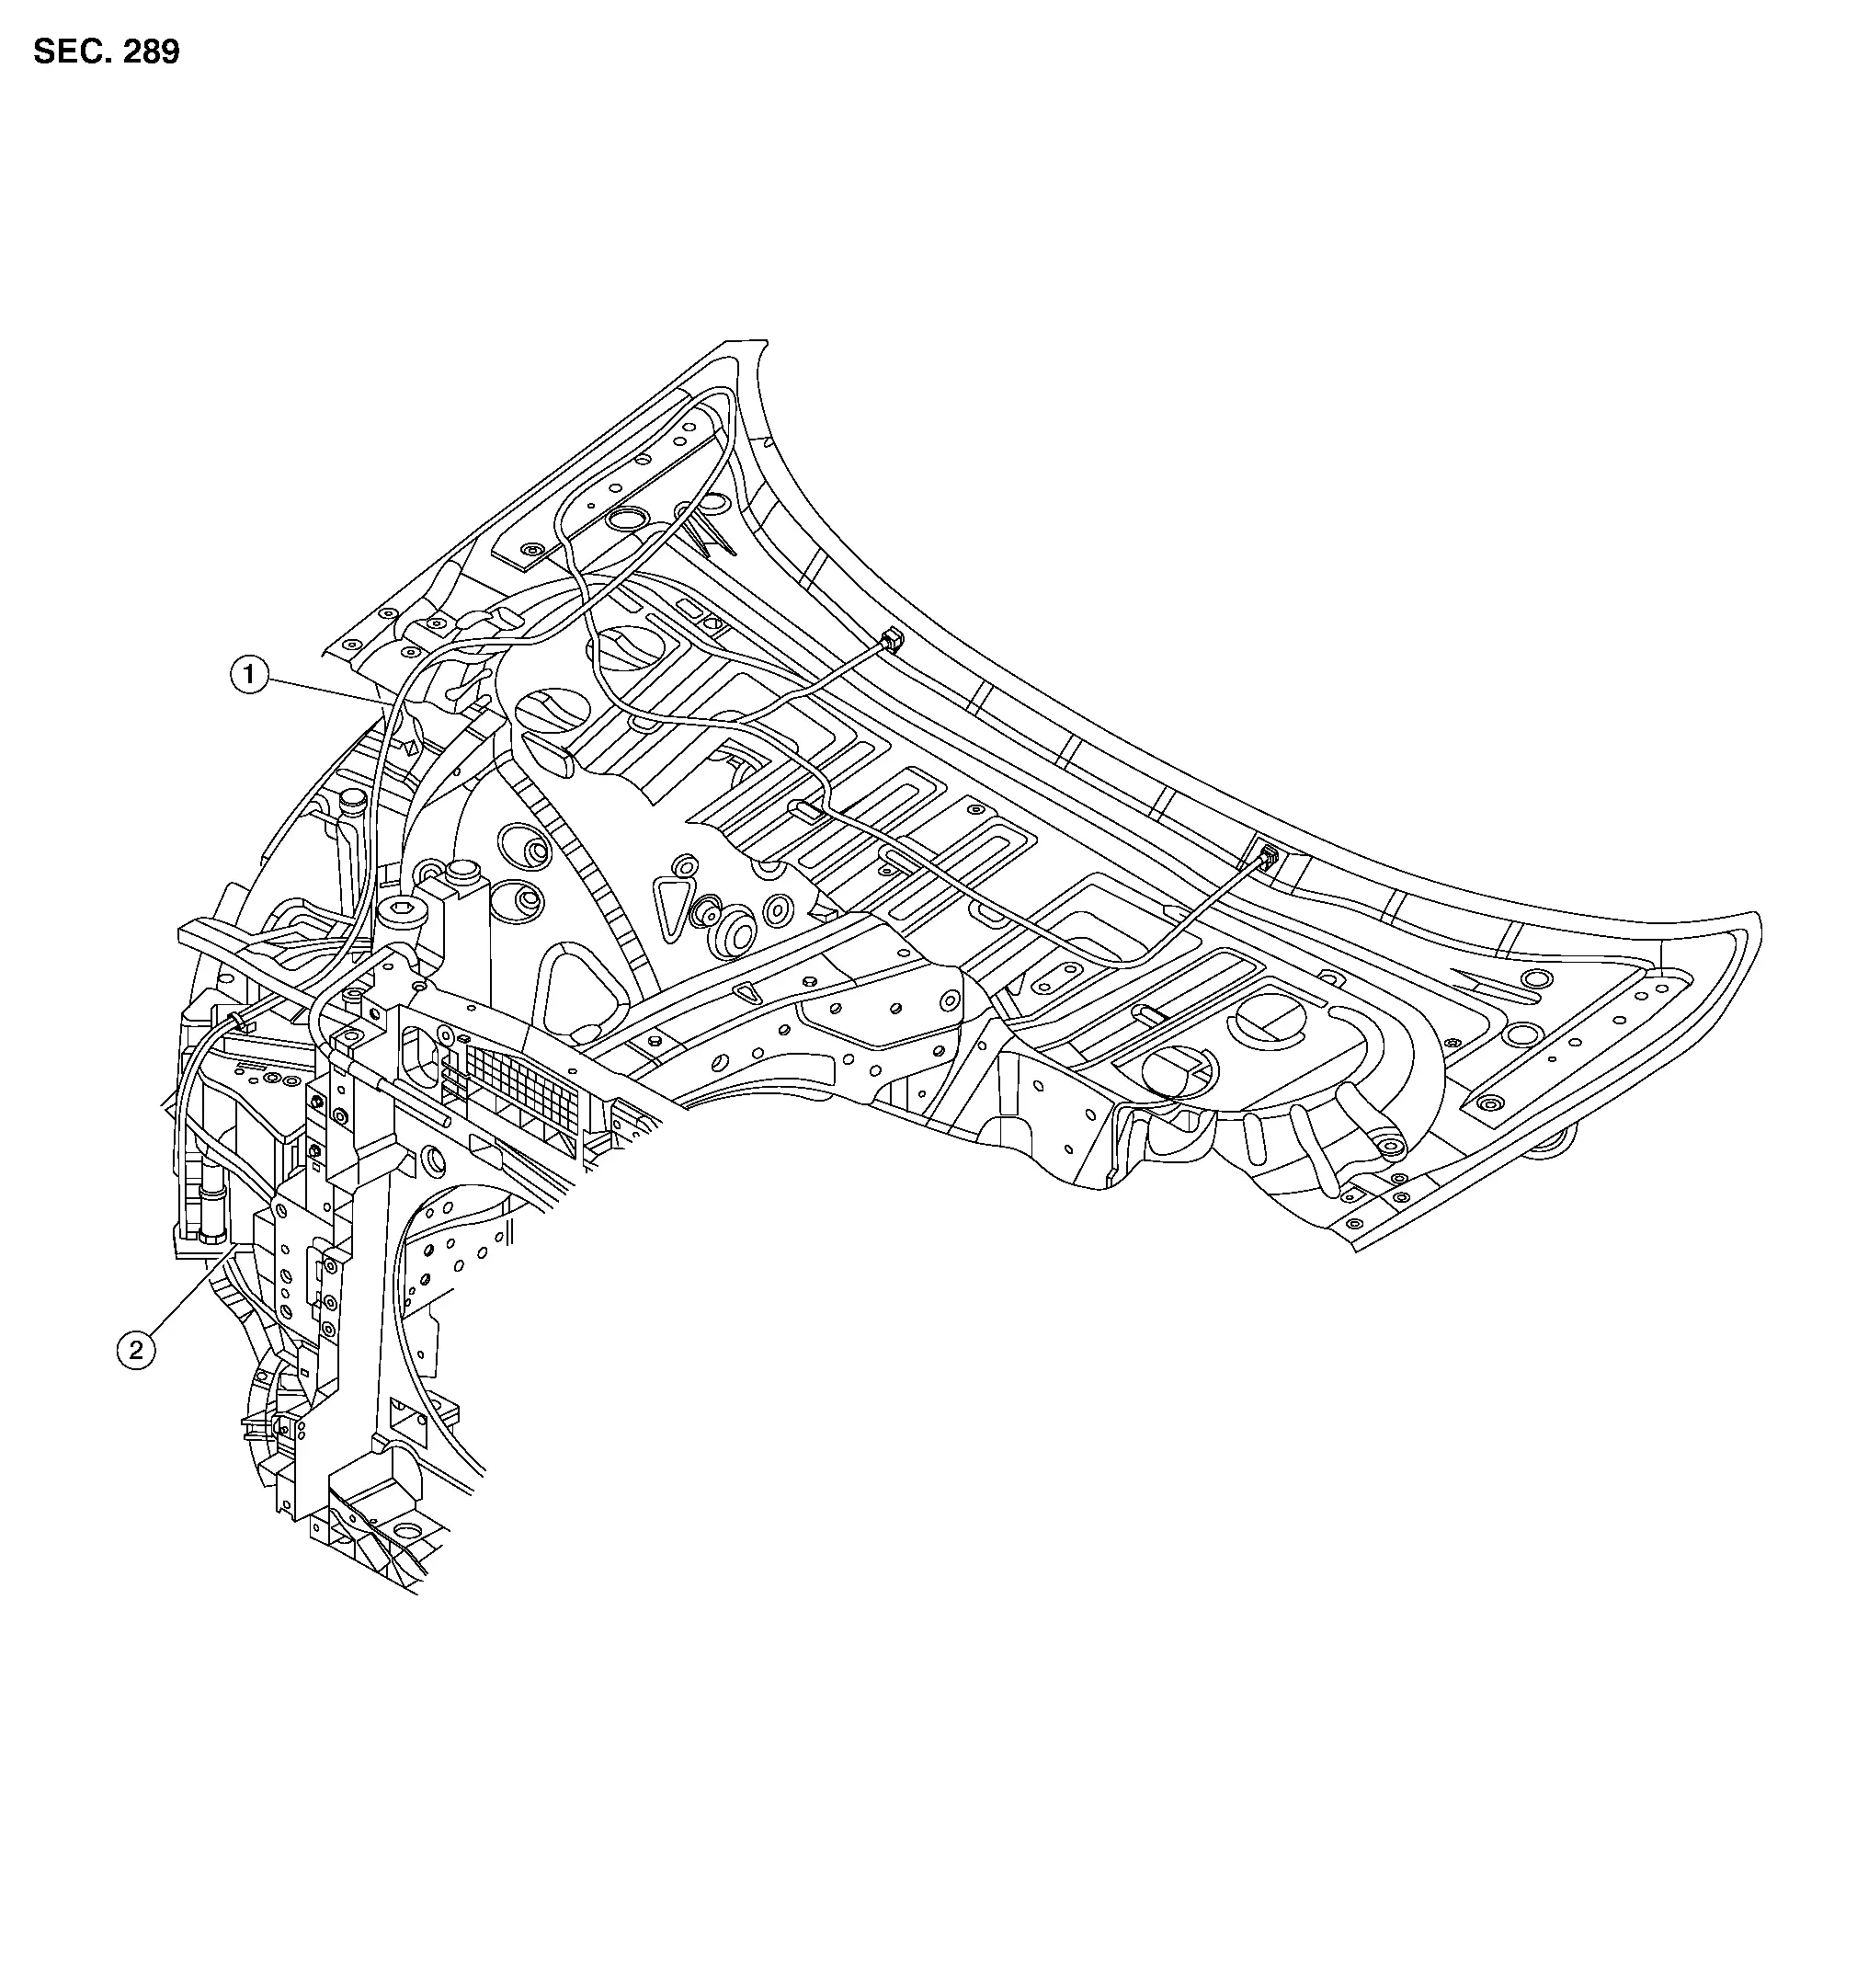
| 1. | Front washer tube | 2. | Washer tank |
Removal and Installation - Front Washer Tube
REMOVAL
Remove the front bumper. Refer to Removal and Installation.
Disconnect the front washer tube from the front washer motor.
Partially remove hood insulator. Refer to Exploded View.
Disconnect front washer tube from washer fluid splitter.
Release clips and remove the front washer tube.
INSTALLATION
Installation is in the reverse order of removal.
Front Wiper Arm Nissan Pathfinder SUV
Exploded View

| 1. | Front wiper blade (LH) | 2. | Front wiper blade (RH) | 3. | Front wiper arm (RH) |
| 4. | Front wiper arm cap | 5. | Front wiper drive assembly | 6. | Front wiper arm (LH) |
| A. | Refer to Installation. |
Removal and Installation
REMOVAL
Operate the front wiper to move it to the auto stop position.
Open the hood.
Remove the front wiper arm cap.
Remove the front wiper arm nut.
Raise the front wiper arm, then remove the front wiper arm.
CAUTION:
Be careful not to drop the wiper blade onto the windshield glass.
INSTALLATION
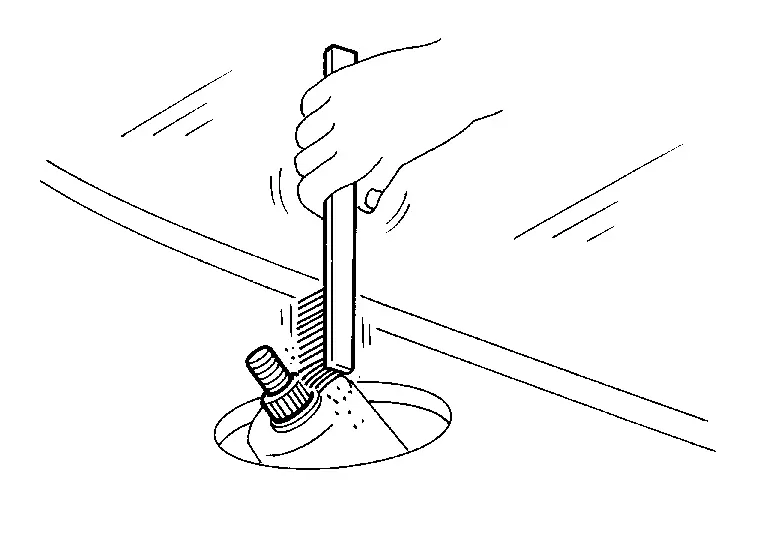
Clean the front wiper arm mount as shown. This will reduce the possibility of wiper arm looseness.

Operate front wiper motor to move the front wiper to the auto stop position.
Adjust the front wiper blade position. Refer to Adjustment.
Install the front wiper arm and the front wiper arm nut.
Install the front wiper arm cap.
Check that the wiper blades stop at the specified position. Refer to Adjustment.
Adjustment
WIPER BLADE POSITION ADJUSTMENT
Clearance between the end of cowl top cover/ front fender cover and the top of front wiper blade center.
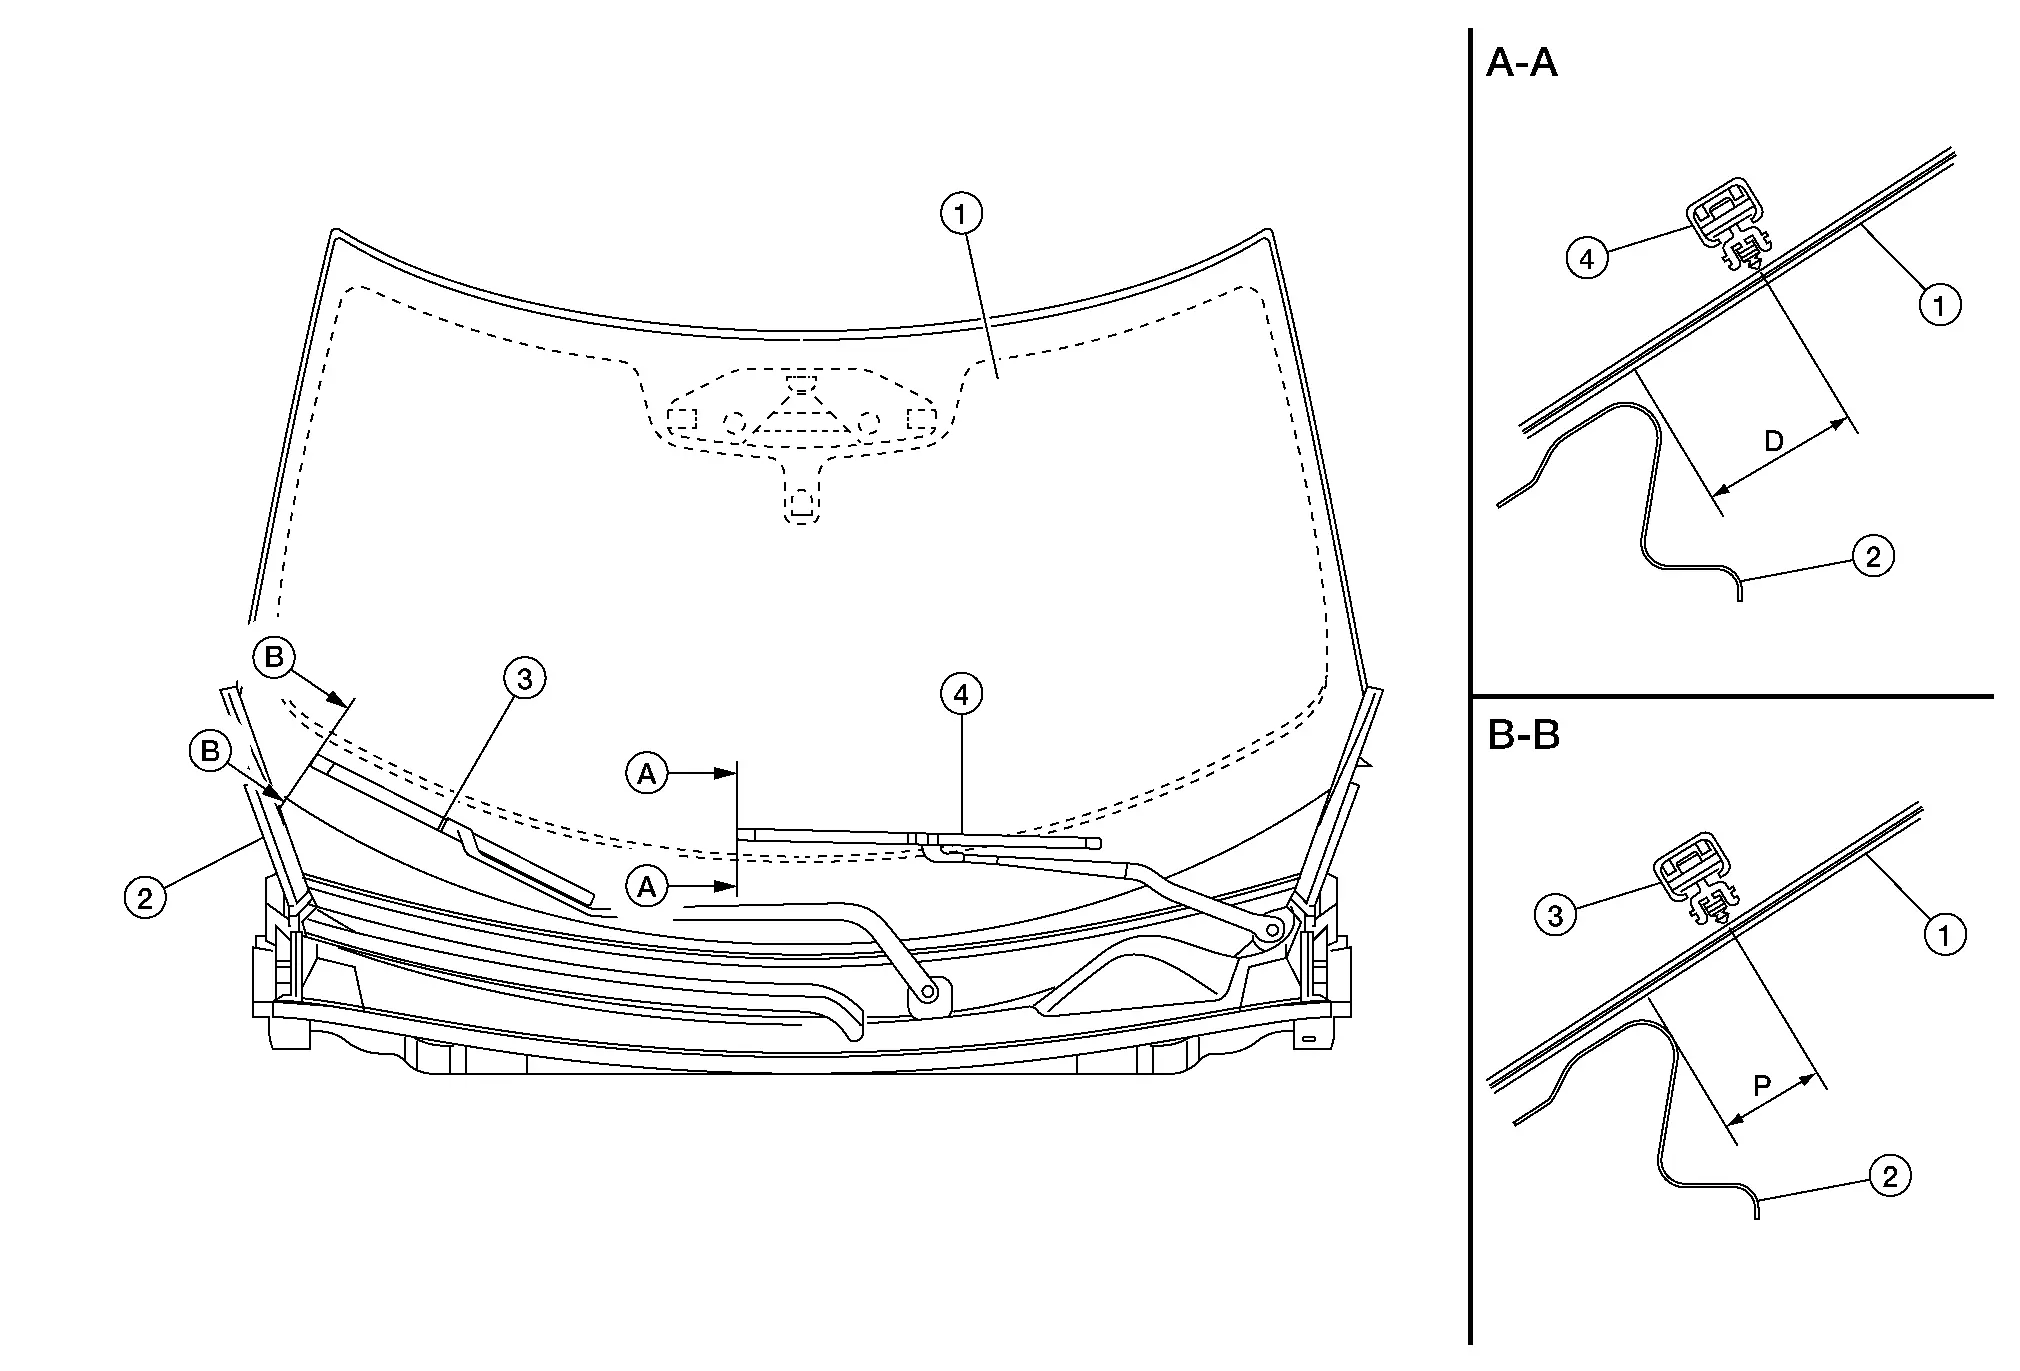
| 1. | Windshield glass | 2. | Cowl top cover | 3. | Front wiper blade (RH) |
| 4. | Front wiper blade (LH) |
| D | : 95 ± 7.5 mm (3.74 ± 0.30 in) |
| P | : 39.8 ± 7.5 mm (1.56 ± 0.30 in) |
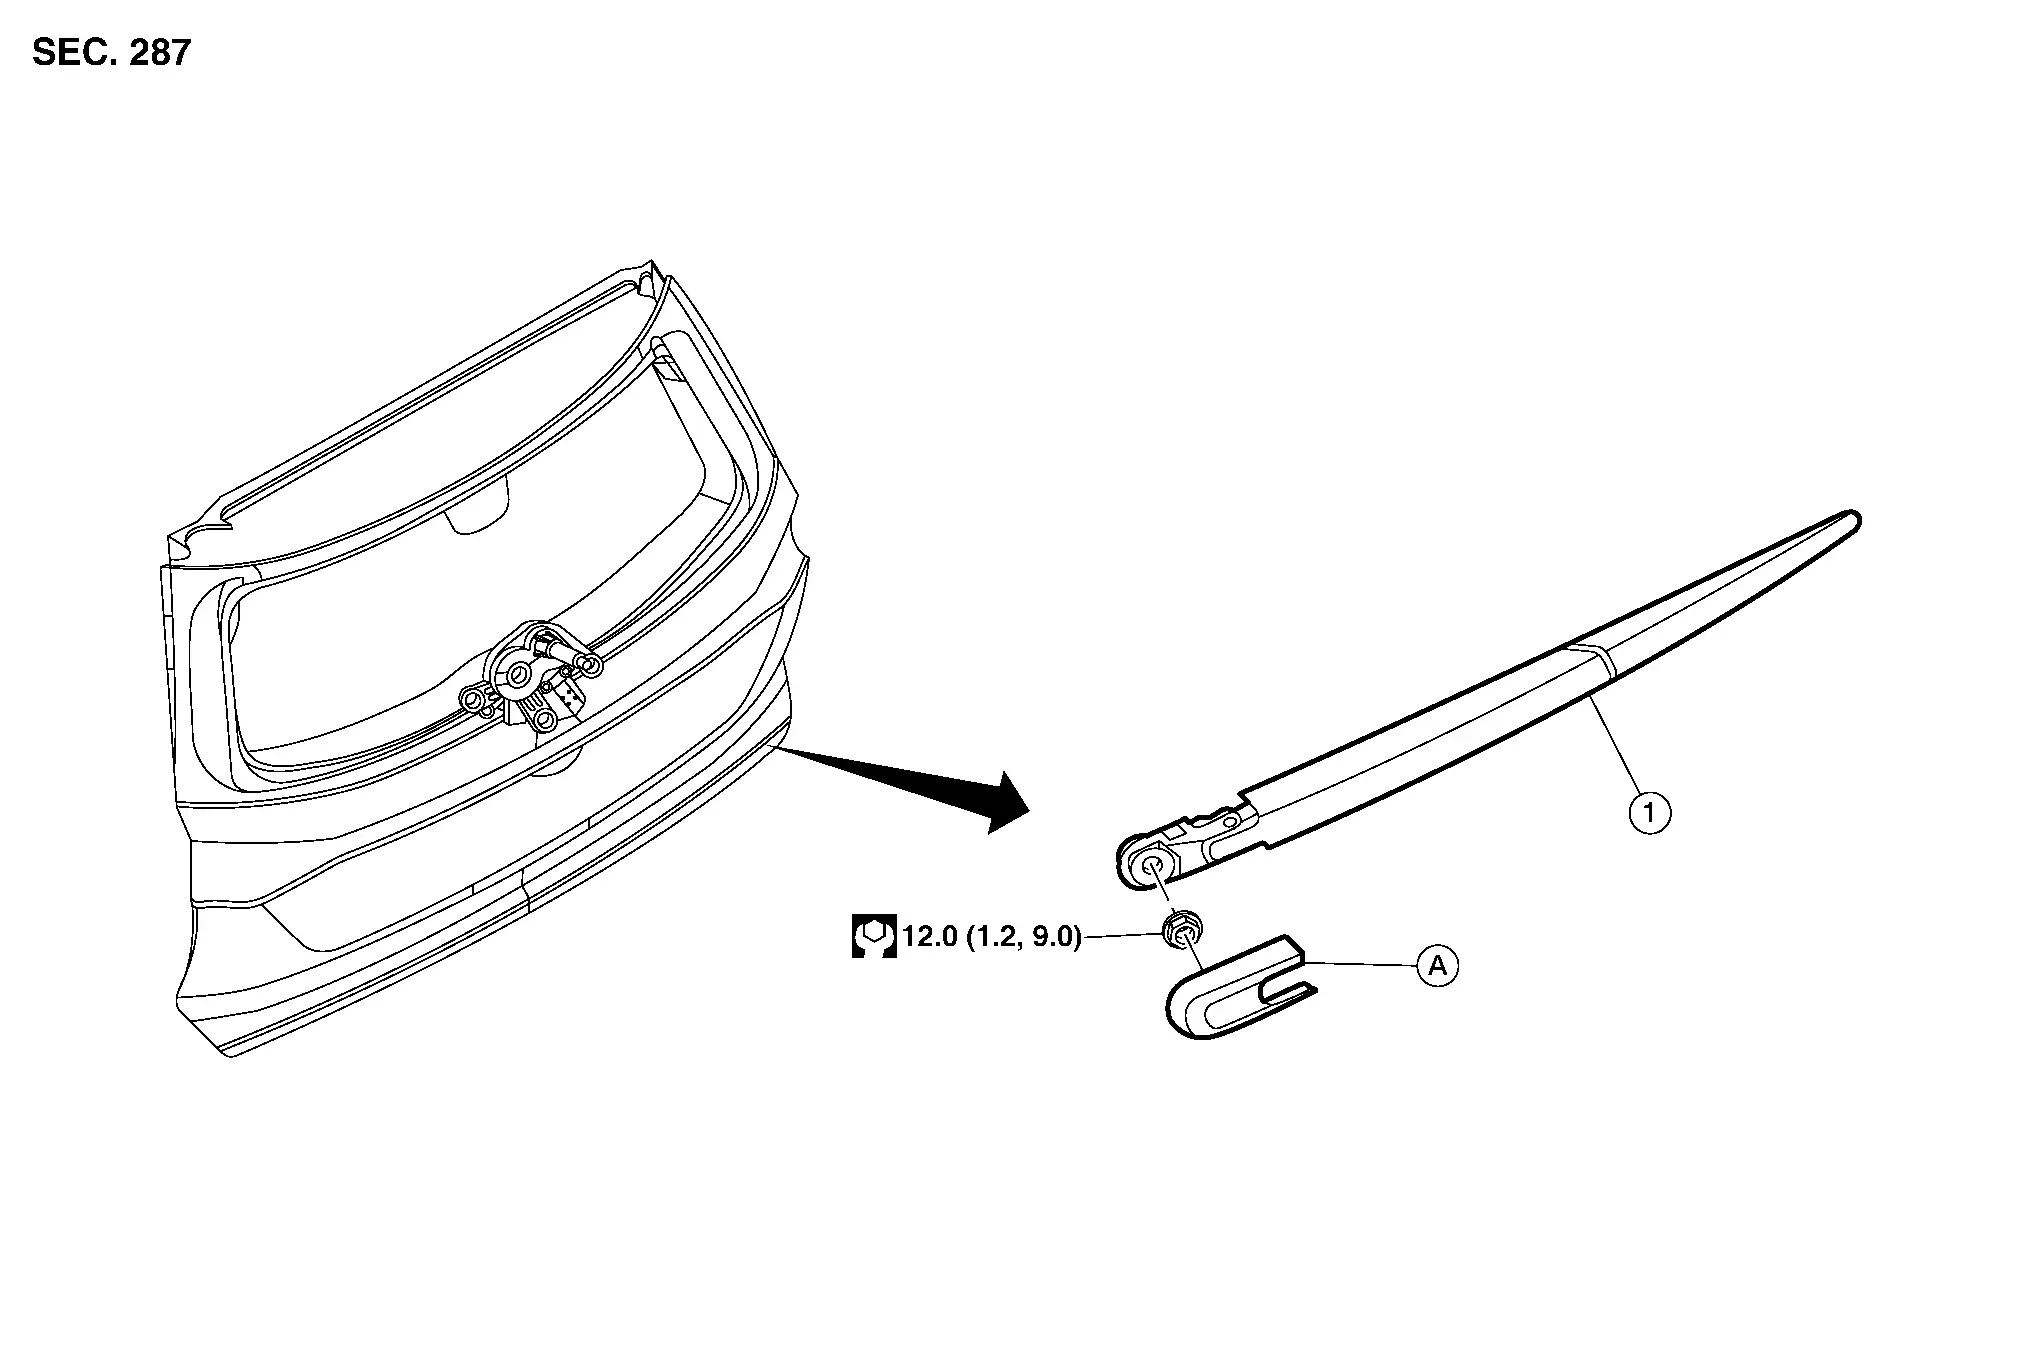
Front Wiper Blade Nissan Pathfinder 2022
Exploded View
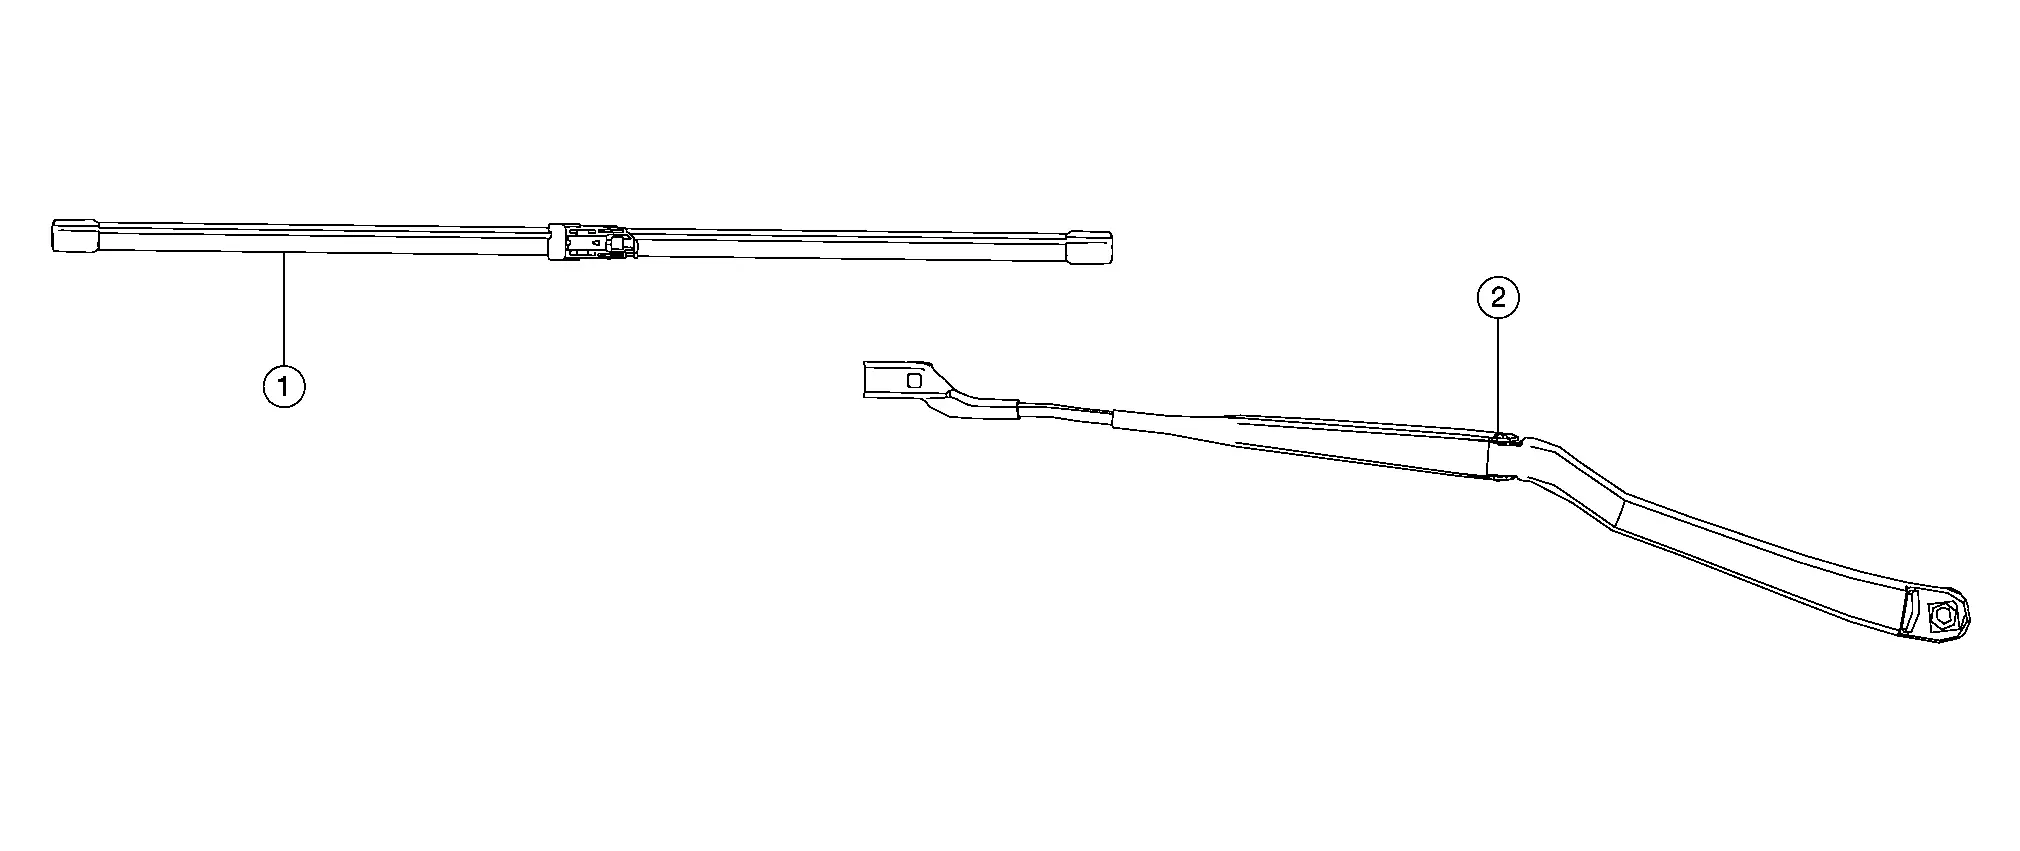
| 1. | Front wiper blade | 2. | Front wiper arm |
 NOTE:
NOTE:
Front wiper arm (LH) shown; Front wiper arm (RH) similar.
Removal and Installation
REMOVAL
Put the wiper arms in the service position.Place the ignition switch ON and then OFF. Within 1 minute, activate washer switch 2 times in less than 0.5 seconds to put the wiper arms in the service position.
Push to release tab (A), then move the wiper blade down (B) the wiper arm.
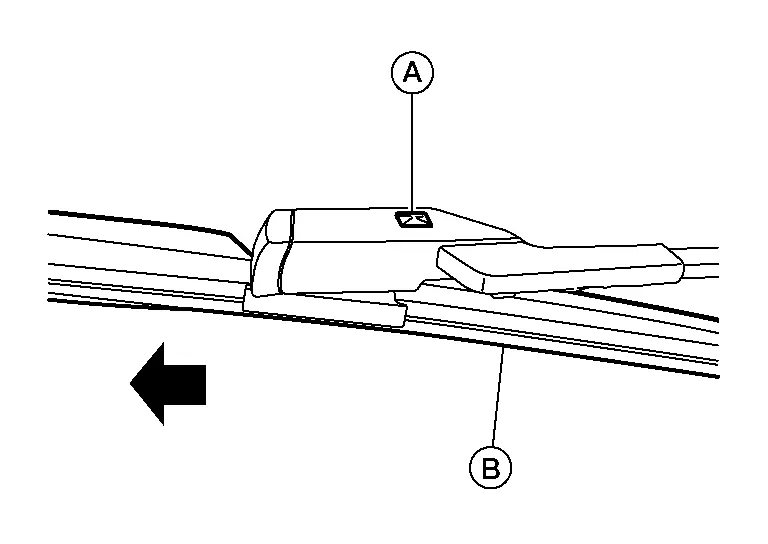
Remove the wiper blade.
INSTALLATION
CAUTION:
-
Return the wiper arm to the original position on the windshield to prevent damage when the hood is opened.
-
Check that the wiper blade contacts the windshield properly; otherwise the wiper arm may be damaged from wind pressure while driving.
Insert the wiper blade onto the wiper arm and slide it up until it clicks into place.
Rotate the wiper blade so the dimple is in the groove.
Lay the wiper arm and wiper blade back down on the windshield.
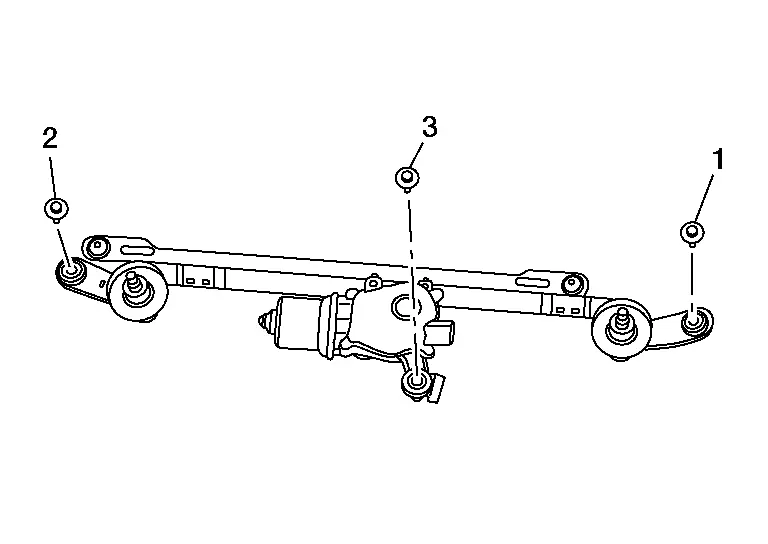
Front Wiper Drive Assembly Nissan Pathfinder R53
Exploded View
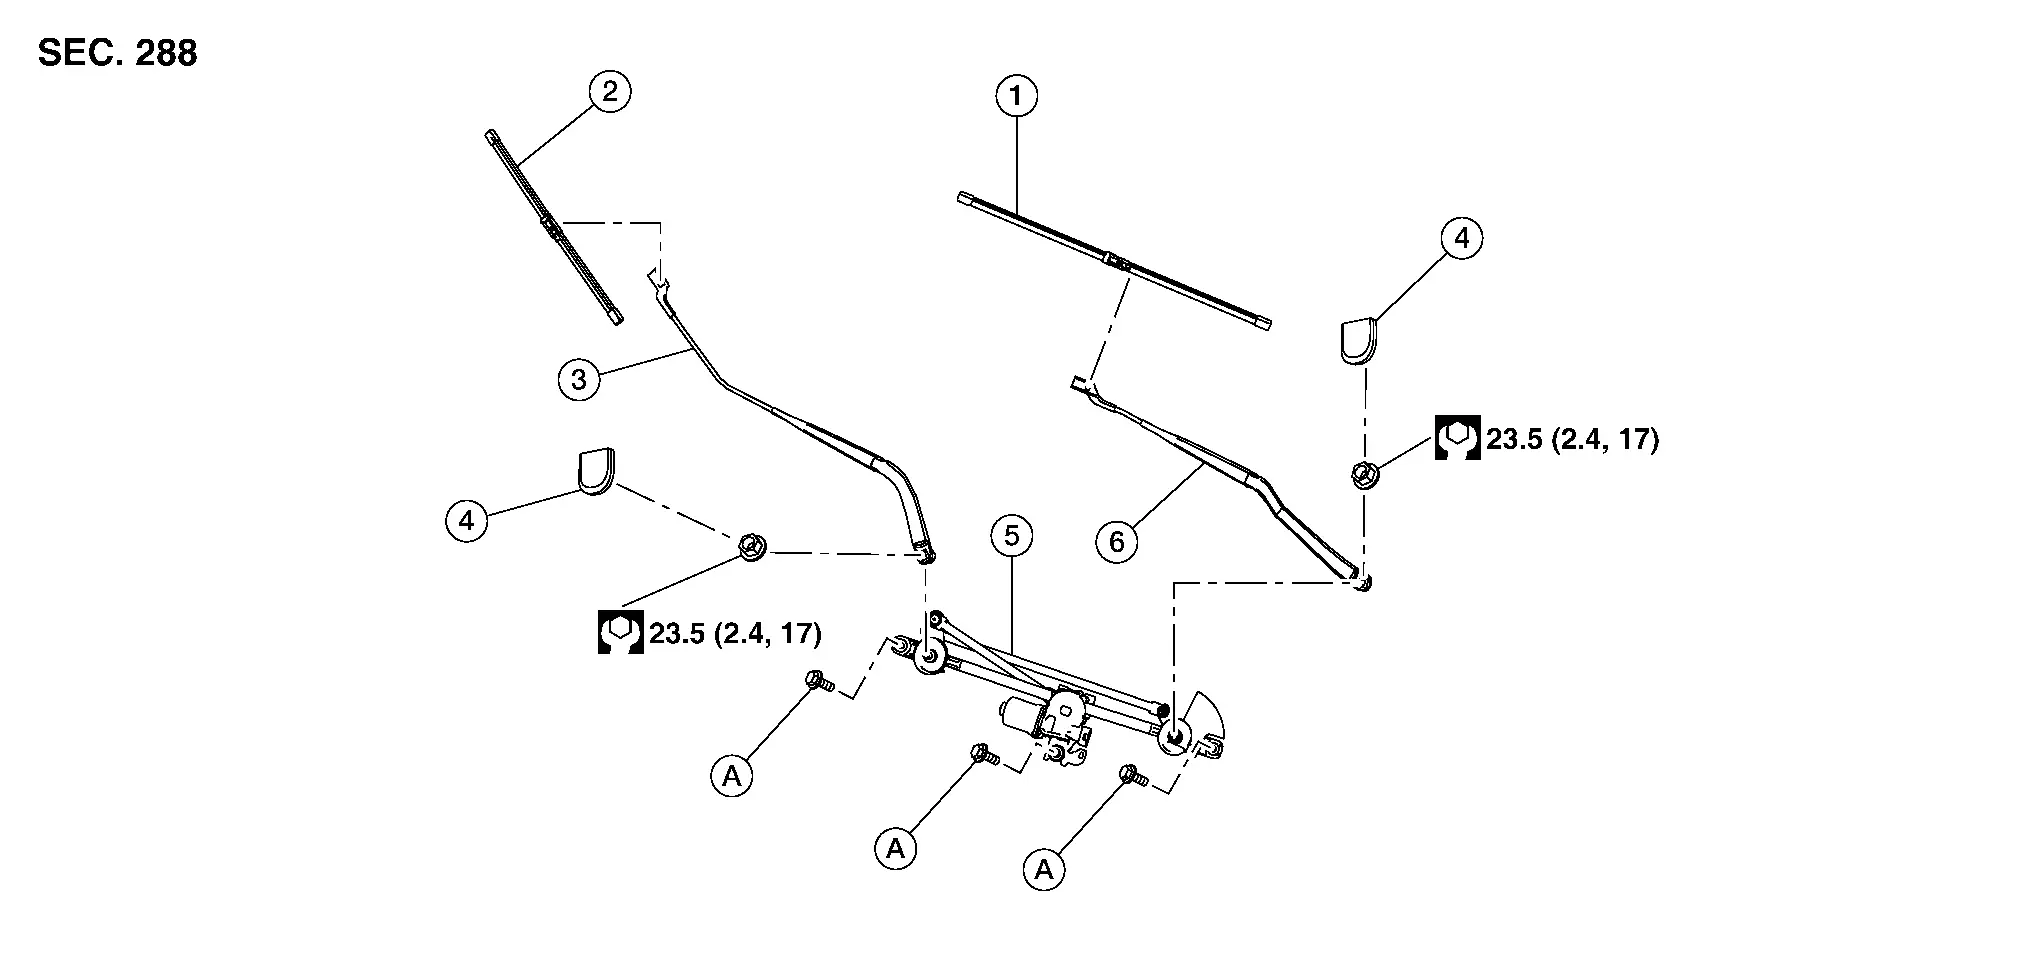
| 1. | Front wiper blade (LH) | 2. | Front wiper blade (RH) | 3. | Front wiper arm (RH) |
| 4. | Front wiper arm cap | 5. | Front wiper drive assembly | 6. | Front wiper arm (LH) |
| A. | Refer to Installation. |
Removal and Installation
REMOVAL
Remove the cowl top cover. Refer to Removal and Installation.
Disconnect the harness connector from the front wiper motor.
Remove the bolts from the front wiper drive assembly.
Remove the front wiper drive assembly.
INSTALLATION
Install the front wiper drive assembly.
 NOTE:
NOTE:
Install front wiper drive assembly bolts to specification in the order shown.
| Front wiper drive assembly bolts | : 8 N·m (0.82 kg-m, 71 in-lb) |
Connect the harness connector to the front wiper motor.
Operate the front wiper to move it to the auto stop position.
Install the cowl top cover. Refer to Removal and Installation.
Wiper and Washer Switch Nissan Pathfinder 5th Gen
Removal and Installation
The wiper and washer switch is serviced as part of the combination switch assembly. Refer to Removal and Installation.
Rain Sensor Nissan Pathfinder
Removal and Installation
Using a suitable tool, release clips and remove windshield glass finisher (1).

 |
: Clip |
Disconnect harness connector from rain sensor (1).
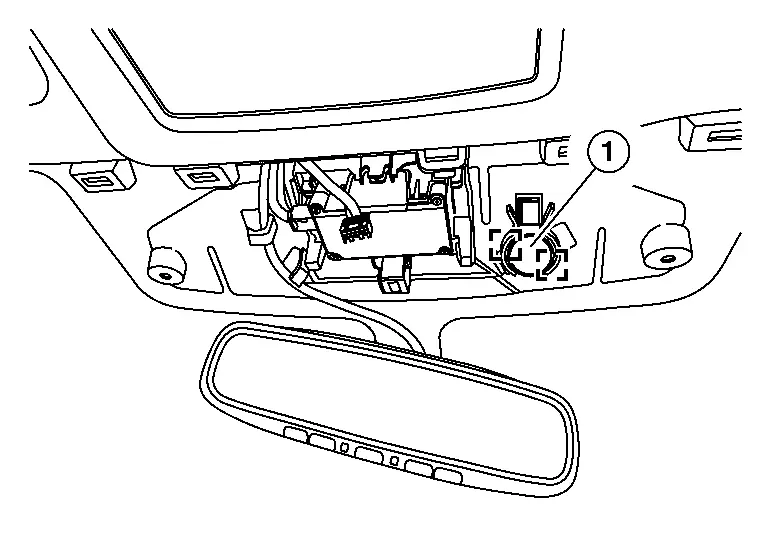
 |
: Metal clip |
Using a suitable tool, release metal clips and remove rain sensor.
INSTALLATION
Installation is in the reverse order of removal.
Rear Wiper Arm Nissan Pathfinder SUV
Exploded View
| 1. | Rear wiper arm | A. | Rear wiper arm cover |
Removal and Installation
REMOVAL
Operate the rear wiper to move it to the auto stop position.
Remove the rear wiper arm cap.
Remove the rear wiper arm nut.
Raise the rear wiper arm, then remove the rear wiper arm.
CAUTION:
Be careful not to drop the wiper blade onto the back door glass.
INSTALLATION
Clean the rear wiper arm mount as shown. This will reduce the possibility of wiper arm looseness.
Operate rear wiper motor to move the rear wiper to the auto stop position.
Install the rear wiper arm and the rear wiper arm nut.
CAUTION:
Be careful not to drop the wiper blade onto the back door glass.
Install the rear wiper arm cap.
Check that the wiper blades stop at the specified position. Refer to Adjustment.
Adjustment
| 1. | Back door glass | 2. | Rear wiper arm | A. | Wiping area |
| B. | 7.5 mm (0.3 in) |
Rear Wiper Motor Nissan Pathfinder 5th Gen
Exploded View
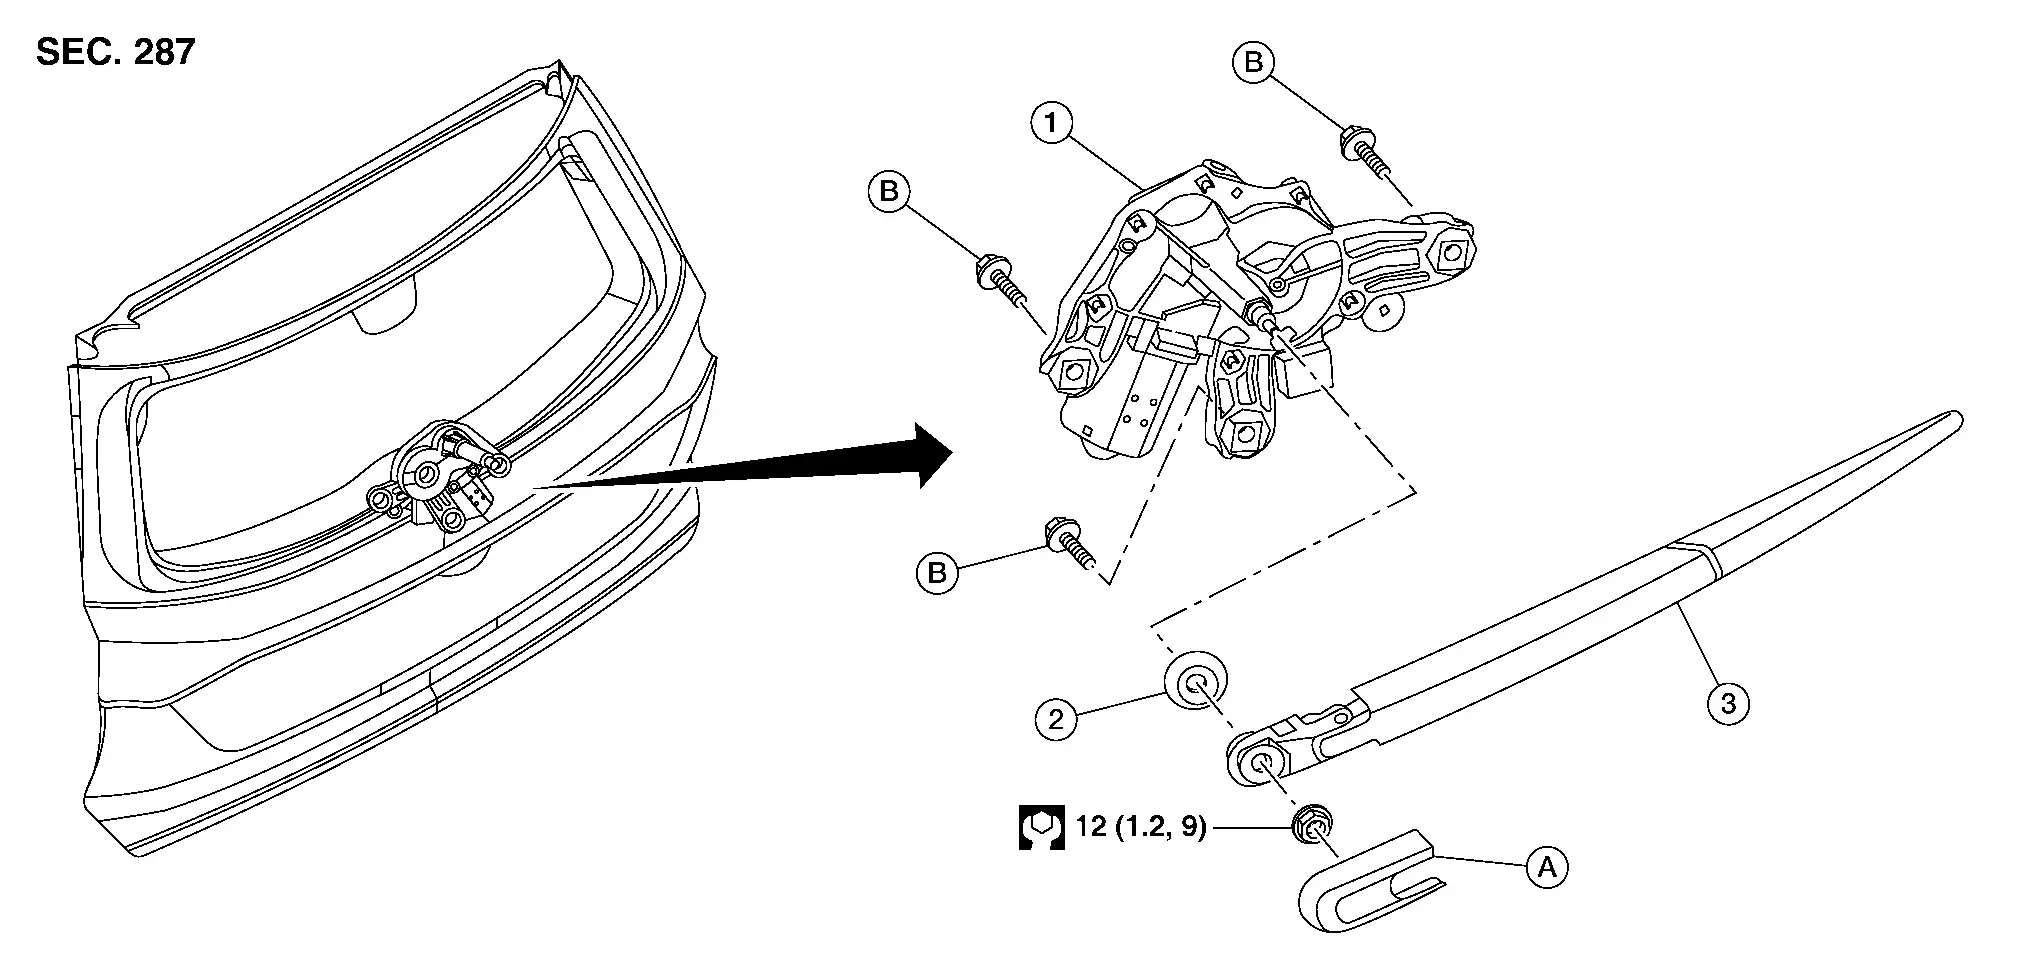
| 1. | Rear wiper motor | 2. | Seal | 3. | Rear wiper arm |
| A. | Rear wiper arm cover | B | Refer to Removal and Installation. |
Removal and Installation
REMOVAL
Remove the rear wiper arm. Refer to Removal and Installation.
Remove the back door lower finisher. Refer to Removal and Installation.
Disconnect the harness connector from the rear wiper motor.
Remove the rear wiper motor bolts.
Remove the rear wiper motor.
INSTALLATION
Installation is in the reverse order of removal.
-
Tighten rear wiper motor bolts to specification in sequence shown.
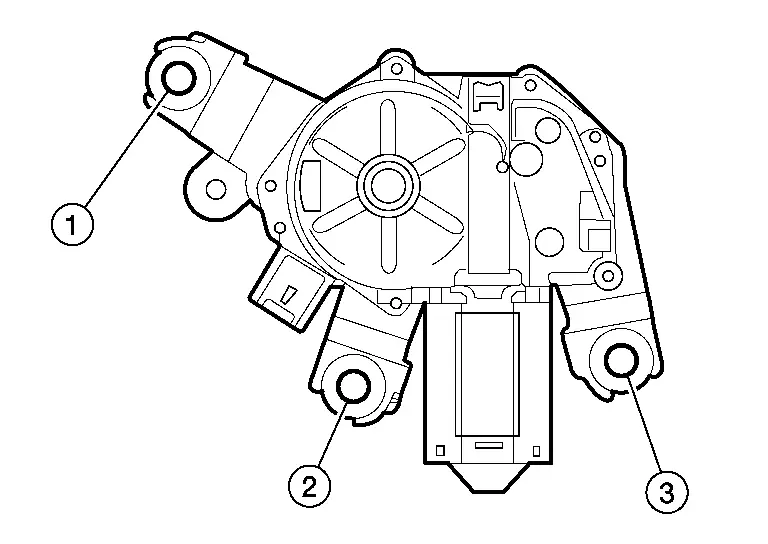
| Bolts 1 - 3 | : 5 N·m (0.5 Kg-m, 44 in-lb) |
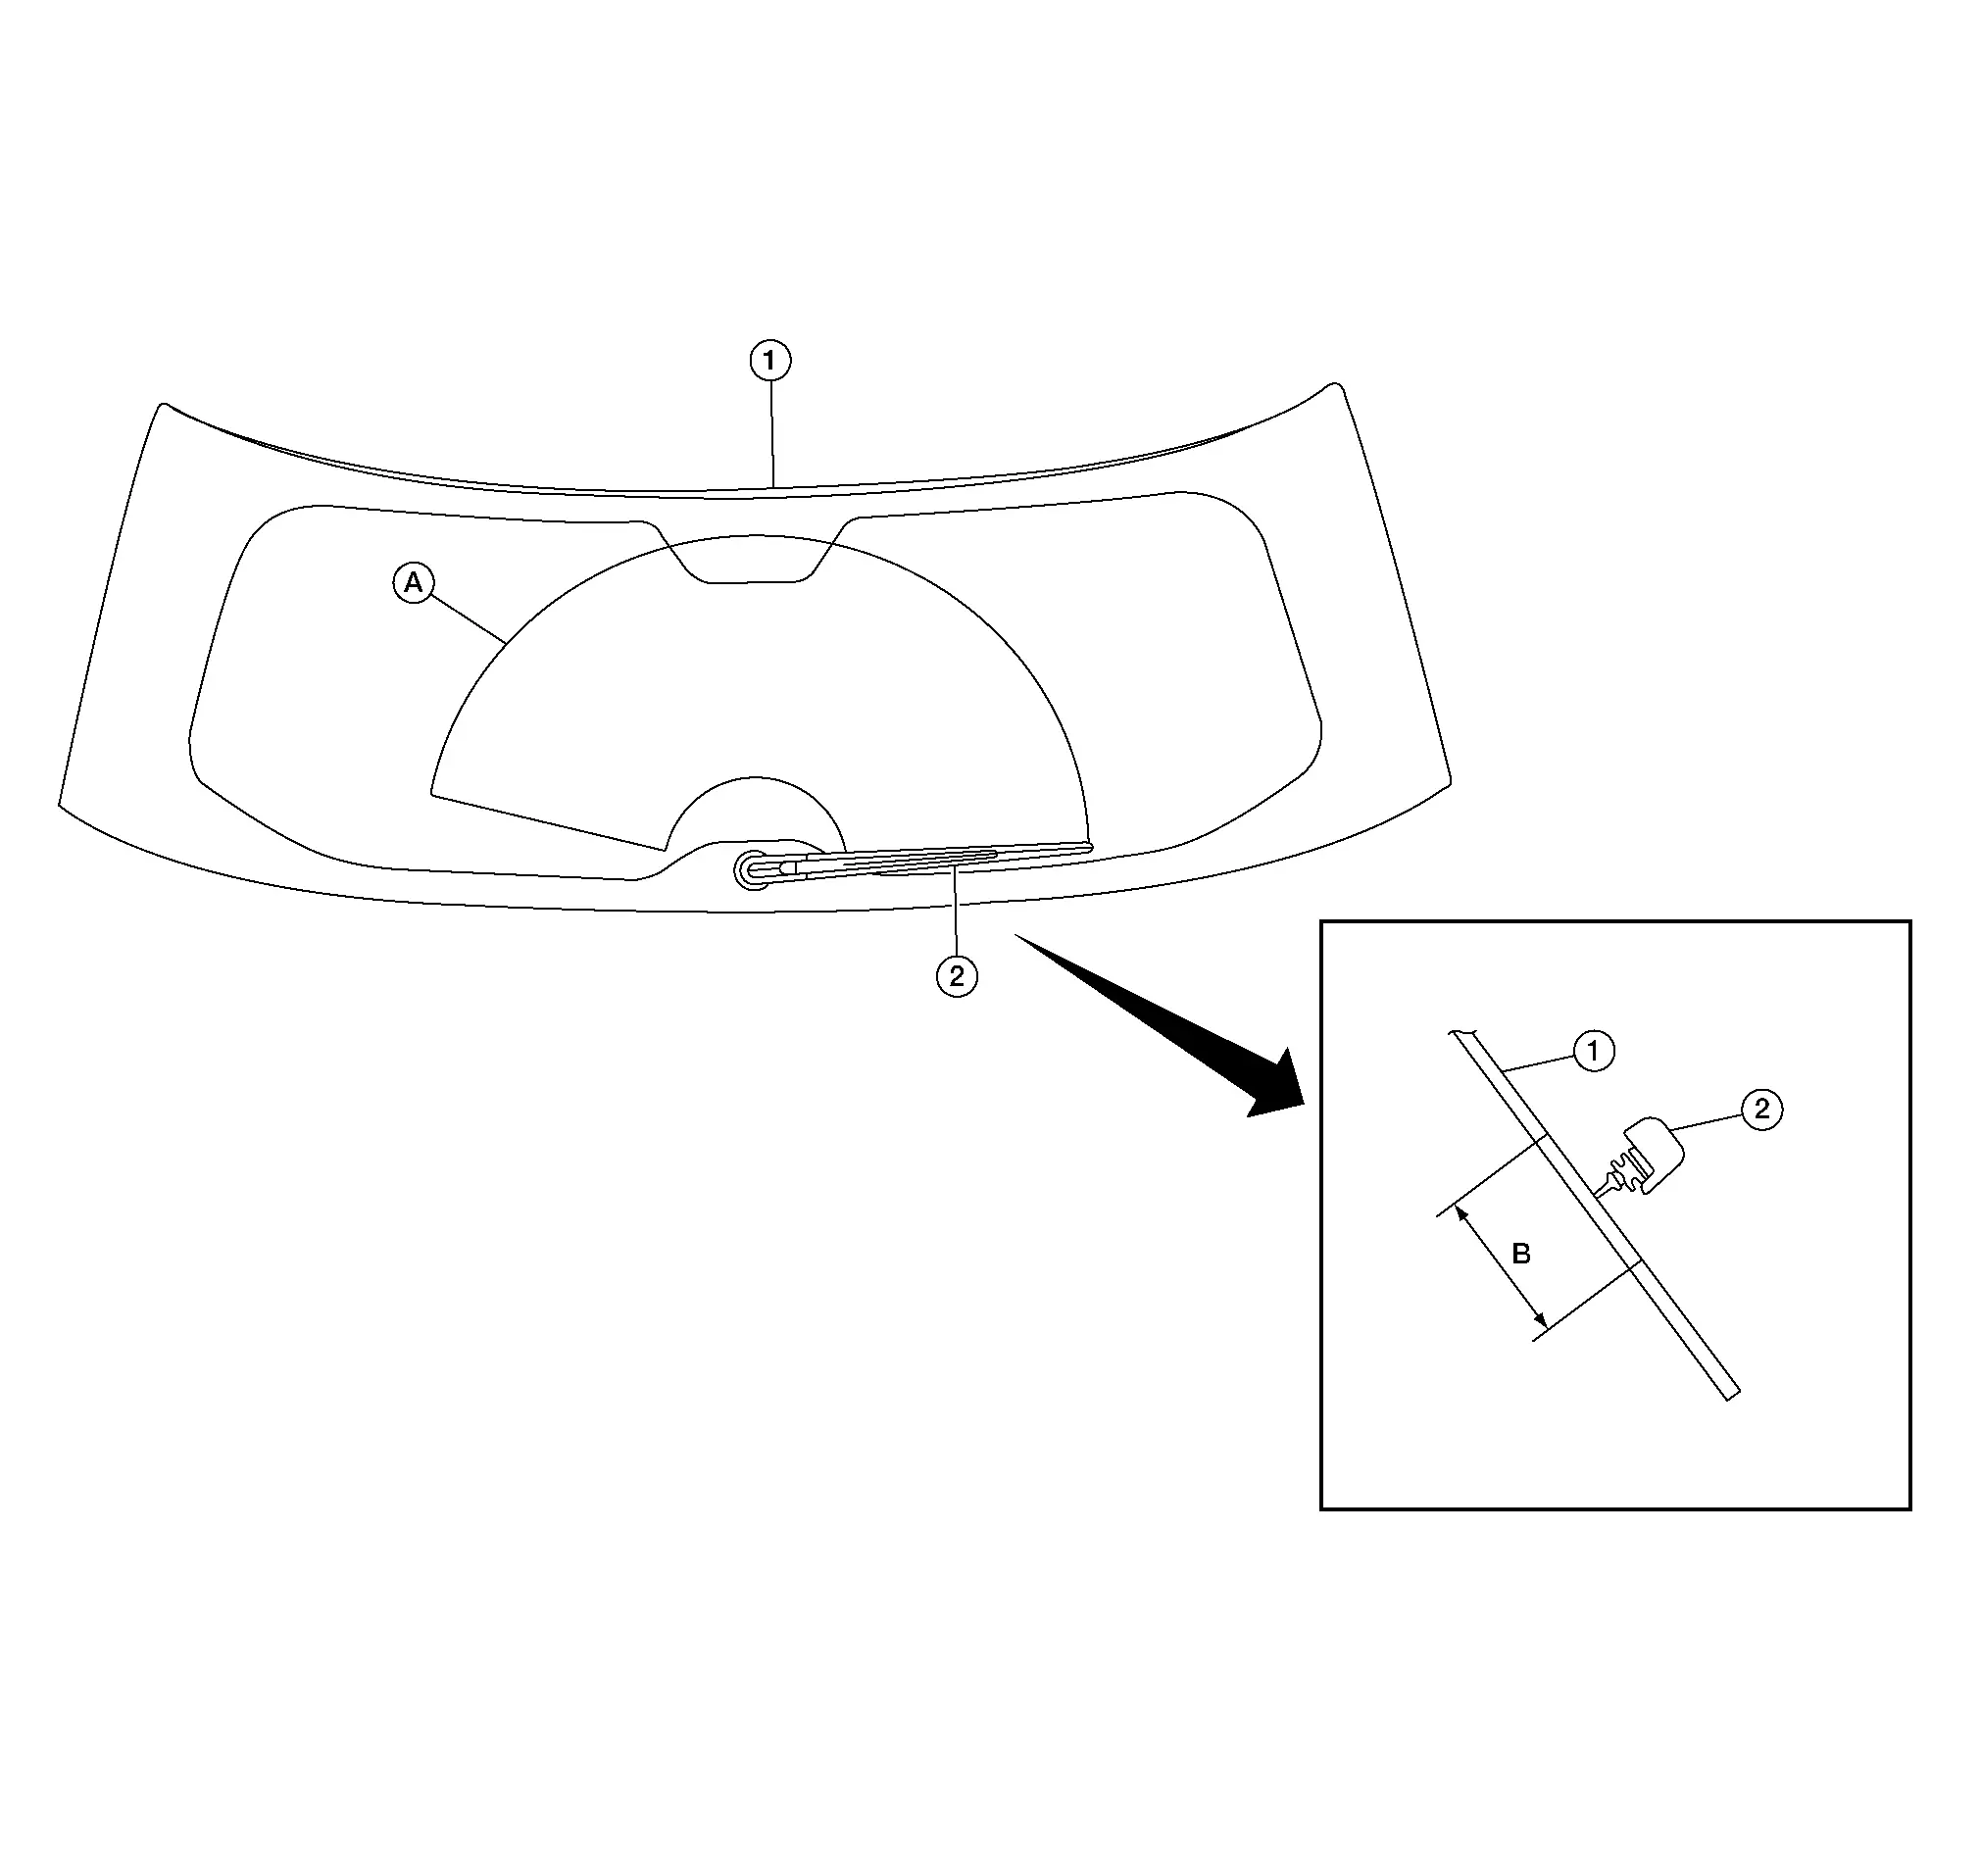
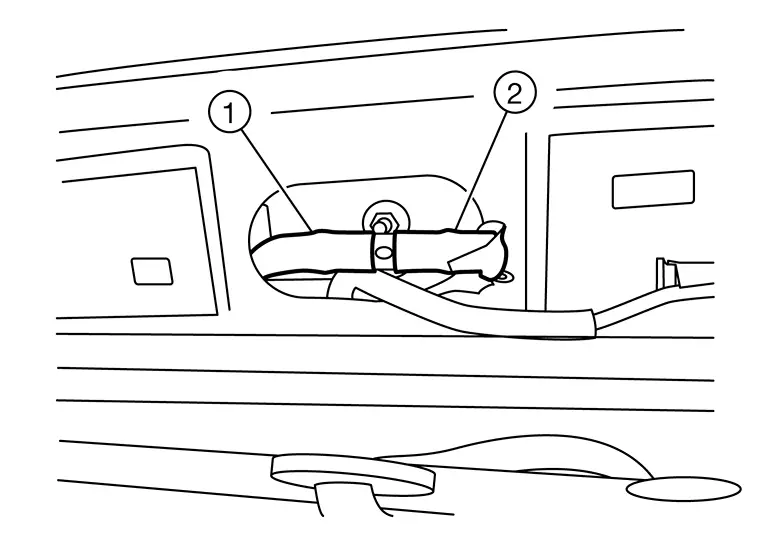
Rear Washer Nozzle and Tube Nissan Pathfinder R53
Washer Tube Layout
 |
: Metal Clip |
Removal and Installation - Rear Washer Tube
REMOVAL
Remove glove box assembly. Refer to Removal and Installation.
Remove the dash side finisher. Refer to Exploded View.
Remove the front kicking plate inner (RH). Refer to Exploded View.
Remove the center pillar lower finisher. Refer to Removal and Installation.
Remove the rear kicking plate inner (RH). Refer to Exploded View.
Remove the rear pillar finisher (RH). Refer to Removal and Installation.
Remove back door side finisher (RH). Refer to Removal and Installation.
Partially lower the rear headliner. Refer to Exploded View.
Remove front bumper. Refer to Removal and Installation.
Disconnect the rear washer tube (1) from the washer pump motor (A).
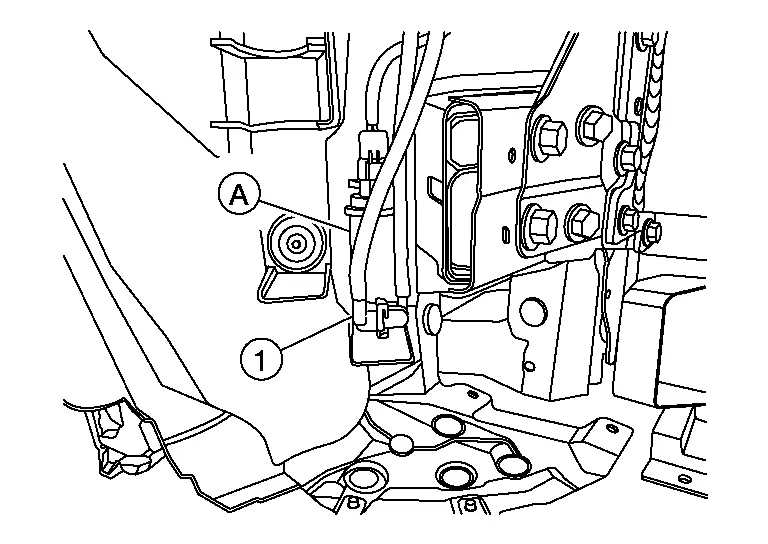
Disconnect the rear washer tube (2) from the rear washer nozzle tube (1).
Using a suitable tool, release clips and remove the rear washer tube.
INSTALLATION
Installation is in the reverse order of removal.
Removal and Installation - Rear Washer Nozzle
REMOVAL
Rear washer nozzle is serviced as part of the rear spoiler. Remove rear spoiler. Refer to Removal and Installation.
Inspection
Check that air can pass through the nozzle by blowing into the nozzle and that air cannot flow in the opposite direction.
If operating properly, spray positions should match the positions shown. If spray positions do not match, confirm the rear washer nozzle is properly seated and working properly. If the spray positions still do not match as shown, then replace the rear washer nozzle. Refer to Removal and Installation - Rear Washer Nozzle.
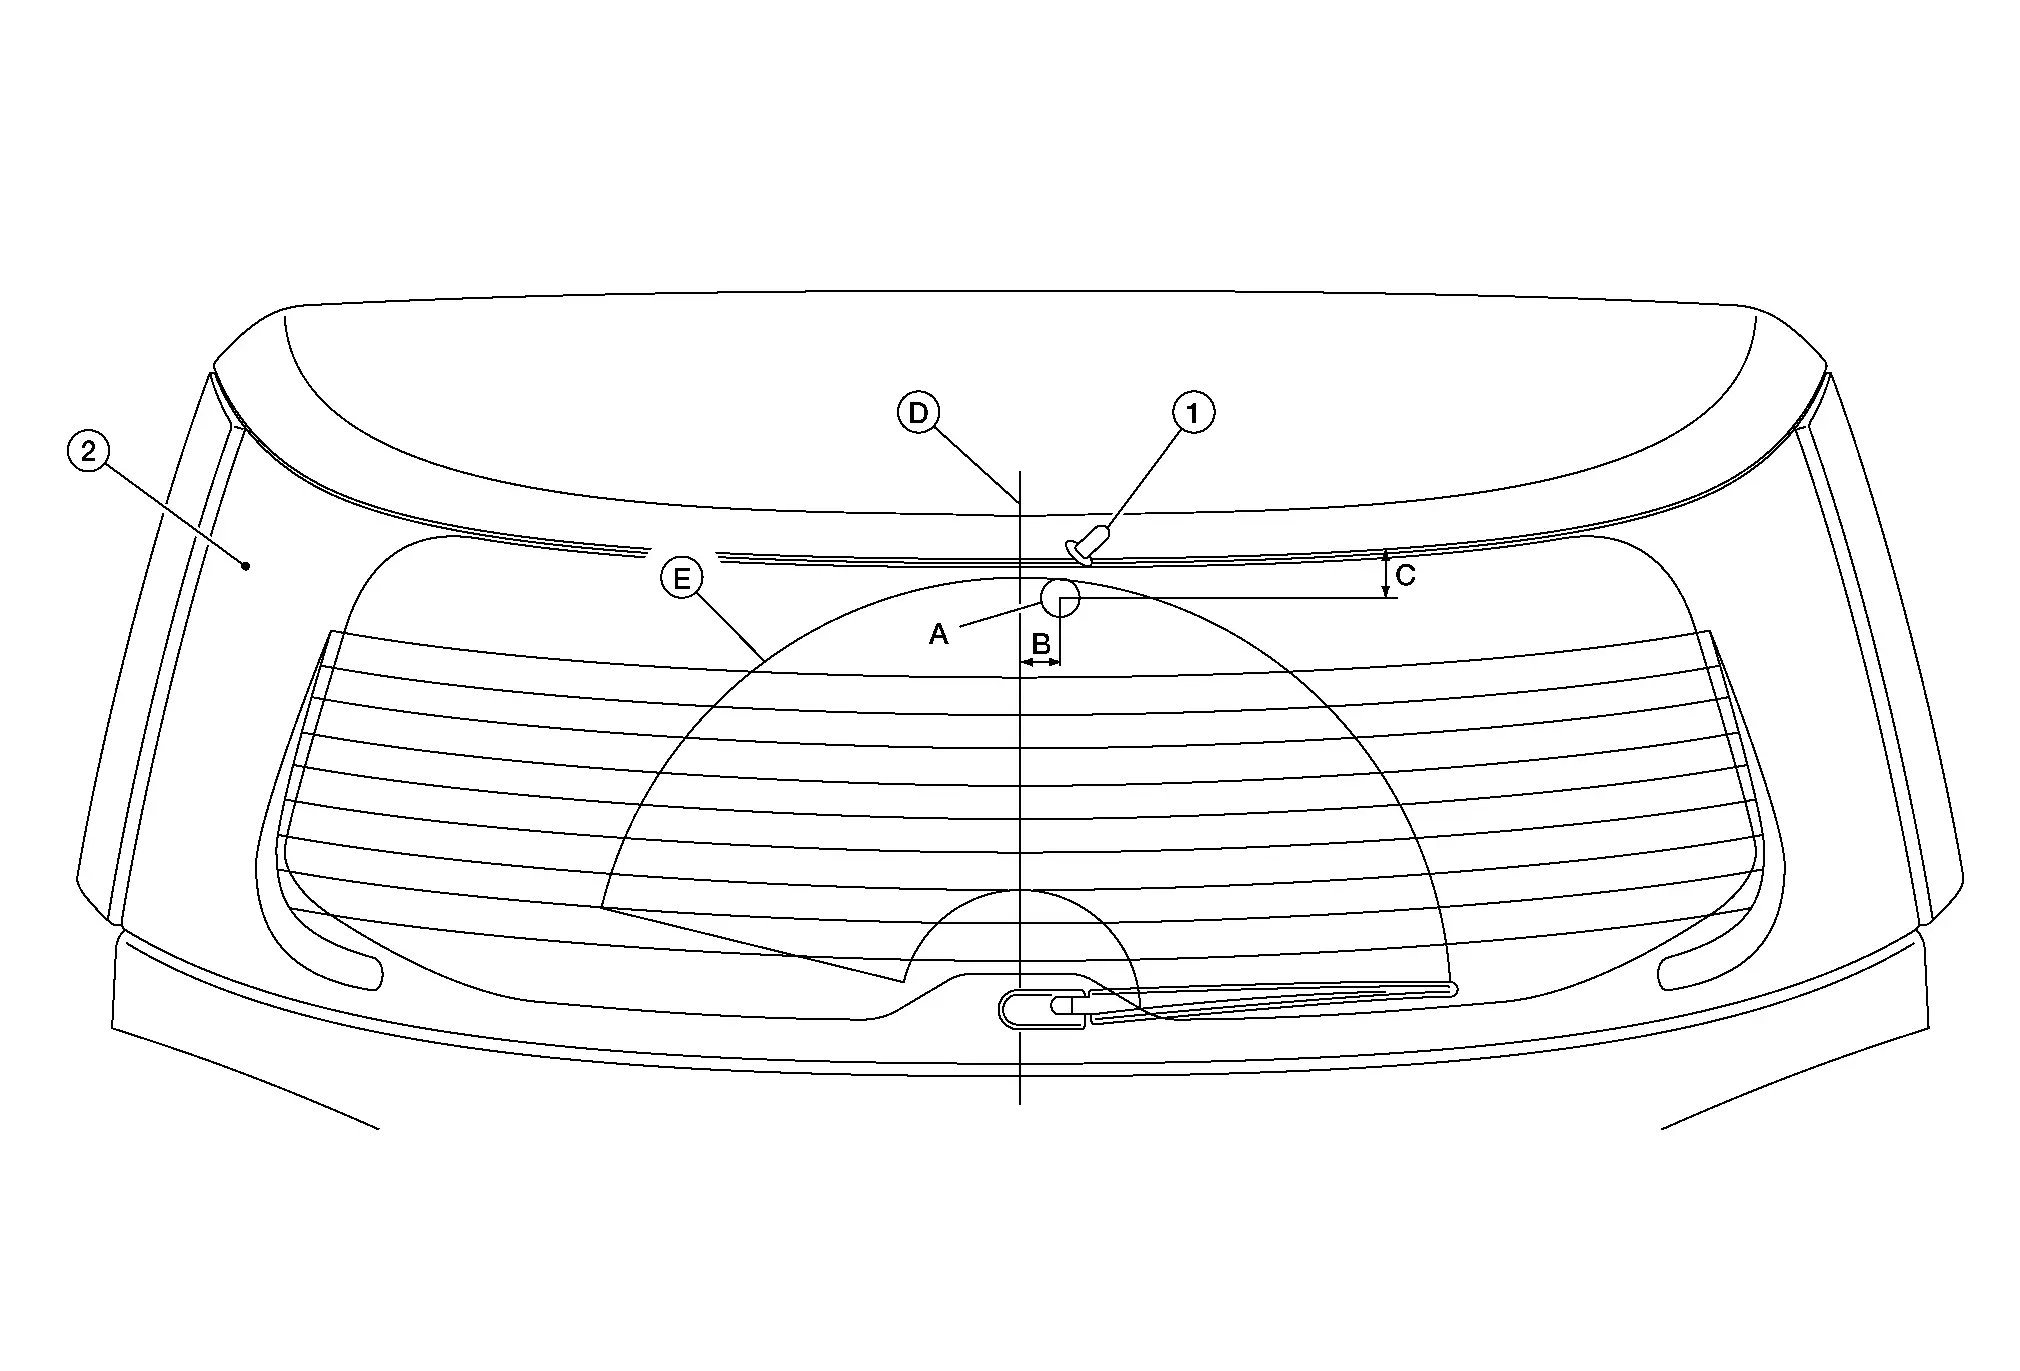
| 1. | Rear washer nozzle | 2. | Rear window glass | A. | Rear washer nozzle spray area |
| B. | 31 mm (1.22 in) | C. | 32 mm (1.26 in) | D. | Rear window glass centerline |
| E | Wiping area |

Nissan Pathfinder (R53) 2022-2026 Service Manual
Removal and Installation
- Washer Tank
- Front Washer Motor
- Front Washer Nozzle and Tube
- Front Wiper Arm
- Front Wiper Blade
- Front Wiper Drive Assembly
- Wiper and Washer Switch
- Rain Sensor
- Rear Wiper Arm
- Rear Wiper Motor
- Rear Washer Nozzle and Tube
Contact Us
Nissan Pathfinder Info Center
Email: info@nipathfinder.com
Phone: +1 (800) 123-4567
Address: 123 Pathfinder Blvd, Nashville, TN 37214, USA
Working Hours: Mon–Fri, 9:00 AM – 5:00 PM (EST)
