Nissan Pathfinder: Srs Air Bag - Removal and Installation
- Driver Air Bag Module
- Spiral Cable
- Front Passenger Air Bag Module
- Knee Air Bag Module Lh
- Side Curtain Air Bag Module
- Front Side Air Bag Module
- Rear Side Air Bag Module
- Crash Zone Sensor
- Front Door Satellite Sensor
- Rear Side Air Bag Satellite Sensor
- Air Bag Diagnosis Sensor Unit
- Front Seat Belt Pre-Tensioner
- Rear Seat Belt Pre-Tensioner
- Front Seat Belt Buckle Switch
- Front Passenger Air Bag Off Indicator
Driver Air Bag Module Nissan Pathfinder
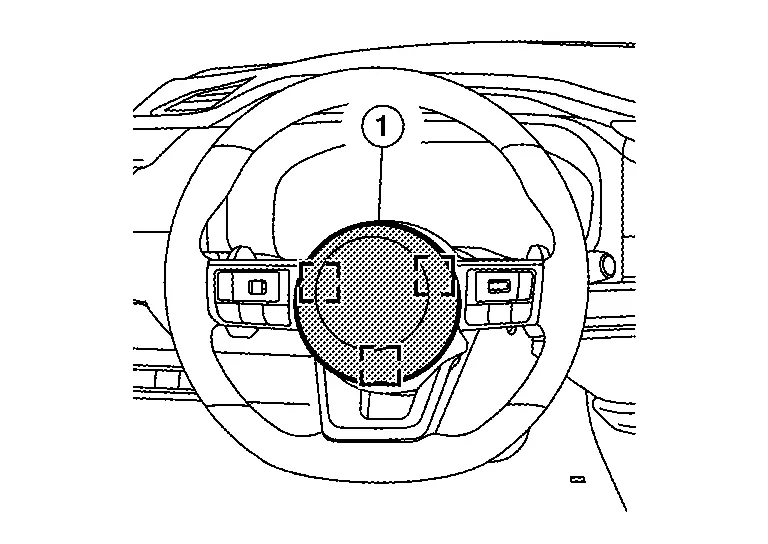
Exploded View
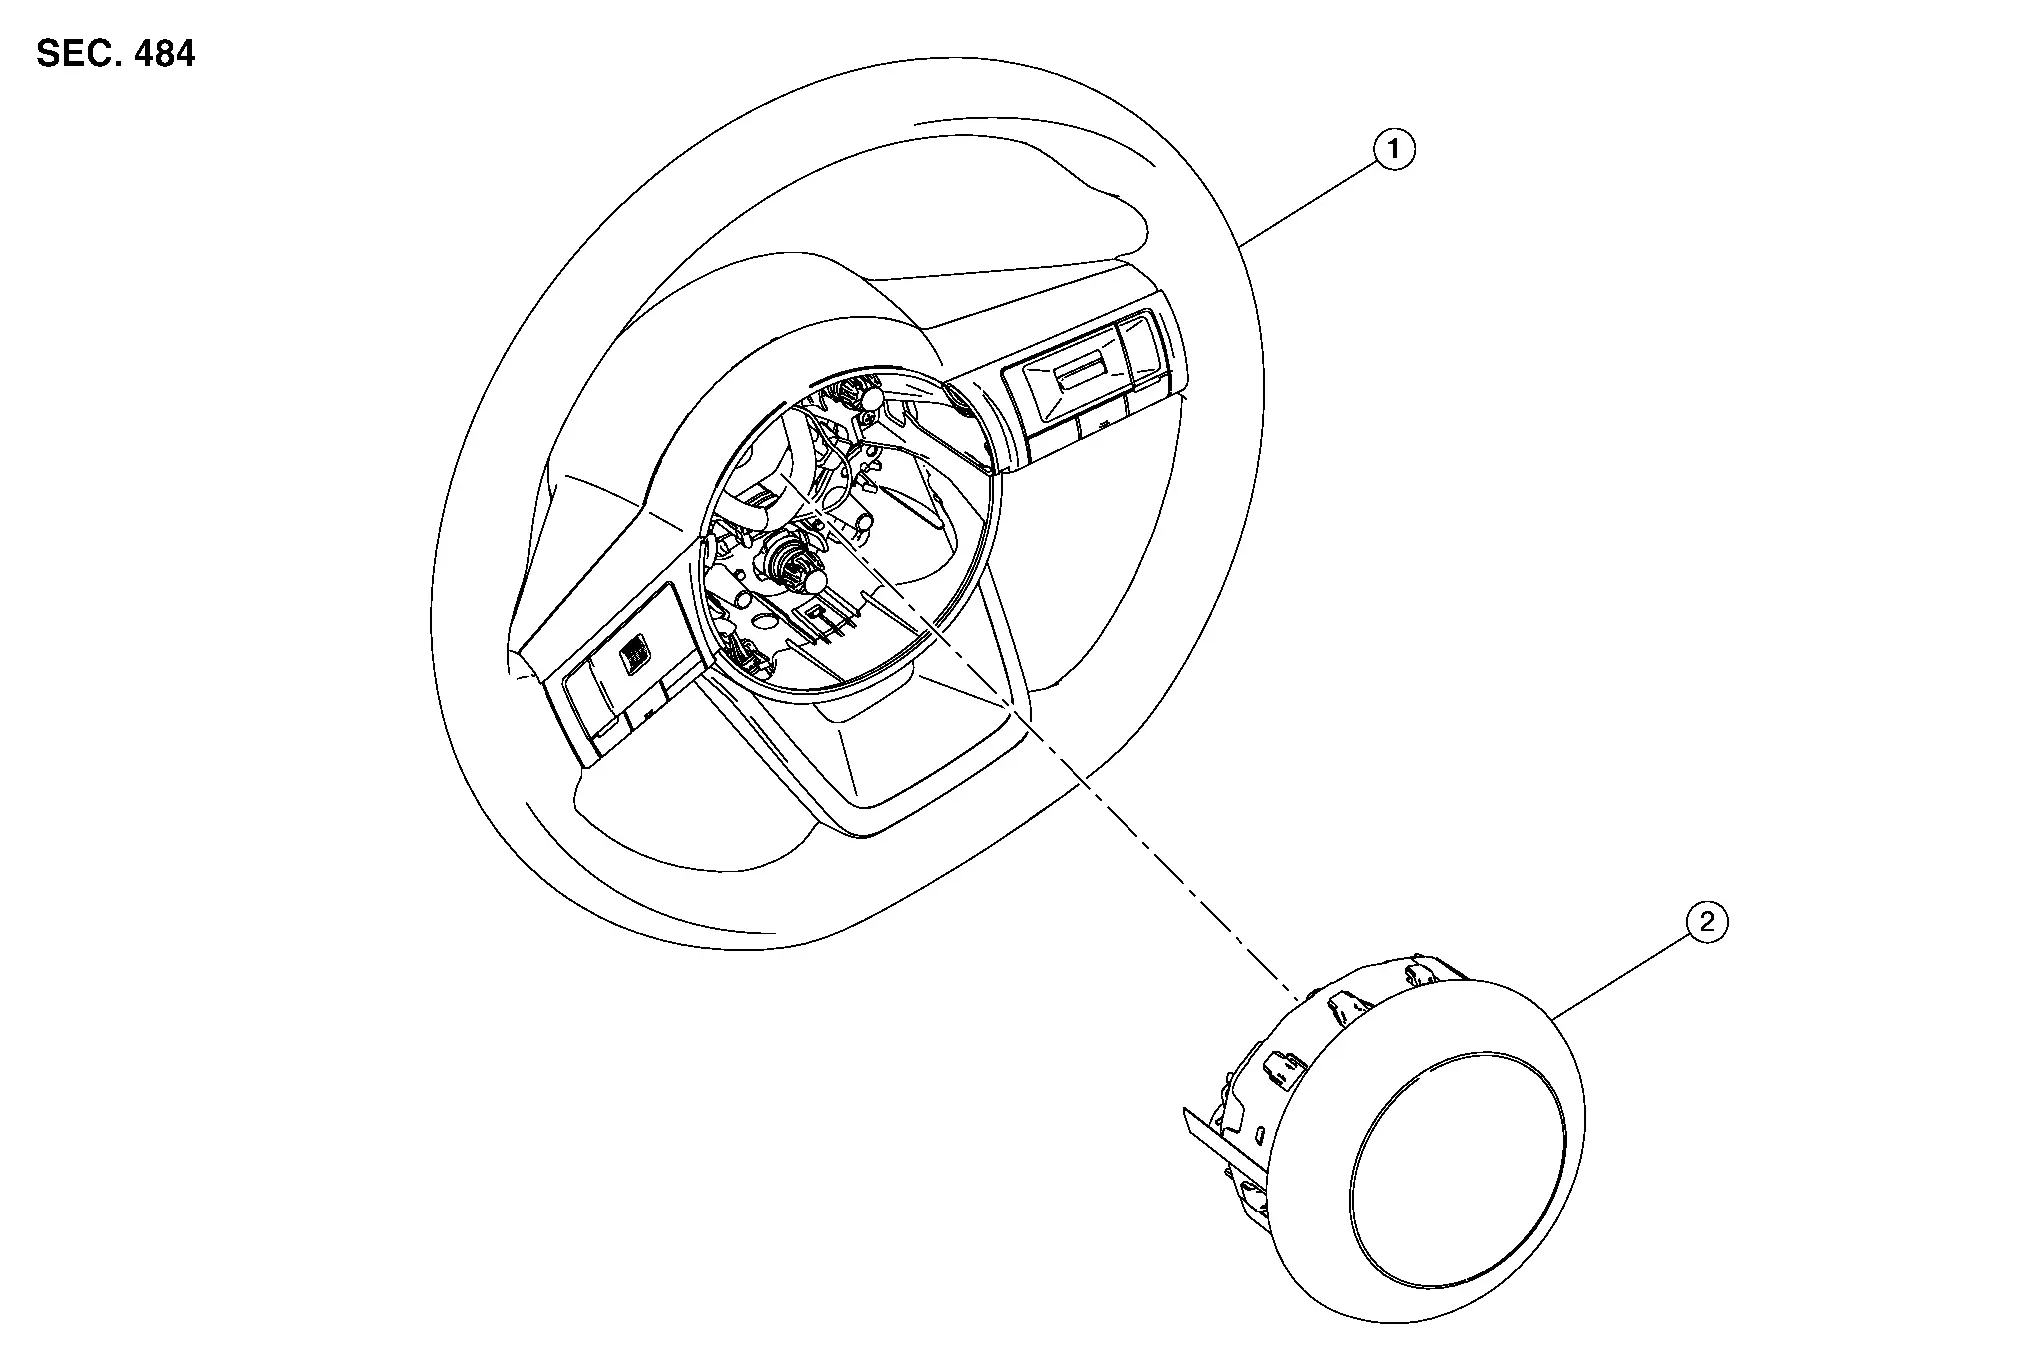
| 1. | Steering wheel | 2. | Driver air bag module |
Removal and Installation
WARNING:
-
Before servicing, place the ignition switch in the OFF position, disconnect main battery negative terminal and wait for 3 minutes or more (discharges electricity held in the additional power supply circuit of the air bag diagnosis sensor unit).
-
Always work from the side of air bag module. Do not work in front of it.
-
Do not use air tools or electric tools for servicing.
REMOVAL
 NOTE:
NOTE:
Dual stage driver air bag module shown, single stage driver air bag module has only one harness connector.
Disconnect negative battery terminals, then wait at least three minutes. Refer to Battery Disconnect.
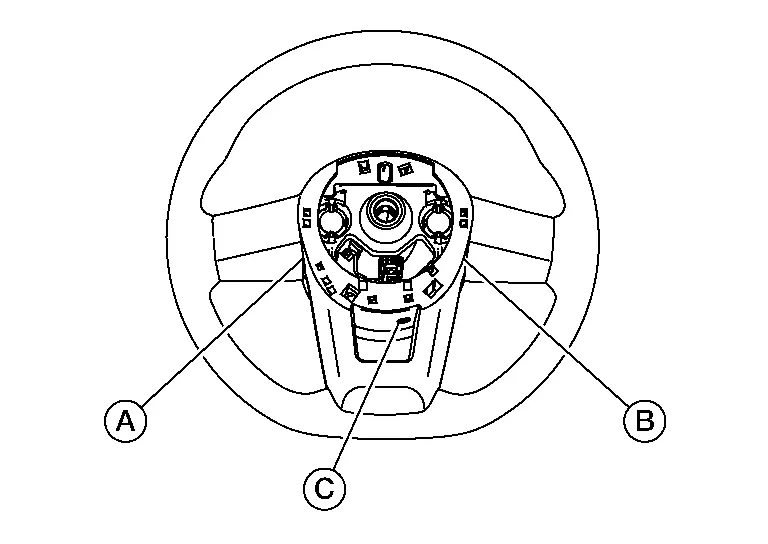
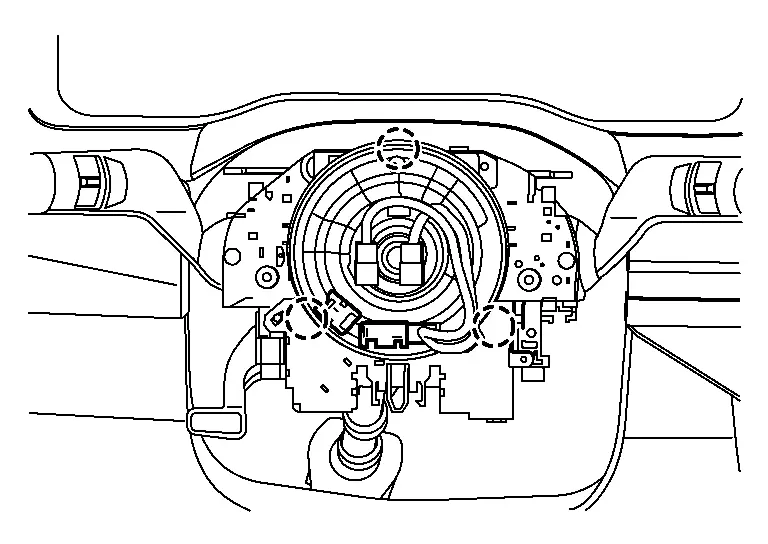
Locate the access holes.
 NOTE:
NOTE:
Steering wheel removed for clarity.
| (A) | : Right side access hole |
| (B) | : Left side access hole |
| (C) | : Bottom access hole |
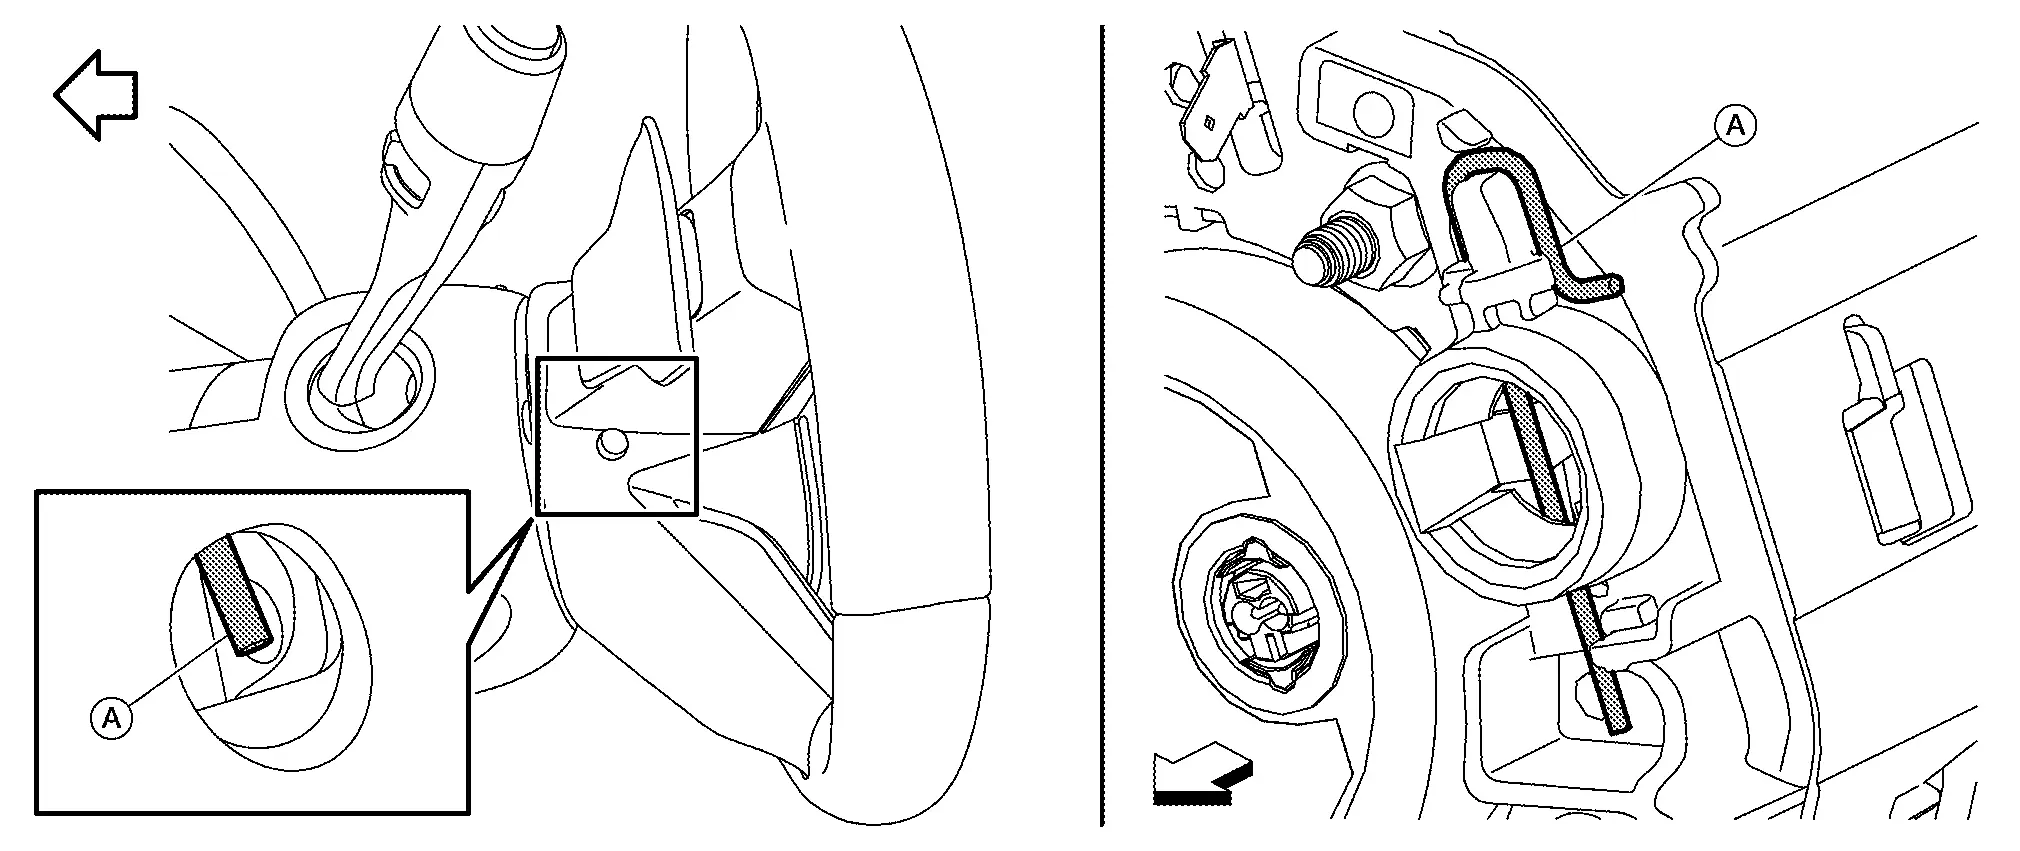
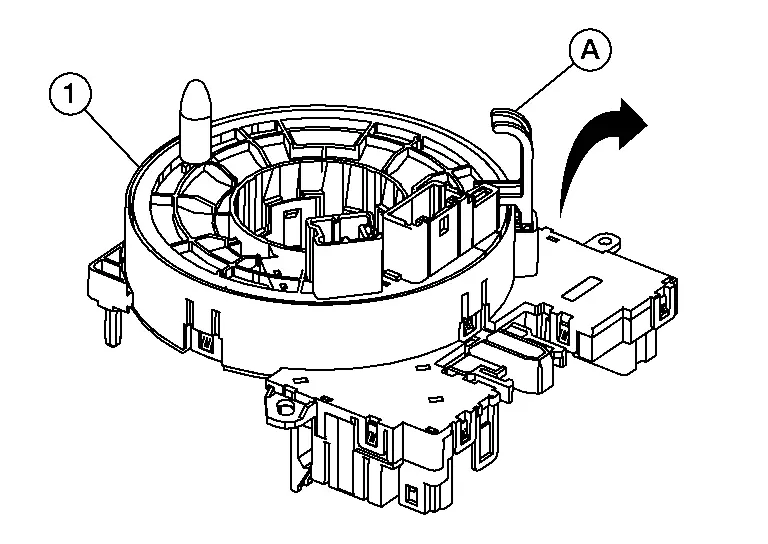
On the left side, right side, and bottom access holes of the steering wheel, check the position of the torsion spring (A) securing the driver air bag module.
 |
: Front |
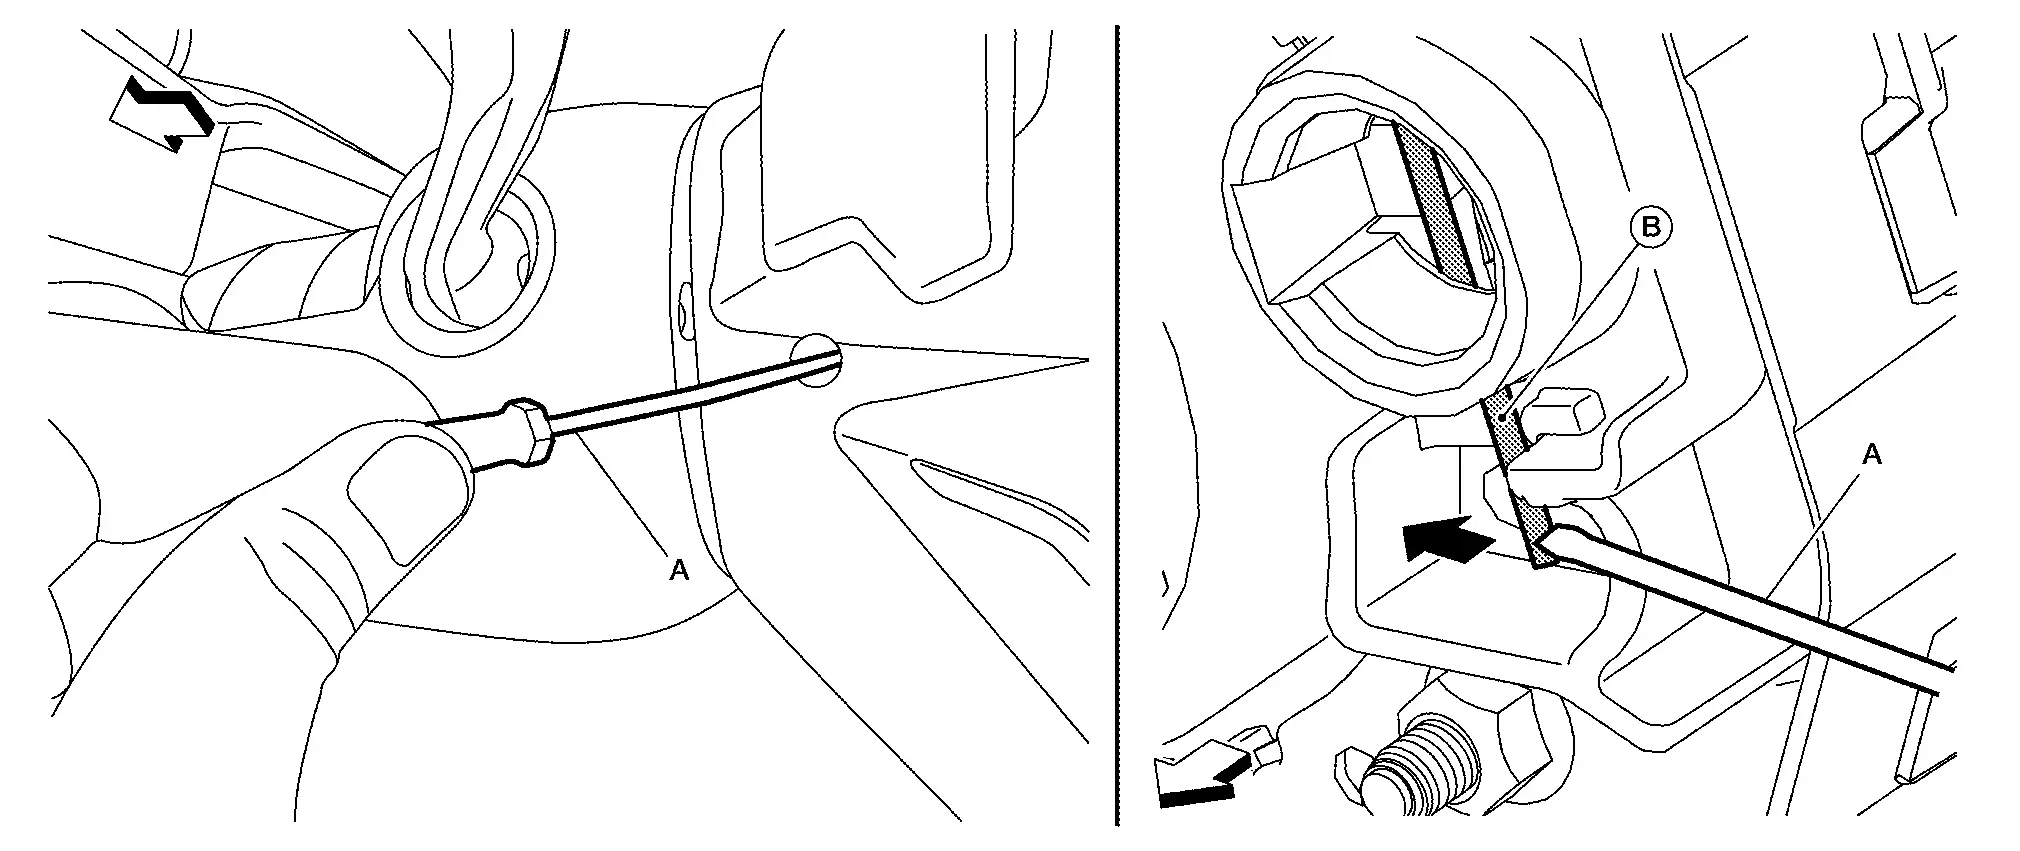
Insert suitable tool (A) into the left side access hole, then press and disengage torsion spring (B).
 |
: Front |
Disengage the remaining springs on the right side and bottom access hole.
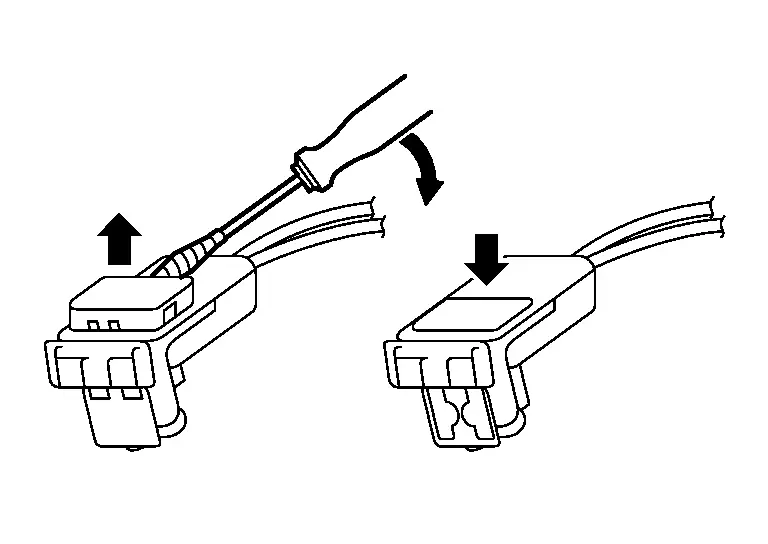
Disconnect harness connector (A) from the driver air bag module and harness connector (B) from the horn switch.
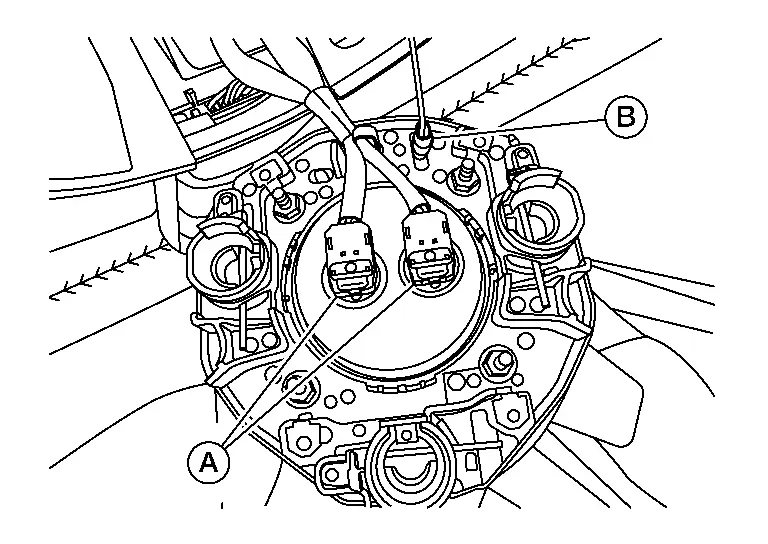

CAUTION:
To disconnect the driver air bag module harness connector, insert a thin screwdriver wrapped in tape into the notch and lift the lock as shown.
Remove the driver air bag module harnesses (A) from the hook (B) and remove the driver air bag module.
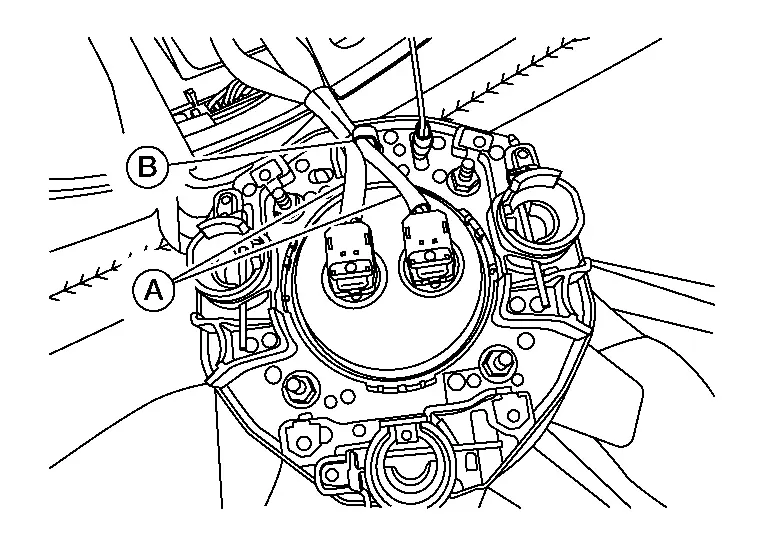
CAUTION:
-
Always place the driver air bag module with pad side facing upward.

: Upward -
Replace the driver air bag module if it has been dropped or sustained an impact.

-
Do not strike the driver air bag module.
-
Do not insert any foreign objects (screwdriver, etc.) into the driver air bag module.
-
Do not disassemble the driver air bag module.
-
Do not expose the driver air bag module to temperatures exceeding 90°C (194°F).
-
Do not allow oil, grease, detergent or water to come in contact with the driver air bag module.
INSTALLATION
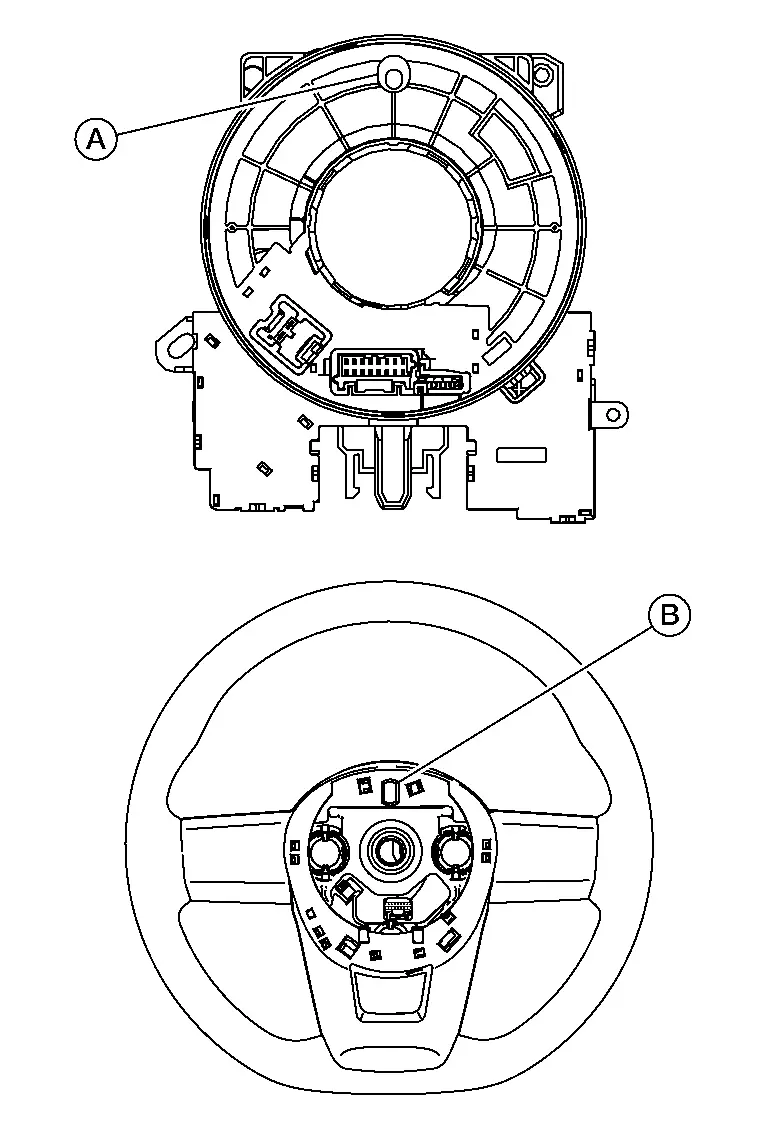
Make sure the driver air bag module harnesses (A) is positioned through the hook (B) of the steering wheel as shown.
Connect the harness connectors (A) to the driver air bag module and harness connector (B) to the horn switch.

CAUTION:
-
To connect the harness connector, insert a thin screwdriver wrapped in tape into the notch and lift the lock as shown.
-
With the lock raised, connect the harness connector to the side curtain air bag module.
-
Push the lock into the harness connector as shown.
-
Check that the lock and harness connector are securely engaged.
Make sure the driver air bag module harnesses (A) are positioned through the hook (B) of the driver air bag module.

Install the driver air bag module (1) to the steering wheel.
 |
: Metal clip |
CAUTION:
-
Press driver air bag module until it snaps in place with a clicking sound.
-
Do not pinch or damage the harnesses while installing the driver air bag module.
Connect the negative and positive battery terminals. Refer to Battery Disconnect.
Check the horn and each function of the steering switches.
Check that no system malfunction is detected causing the air bag warning lamp to illuminate.
CAUTION:
If a malfunction is indicated by the air bag warning lamp after repair or replacement of the malfunctioning parts, perform the SRS final check. Refer to SRS Final Check.
Spiral Cable Nissan Pathfinder
Exploded View
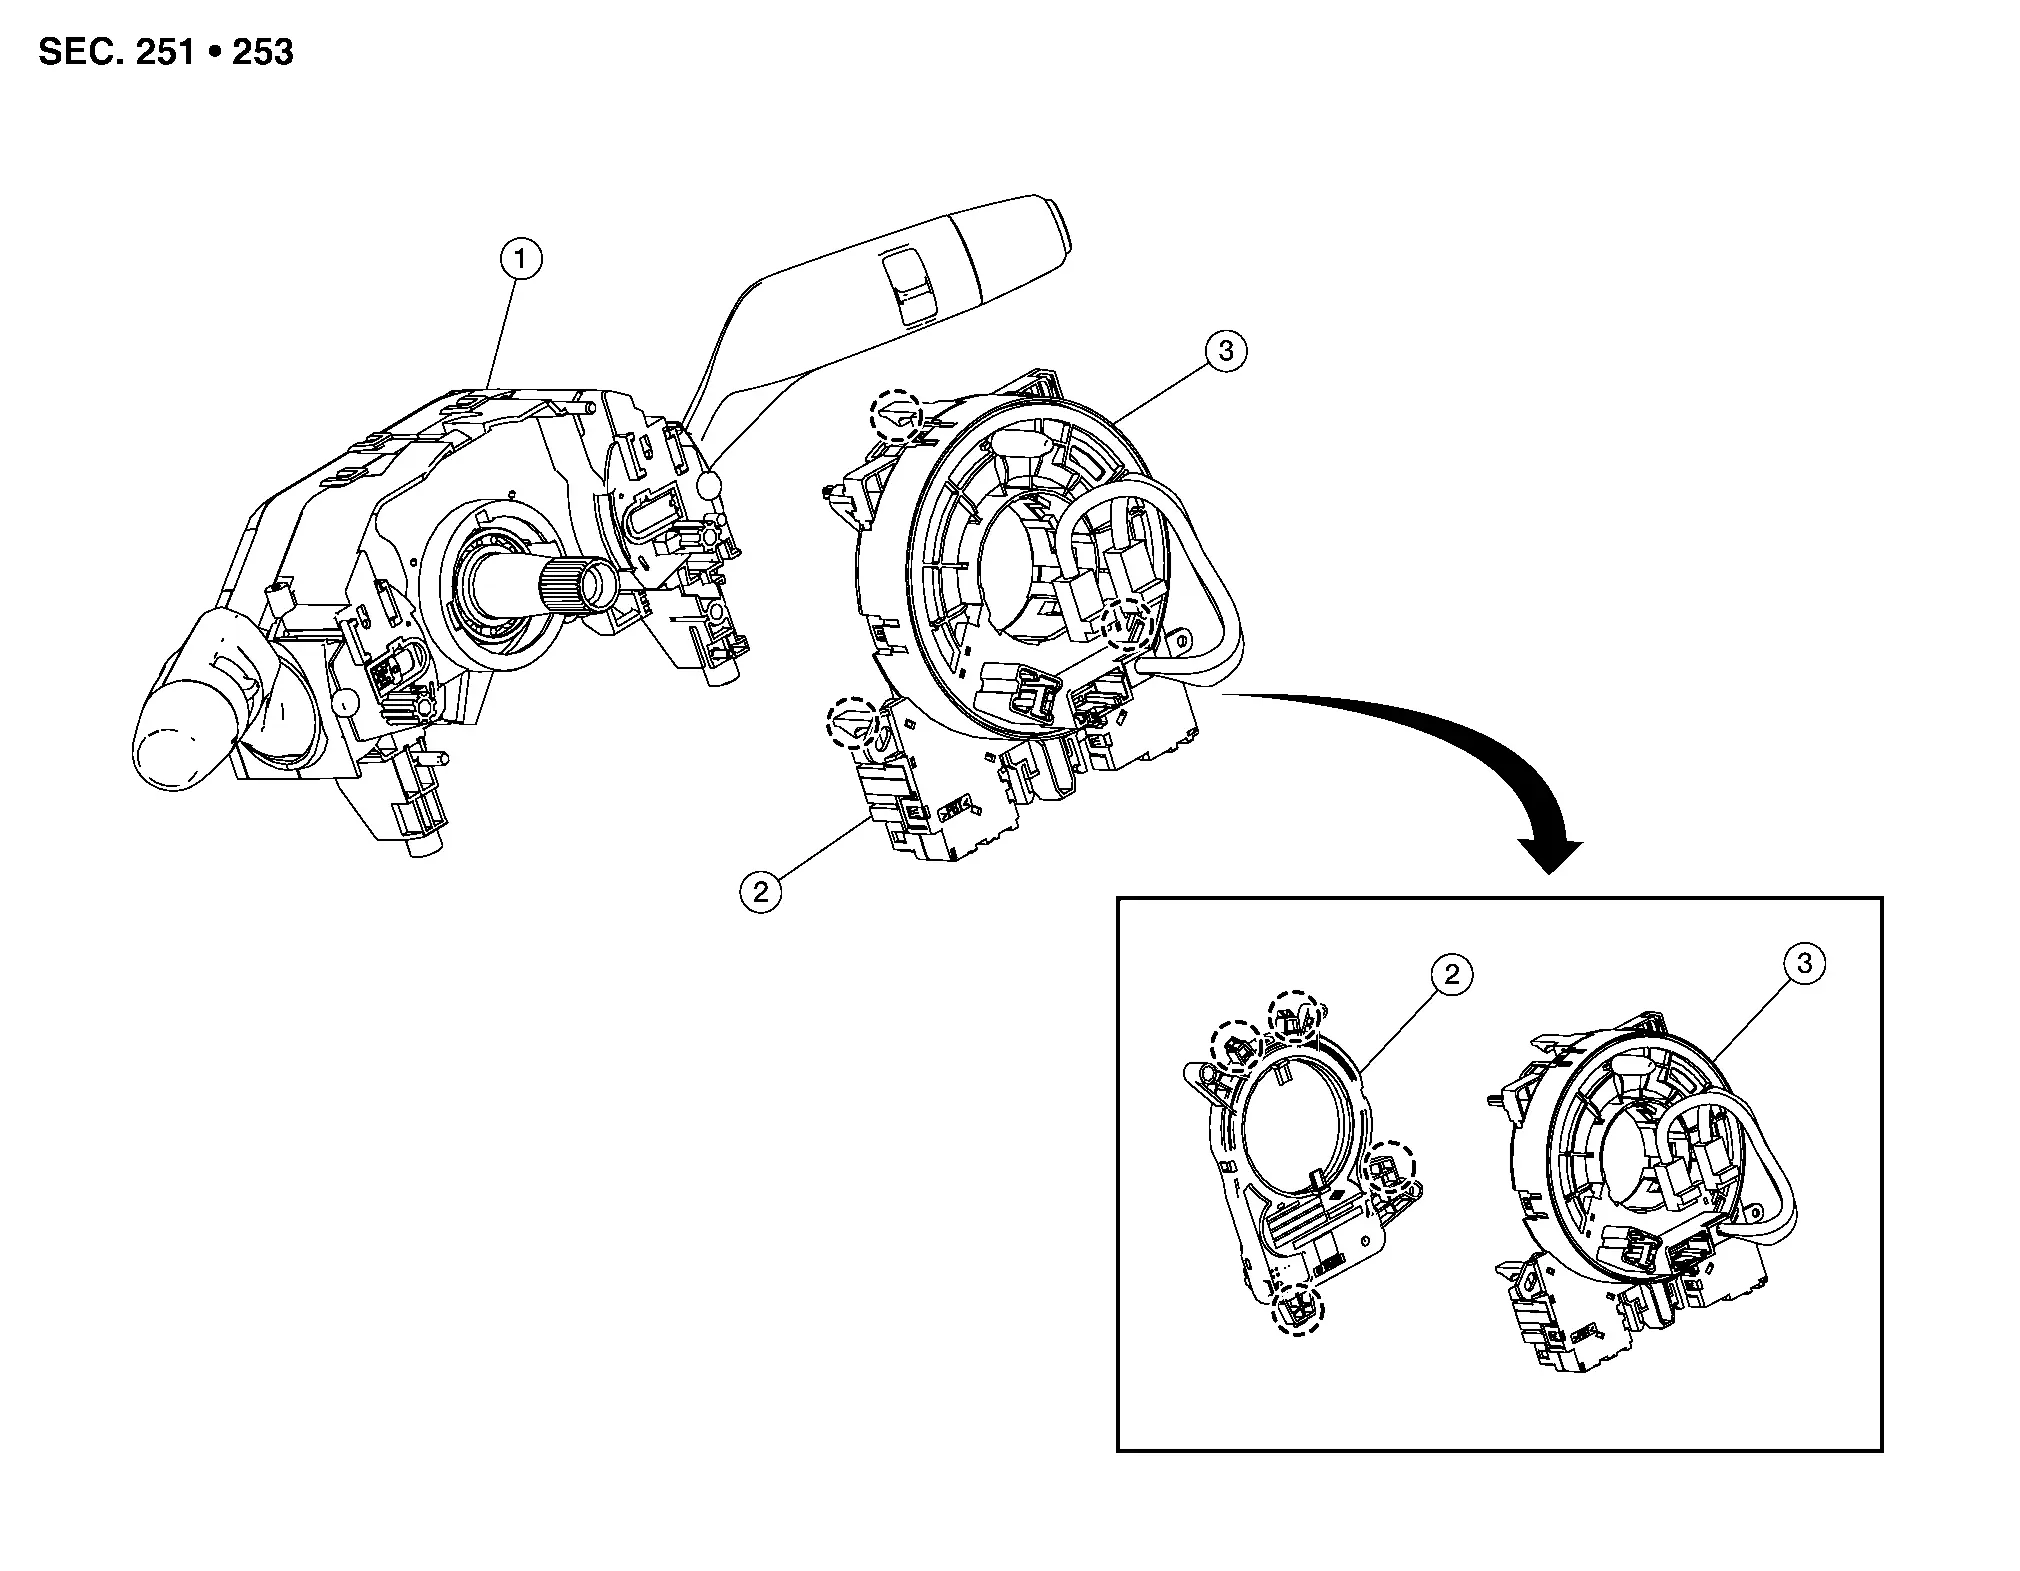
| 1. | Combination switch | 2. | Steering angle sensor | 3. | Spiral cable |
 |
Pawl |
Removal and Installation
WARNING:
-
Before servicing, place the ignition switch in the OFF position, disconnect main battery negative terminal and wait for 3 minutes or more (discharges electricity held in the additional power supply circuit of the air bag diagnosis sensor unit).
-
Do not use air tools or electric tools for servicing.
REMOVAL
Disconnect negative battery terminals, then wait at least three minutes. Refer to Battery Disconnect.
Remove the steering wheel. Refer to Removal and Installation.
Remove the steering column upper and lower covers. Refer to Removal and Installation.
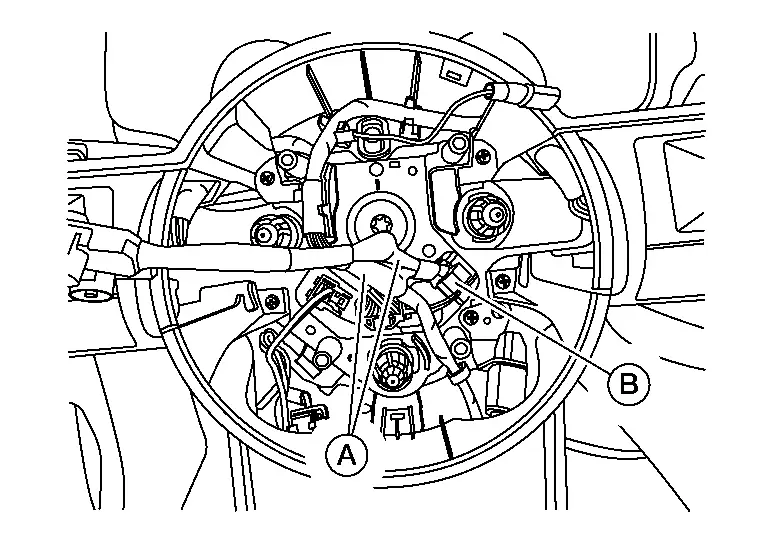
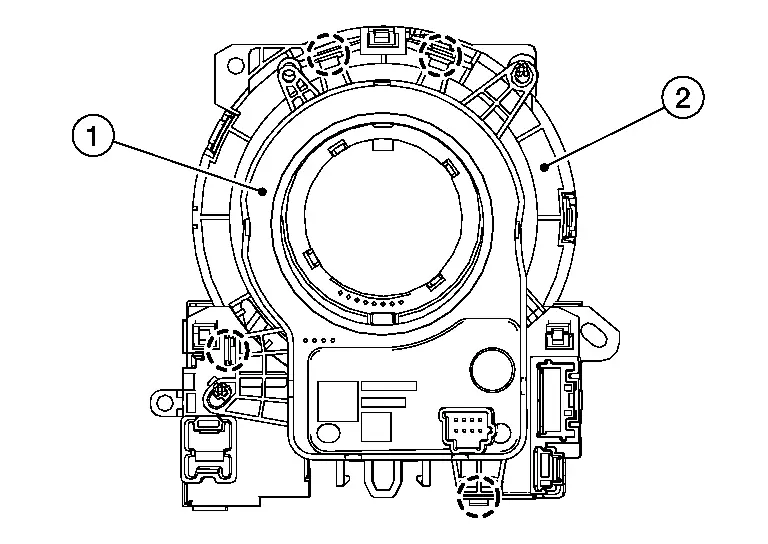
Disconnect harness connectors (A) from the spiral cable (1).
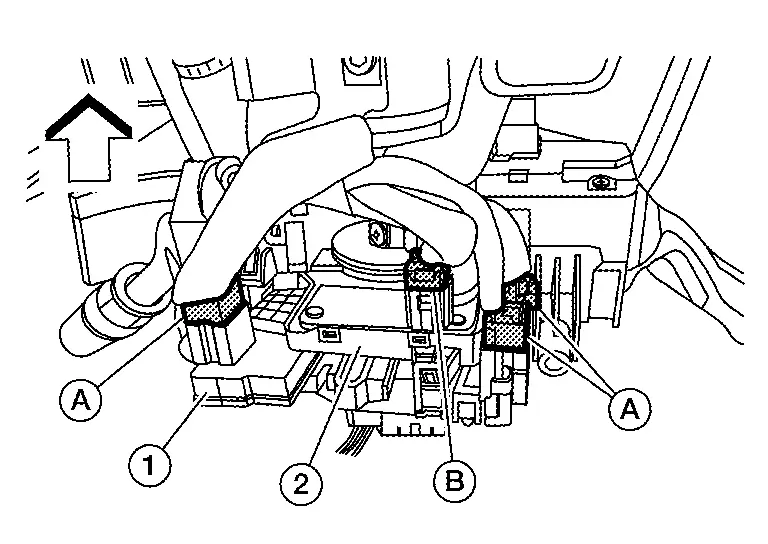
Disconnect the harness connector (B) from the steering angle sensor (2).
Using suitable tool, release pawls and remove spiral cable with steering angle sensor from the combination switch.
 |
: Pawl |
Using suitable tool, release pawls and remove the steering angle sensor (1) from the spiral cable (2).
 |
: Pawl |
CAUTION:
-
Do not strike or drop the spiral cable.
-
Replace the spiral cable if it has been dropped or sustained an impact.
-
Do not disassemble the spiral cable.
-
Do not allow oil, grease, detergent or water to come in contact with the spiral cable.
-
Do not turn the spiral cable quickly or beyond the limit number of turns (approximately 2.5 turns from the neutral position), this may cause the cable to snap.

INSTALLATION
Installation is in the reverse order of removal.
-
The turn signal lever must be in the neutral position for spiral cable installation.
-
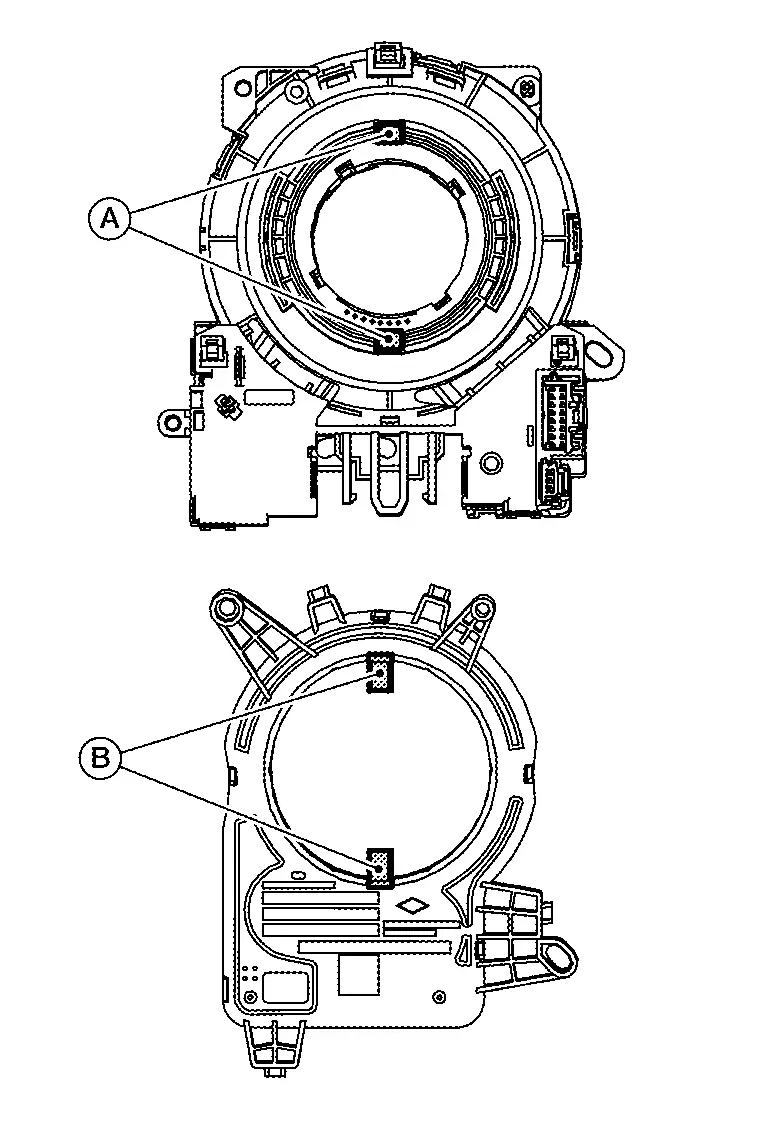
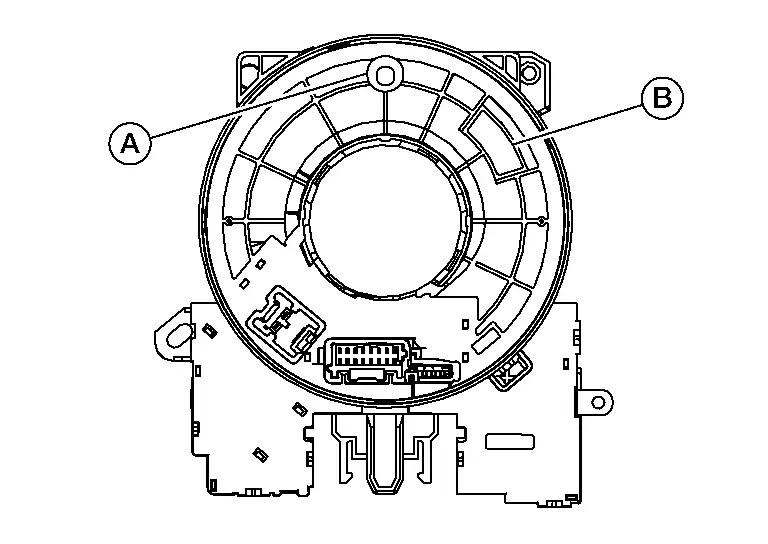
When installing the steering angle sensor to the spiral cable, make sure the spiral cable notch (A) is aligned with notch (B) of the steering angle sensor.
-
Set the spiral cable neutral position by carefully turning the spiral cable clockwise to the end position. Turn the spiral cable counterclockwise 2.5 turns stopping when the locating pin (A) is at the top most position and the clear window (B) appears yellow.
 NOTE:
NOTE:
-
If a new part is installed, the neutral position is already set with a lock pin in place and should not be adjusted after the lock pin is removed. Make sure the lock pin is removed after the steering column covers are installed but before the steering wheel is installed.
-
Snap off lock pin (A) from the spiral cable (1) in the direction shown to remove lock pin.
 NOTE:
NOTE:
Spiral cable removed for clarity.
-
-
During steering wheel installation, make sure the spiral cable locating pin (A) is aligned with slot (B) on back of steering wheel.
-
Perform the neutral position adjustment for the steering angle sensor. Refer to Description.
CAUTION:
-
The spiral cable may snap during steering operation if the spiral cable is installed in an improper position.
-
Do not overturn the spiral cable or go beyond the maximum number of turns allowed. This will cause the cable to snap.
-
The turn signal lever must be in the neutral position for spiral cable installation.
-
Do not apply lubricant to the spiral cable.
-
Do not allow oil, grease, detergent or water to come in contact with the spiral cable.
-
After the work is completed, check that no system malfunction is detected by air bag warning lamp.
-
If a malfunction is detected by the air bag warning lamp after repair or replacement of the malfunctioning parts, perform the SRS final check. Refer to SRS Final Check.
Front Passenger Air Bag Module Nissan Pathfinder SUV
Exploded View
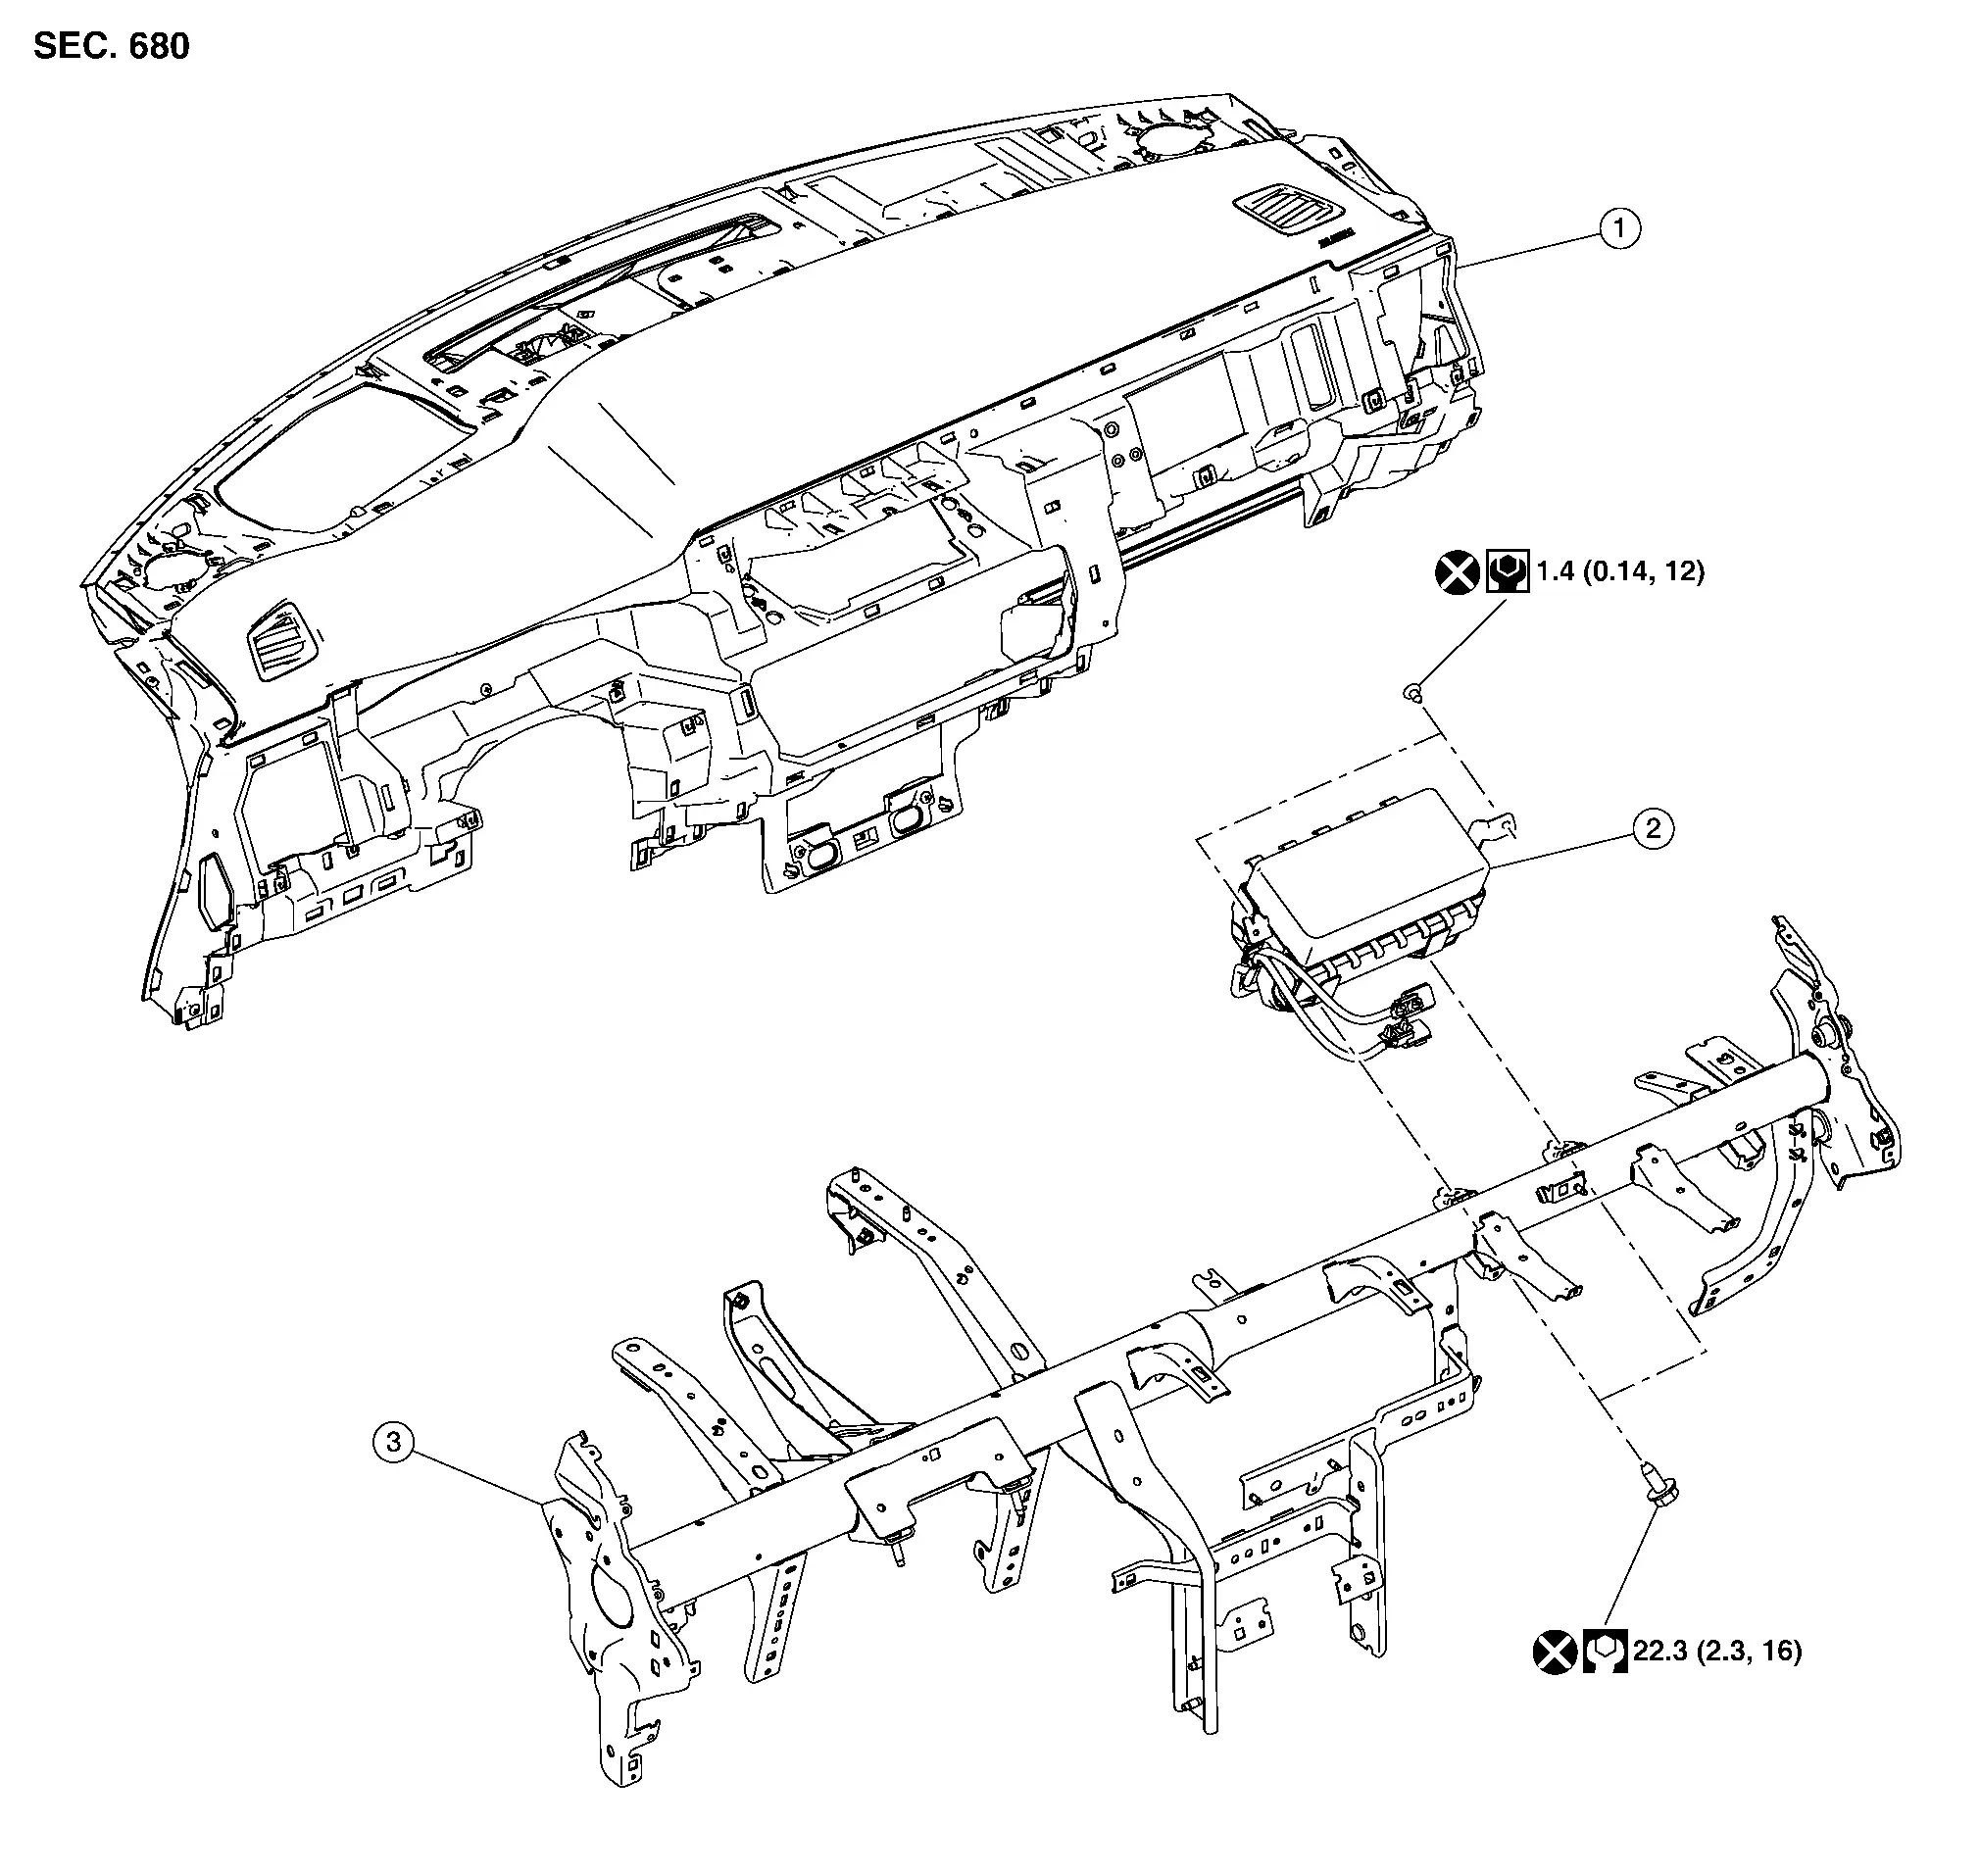
| 1. | Instrument panel assembly | 2. | Front passenger air bag module | 3. | Steering member assembly |
Removal and Installation
WARNING:
-
Before servicing, place the ignition switch in the OFF position, disconnect main battery negative terminal and wait for 3 minutes or more (discharges electricity held in the additional power supply circuit of the air bag diagnosis sensor unit).
-
Always work from the side of air bag module. Do not work in front of it.
-
Do not use air tools or electric tools for servicing.
-
Do not cause impact to the front passenger air bag module by dropping etc. Replace the front passenger air bag module if it has been dropped or sustained an impact.
REMOVAL
Disconnect negative terminals, then wait at least three minutes. Refer to Battery Disconnect.
Remove the instrument panel assembly. Refer to Removal and Installation.
Remove the harness attachments from the instrument panel assembly.
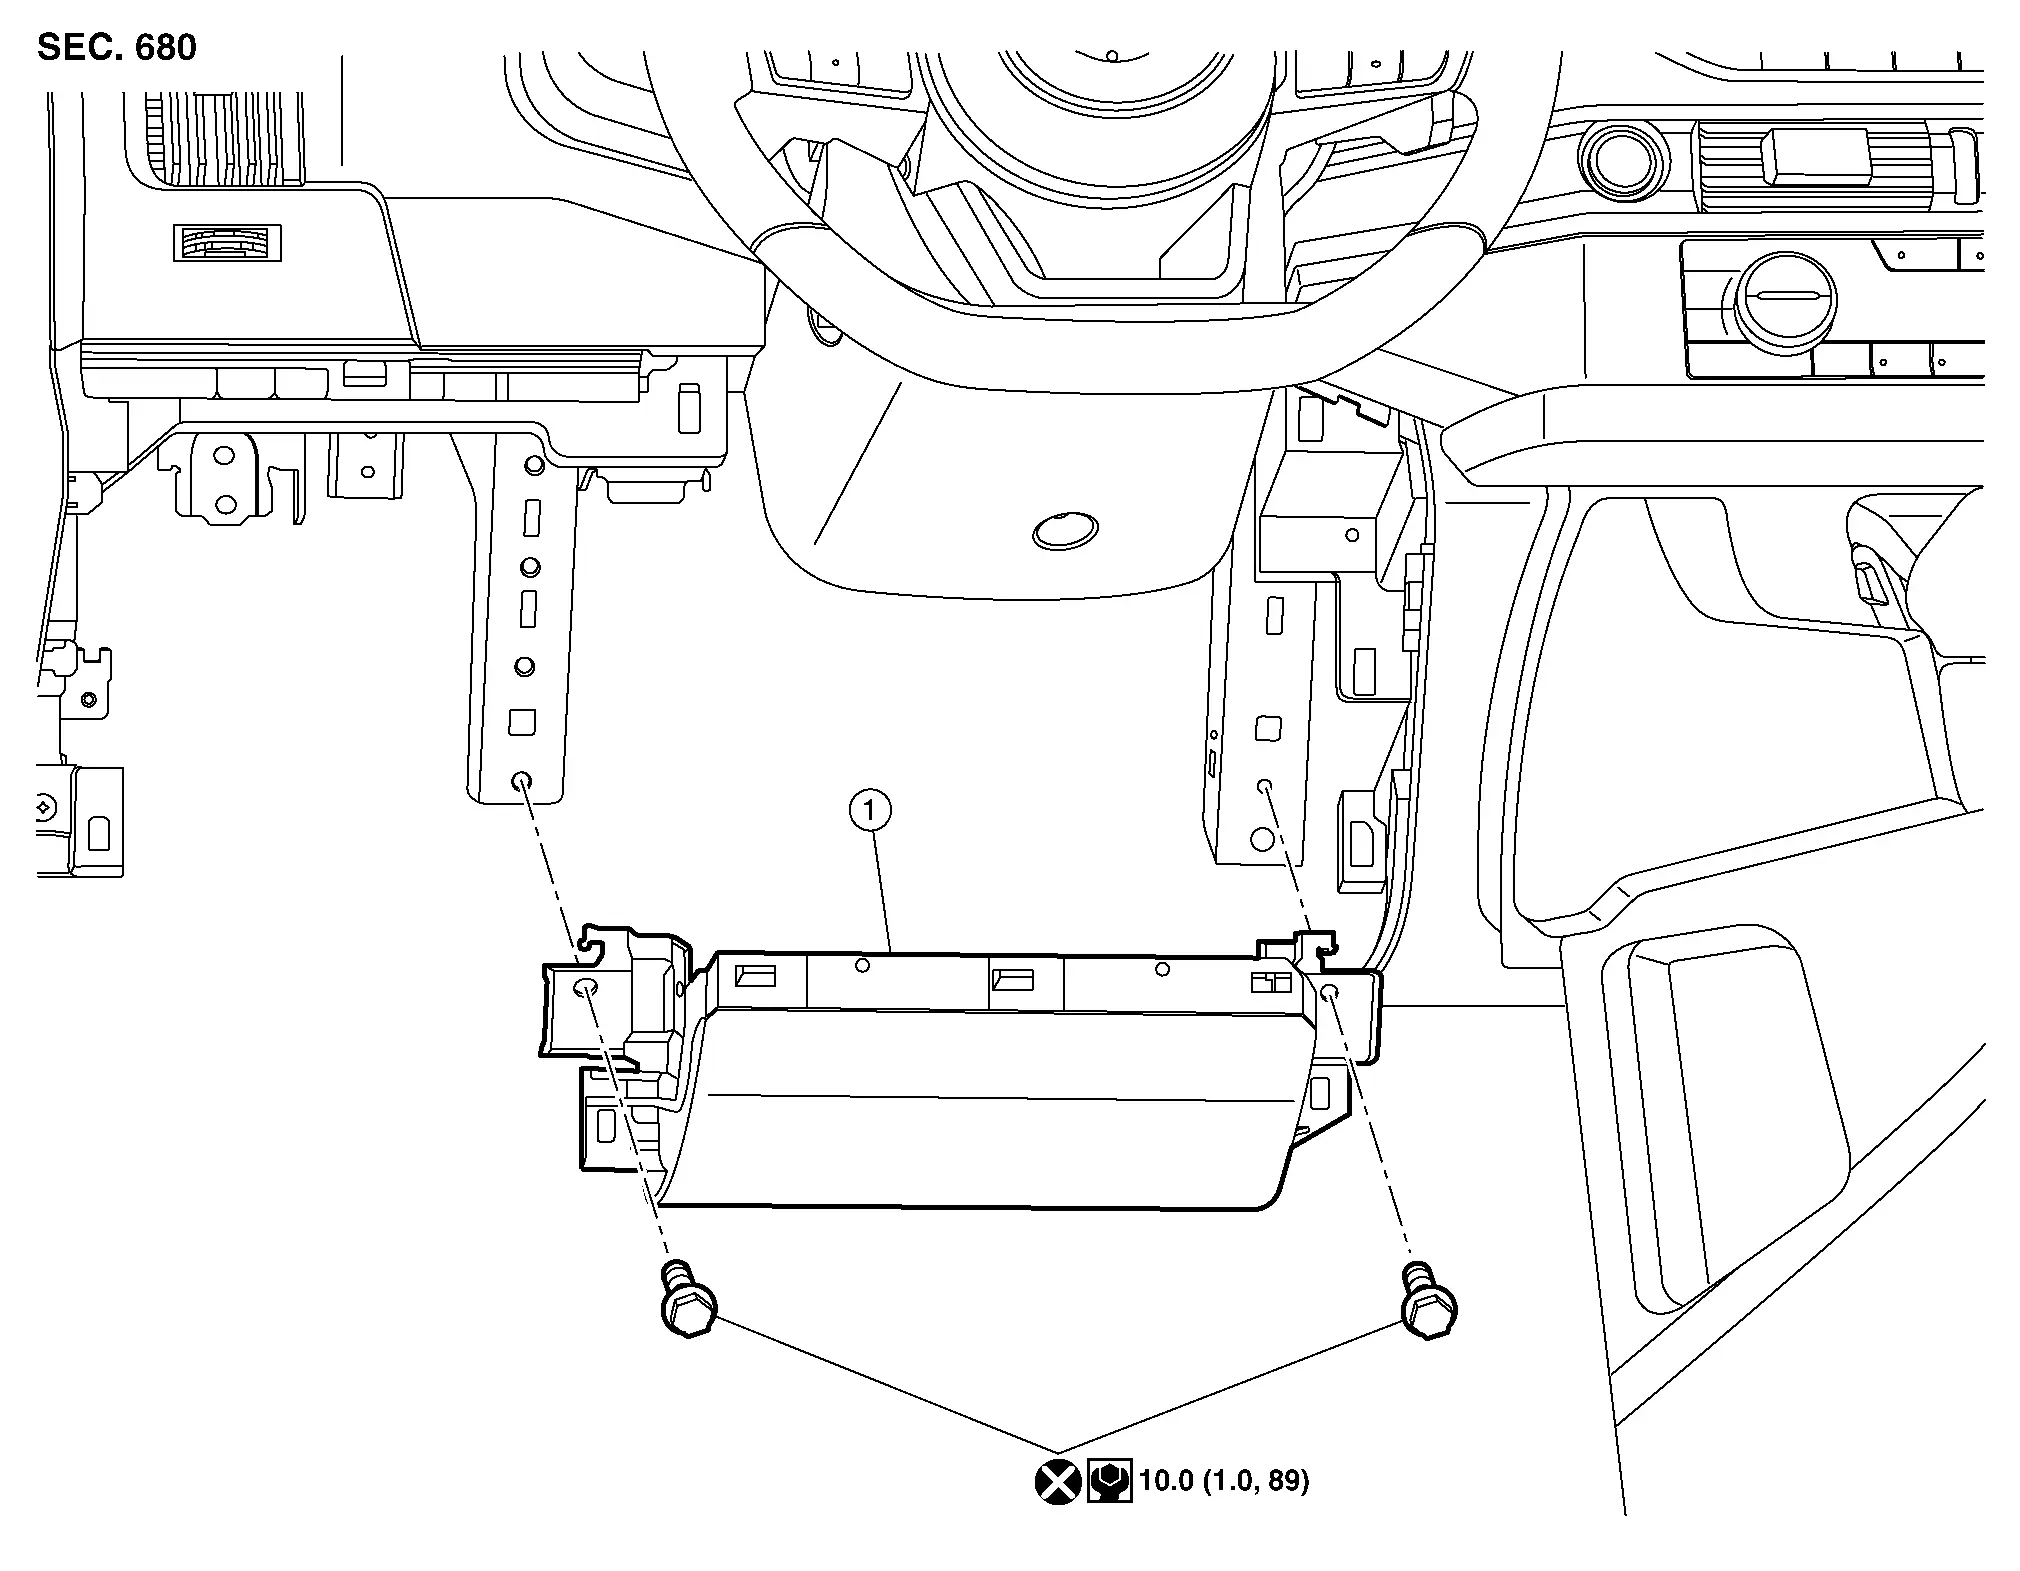
Remove the front passenger air bag module screws.
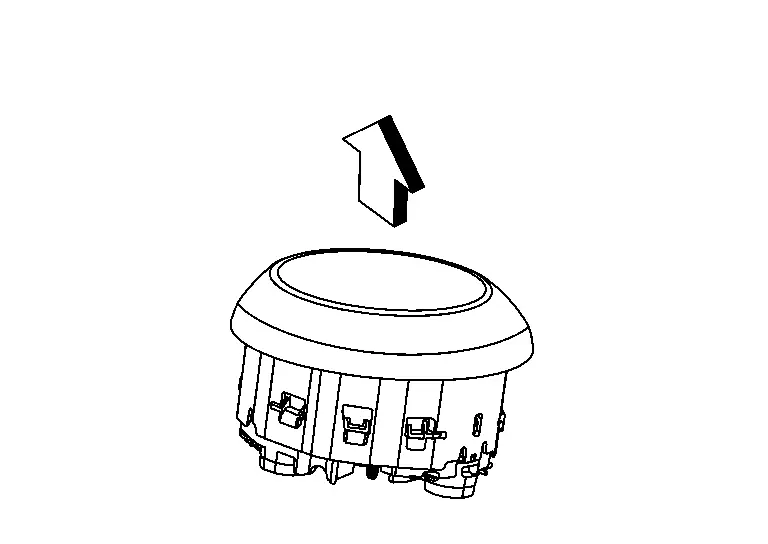
Remove the front passenger air bag module (1) from the instrument panel assembly in the order shown.
CAUTION:
-
Always place the front passenger air bag module with the pad side facing upward as shown.
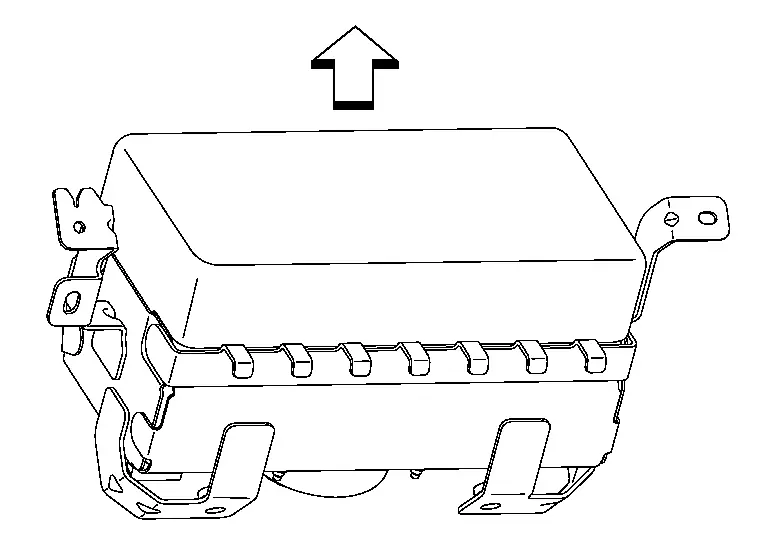

: Upward -
Replace the front passenger air bag module if it has been dropped or sustained an impact.

-
Do not strike the front passenger air bag module.
-
Do not insert any foreign objects (screwdriver, etc.) into the front passenger air bag module.
-
Do not disassemble the front passenger air bag module.
-
Do not expose the front passenger air bag module to temperatures exceeding 90 °C (194 °F).
-
Do not allow oil, grease, detergent, or water to come in contact with the front passenger air bag module.
INSTALLATION
Installation is in the reverse order of removal.
CAUTION:
-
Do not reuse the front passenger air bag module bolts and screws.
-
Do not damage the front passenger air bag module harness during installation.
-
After installation is complete, check that no system malfunction is detected causing the air bag warning lamp to illuminate.
-
If a malfunction is indicated by the air bag warning lamp after repair or replacement of the malfunctioning parts, perform the SRS final check. Refer to SRS Final Check.
Knee Air Bag Module Lh Nissan Pathfinder 5th Gen
Exploded View
| 1. | Knee air bag module LH |
Removal and Installation
WARNING:
-
Before servicing, place the ignition switch in the OFF position, disconnect main battery negative terminal and wait for 3 minutes or more (discharges electricity held in the additional power supply circuit of the air bag diagnosis sensor unit).
-
Always work from the side of the knee air bag module LH. Do not work in front of it.
-
Do not use air tools or electric tools for servicing the knee air bag module LH.
-
Always place the left knee air bag module with the pad side facing upward.
-
Do not cause impact to the knee air bag module LH by dropping, etc. Replace the left knee air bag module if it has been dropped or sustained an impact.
-
Do not allow oil, grease, detergent, or water to come in contact with the knee air bag module LH.
Removal
Disconnect negative battery terminals, then wait at least three minutes. Refer to Battery Disconnect.
Remove the instrument lower panel LH. Refer to Removal and Installation.
Remove the bolts from the knee air bag module LH. Refer to Exploded View.
Disconnect the harness connector and release harness retainer from the knee air bag module LH.
CAUTION:
-
For removing the knee air bag module LH harness connector, lift tabs to release the lock and remove the harness connector.
-
For installing the harness connector, align the connector to the connector housing, then press firmly on the connector until the locking tabs are engaged.
Remove knee air bag module LH.
CAUTION:
-
Always place the knee air bag module LH with the pad side facing upward.
-
Do not strike or impact the knee air bag module LH.
-
Replace the knee air bag module LH if it has been dropped or sustained an impact.
-
Do not insert any foreign objects (screwdriver, etc.) into the knee air bag module LH.
-
Do not disassemble the knee air bag module LH.
-
Do not expose the knee air bag module LH to temperatures exceeding 93°C (199°F).
-
Do not allow oil, grease, detergent, or water to come in contact with the left knee air bag module.
INSTALLATION
Installation is in the reverse order of removal.
-
When installing the knee air bag module LH, hand-tighten the bolts first before tightening to specification.
CAUTION:
-
Do not damage the harness while installing the knee air bag module LH.
-
After installation is complete, check that no system malfunction is detected causing the air bag warning lamp to illuminate.
-
If a malfunction is indicated by the air bag warning lamp after repair or replacement of the malfunctioning parts, perform the SRS final check. Refer to SRS Final Check.
Side Curtain Air Bag Module Nissan Pathfinder 5th Gen
Exploded View
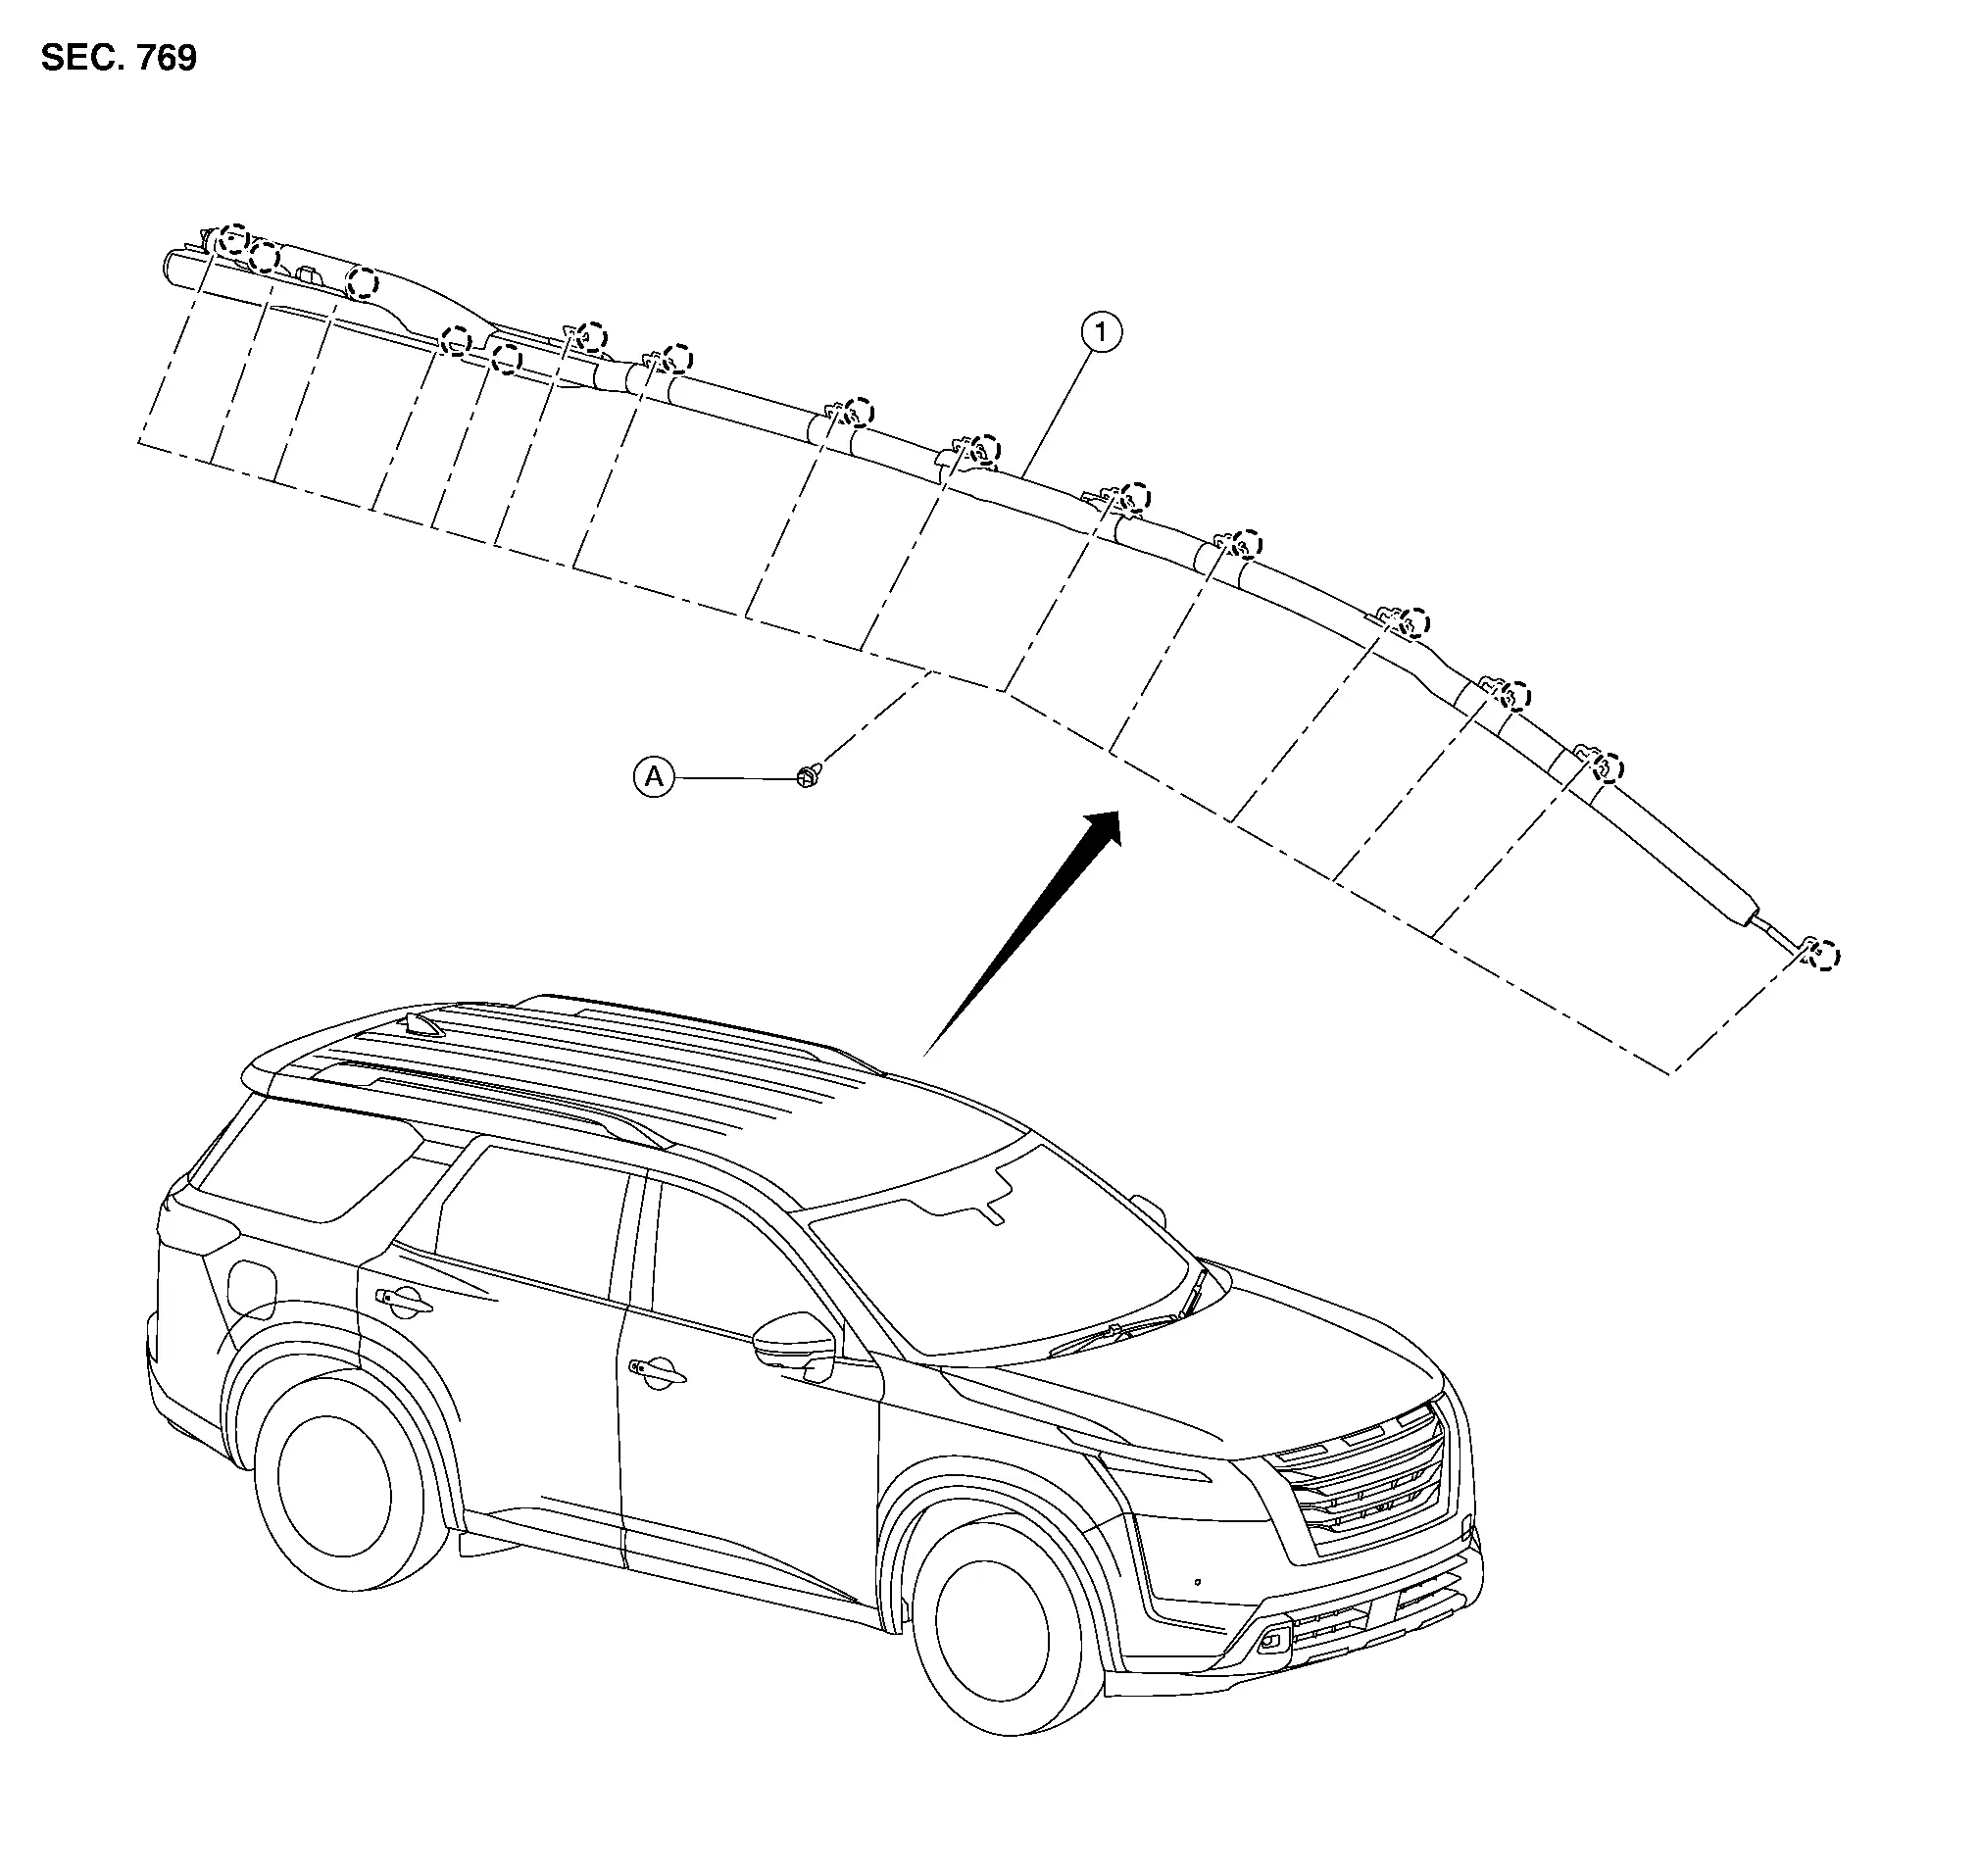
| 1. | Side curtain air bag module | A. | Refer to Removal and Installation. |
 |
Pawl |
 NOTE:
NOTE:
LH side shown, RH side similar.
Removal and Installation
WARNING:
-
Before servicing, place the ignition switch in the OFF position, disconnect main battery negative terminal and wait for 3 minutes or more (discharges electricity held in the additional power supply circuit of the air bag diagnosis sensor unit).
-
Always work from the side of air bag module. Do not work in front of it.
-
Do not use air tools or electric tools for servicing.
REMOVAL
Disconnect negative battery terminals, then wait at least three minutes. Refer to Battery Disconnect.
Remove the rear ventilator duct upper. Refer to Removal and Installation (RH) or Removal and Installation (LH).
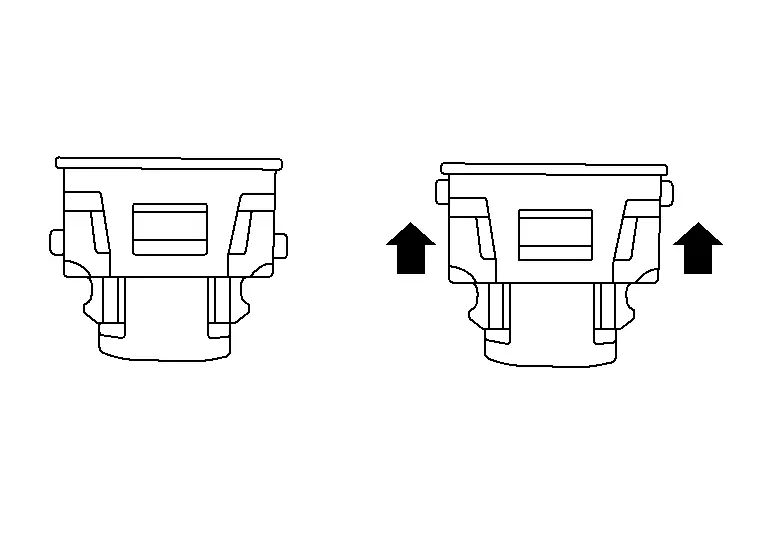
Disconnect the harness connector and release harness retainer from the side curtain air bag module.
CAUTION:
-
For removing the side curtain air bag module harness connector, lift tabs to release the lock and remove the harness connector.

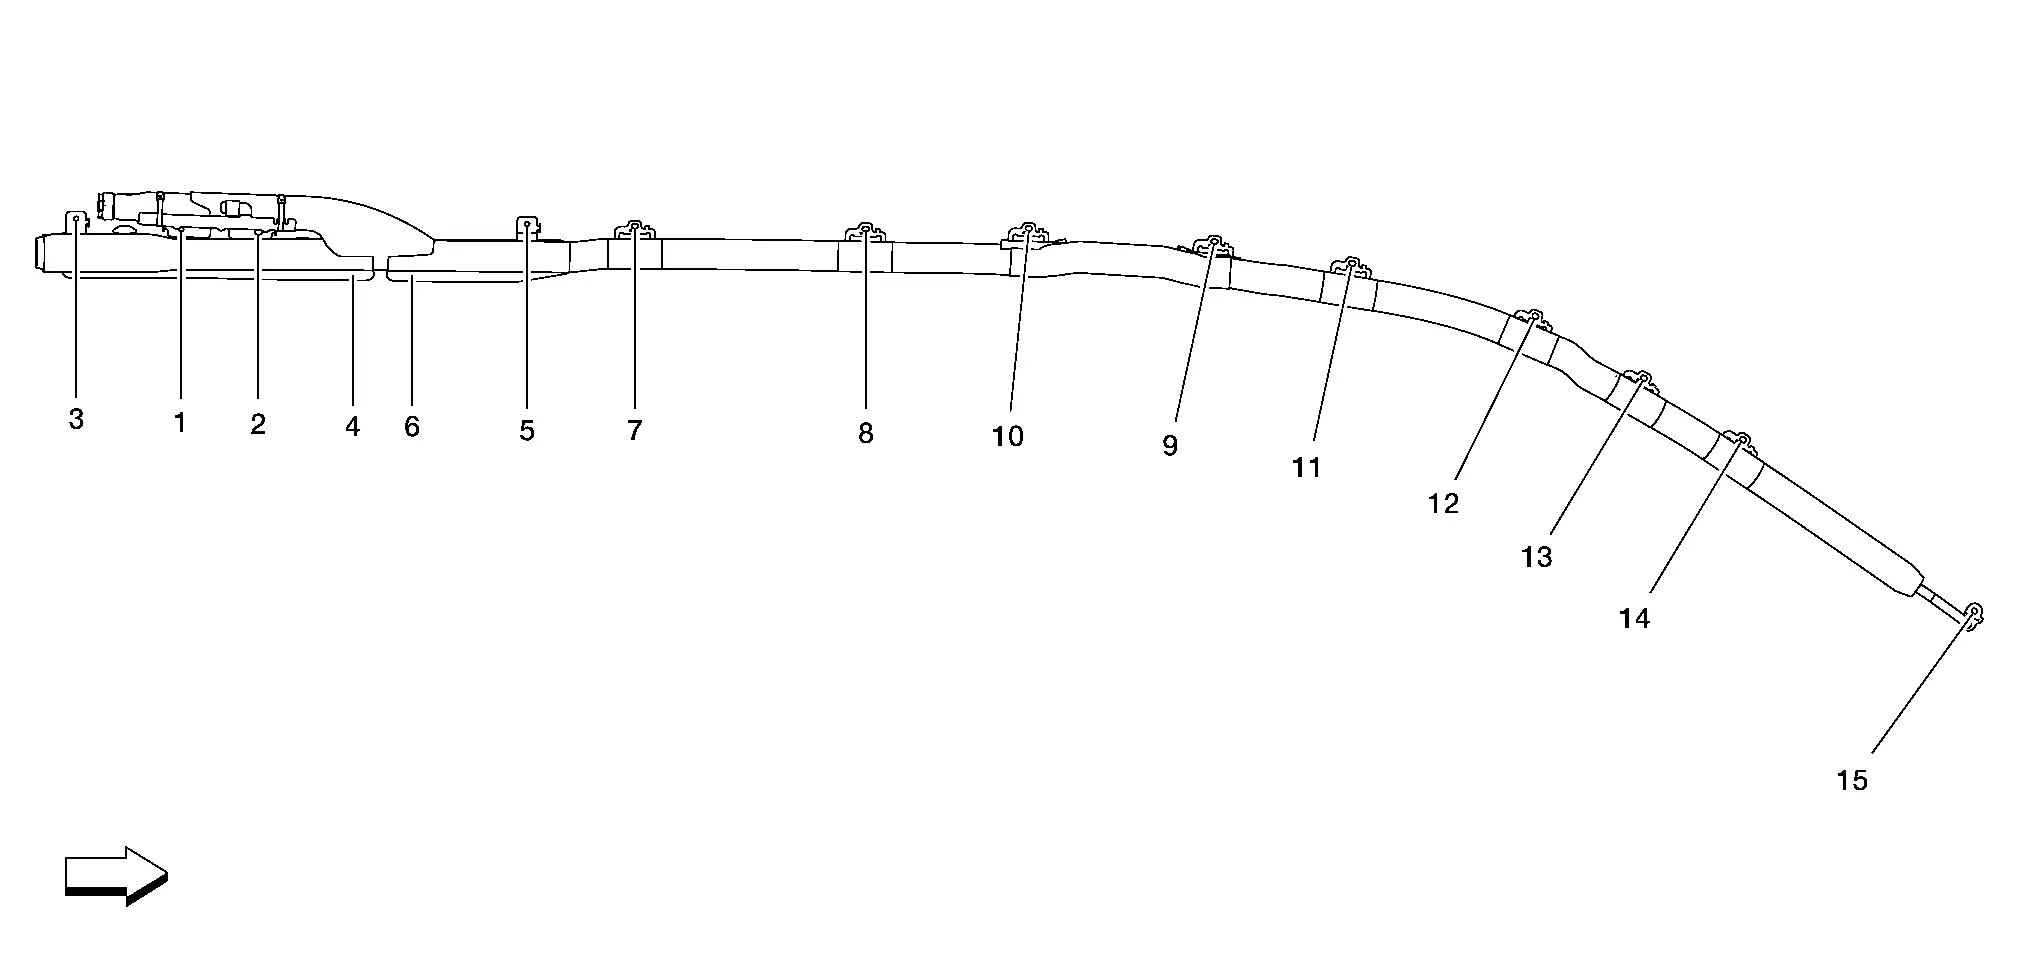
Remove the side curtain air bag module bolts, then remove the side curtain air bag module from the body slots in the order shown.
 |
: Front |
 NOTE:
NOTE:
LH shown, RH similar
CAUTION:
-
Replace the side curtain air bag module if it has been dropped or sustained an impact.
-
Do not strike the side curtain air bag module.
-
Do not insert any foreign objects (screwdriver, etc.) into the side curtain air bag module.
-
Do not disassemble the side curtain air bag module.
-
Do not expose the side curtain air bag module to temperatures exceeding 90 °C (194 °F).
-
Do not allow oil, grease, detergent or water to come in contact with the side curtain air bag module.
INSTALLATION
CAUTION:
-
Do not damage the harness while installing the side curtain air bag module.
-
Make sure that the side curtain air bag module bracket supporting hooks are securely seated into the body slots before releasing the side curtain air bag module during installation to avoid damaging the side curtain air bag module.
-
Make sure that the anti-twist stripe is visible along the entire length of the curtain air bag module.
-
Make sure the side curtain air bag module (1) is set below the assist grip bracket (A).

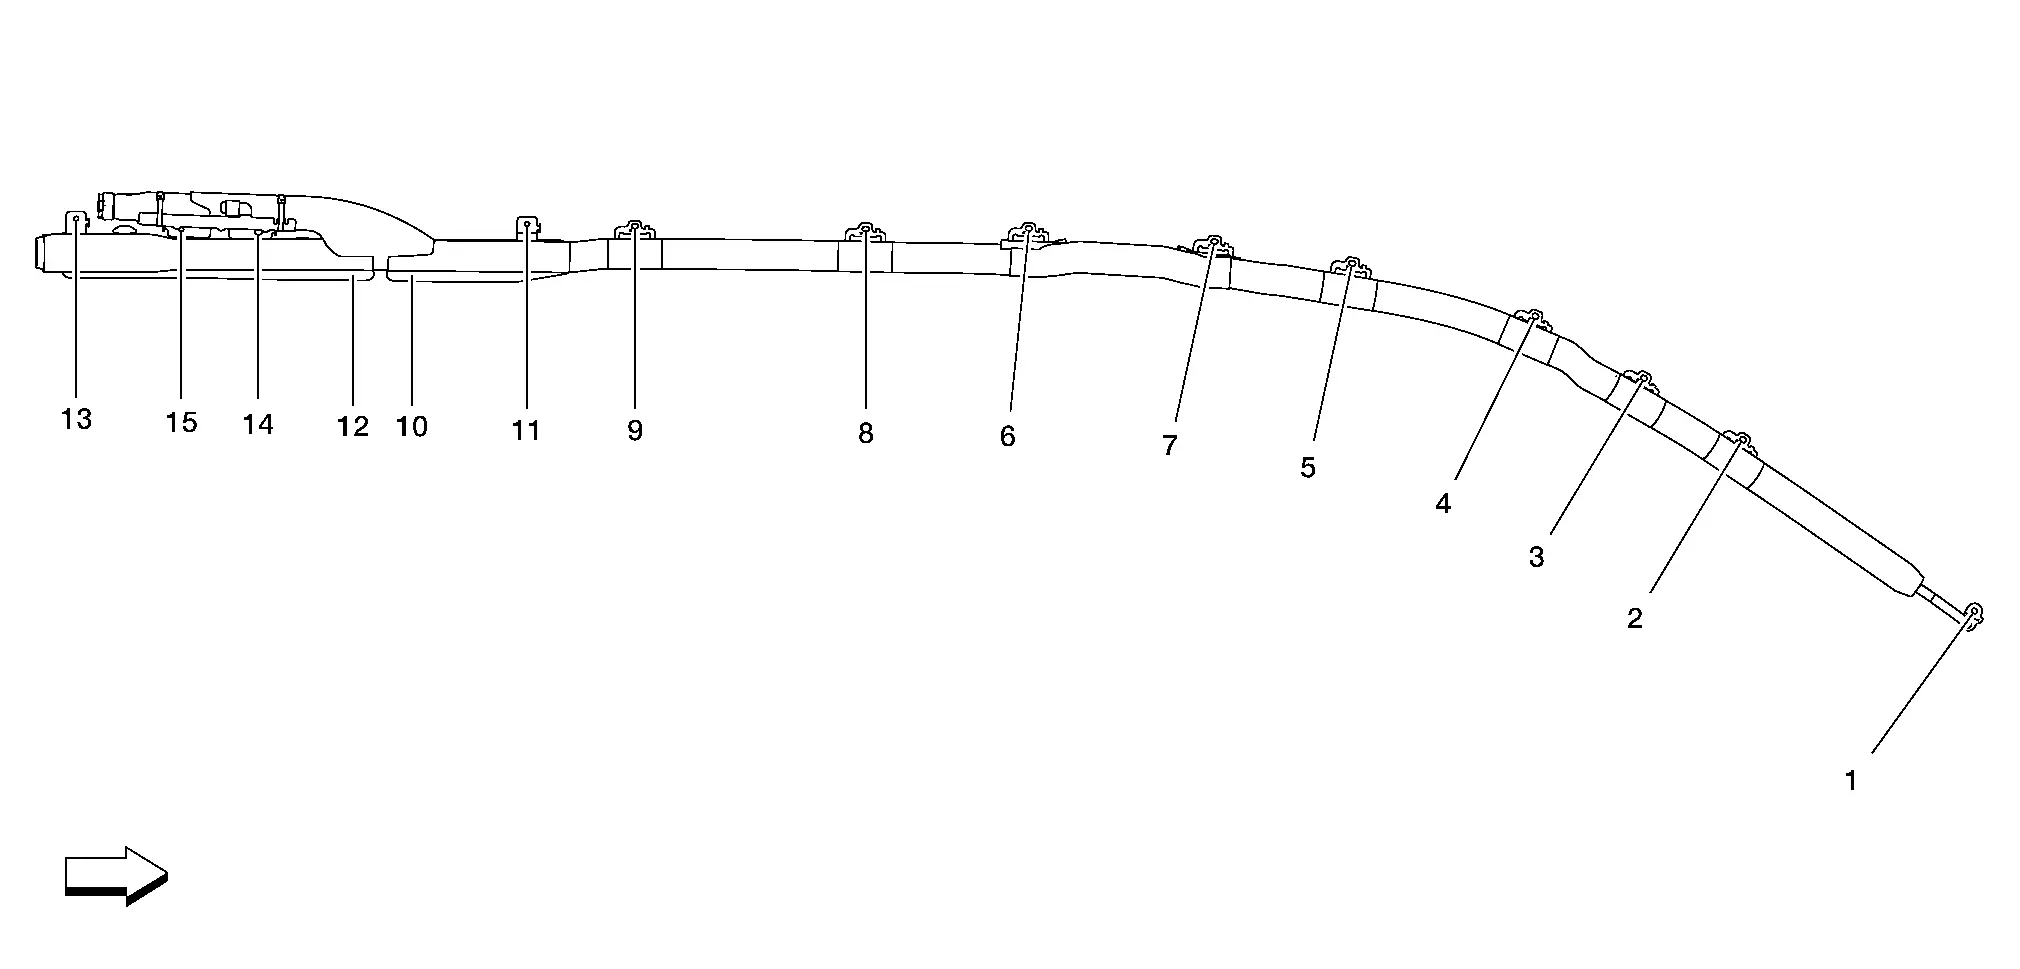
Install the side curtain air bag module in numerical order, using the following steps.
 |
: Front |
 NOTE:
NOTE:
LH shown, RH similar
| Step 1 | : No. 1 - 2 | Install supporting hooks |
| Step 2 | : No. 1 - 2 | 10.8 N·m (1.1 kg-m, 8 ft-lb) |
| Step 3 | : No. 3 - 14 | Install supporting hooks |
| Step 4 | : No. 3 - 14 | 10.8 N·m (1.1 kg-m, 8 ft-lb) |
| Step 5 | : No. 15 | Install supporting hook |
| Step 6 | : No. 15 | 10.8 N·m (1.1 kg-m, 8 ft-lb) |
Connect the harness connector to the side curtain air bag module.
CAUTION:
-
For installing the harness connector, align the connector to the connector housing, then press firmly on the connector until the locking tabs are engaged.
Installation of the remaining components is in the reverse order of removal.
CAUTION:
-
Do not jam the front tether strap (A) when installation the front pillar finisher.
 NOTE:
NOTE:
LH side shown; RH side similar.

: Front -
After installation is complete, check that no system malfunction is detected causing the air bag warning lamp to illuminate.
-
If a malfunction is indicated by the air bag warning lamp after repair or replacement of the malfunctioning parts, perform the SRS final check. Refer to SRS Final Check.
Front Side Air Bag Module Nissan Pathfinder 2026
Exploded View
For exploded view of the front side air bag module. Refer to Exploded View.
Removal and Installation
For removal and installation of the front side air bag module. Refer to Seatback.
Rear Side Air Bag Module Nissan Pathfinder SUV
Exploded View
For exploded view of the rear side air bag module. Refer to Exploded View.
Removal and Installation
REMOVAL
CAUTION:
-
Before servicing, place the ignition switch in the OFF position, disconnect main battery negative terminal and wait for 3 minutes or more (discharges electricity held in the additional power supply circuit of the air bag diagnosis sensor unit).
-
Always work from the side or back of the seatback, do not work in front of seat.
-
Do not use air tools or electric tools for servicing the seat assembly.
-
Do not insert any objects into the rear side air bag module.
-
Do not attempt to disassemble the rear side air bag module.
-
Do not expose the rear side air bag module to temperatures exceeding 90°C (194°F).
-
Do not expose the rear side air bag module to any oil, grease, detergent or water.
-
During disassembly, do not damage the seatback board, connectors, retainers, clips, module harness or the side air bag module.
 NOTE:
NOTE:
If the vehicle has been involved in a collision and the rear side air bag module has deployed, the seatback must be replaced.
Remove the second row seat cushion. Refer to Seat Cushion (Seat RH), Seat Cushion (Captain seat LH), or Seat Cushion (Bench seat LH).
 NOTE:
NOTE:
It is not necessary to separate the seat cushion trim from the seat cushion pad.
Remove the second row seatback. Refer to Seatback (Seat RH), Seatback (Captain seat LH), or Seatback (Bench seat LH).
 NOTE:
NOTE:
It is not necessary to separate the seatback trim from the seatback pad.
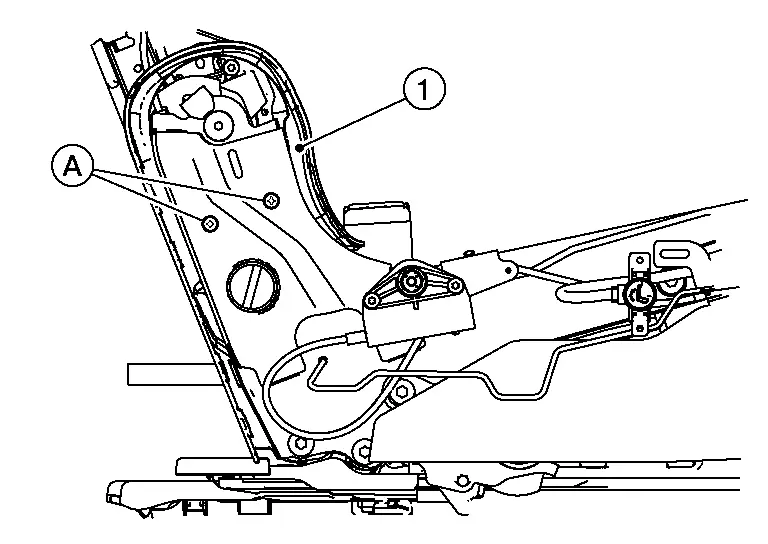
Remove screws (A) and remove the seat cushion inner finisher (1) to access the rear side air bag module harness.
 NOTE:
NOTE:
Seat RH shown; captain seat LH and bench seat LH similar.
Using a suitable tool, release the rear side air bag module harness retainers from the seat frame assembly.
Remove the rear side air bag module.
CAUTION:
-
Replace the rear side air bag module if it has been dropped or sustained an impact.

-
Do not strike the rear side air bag module.
INSTALLATION
Installation is in the reverse order of removal.
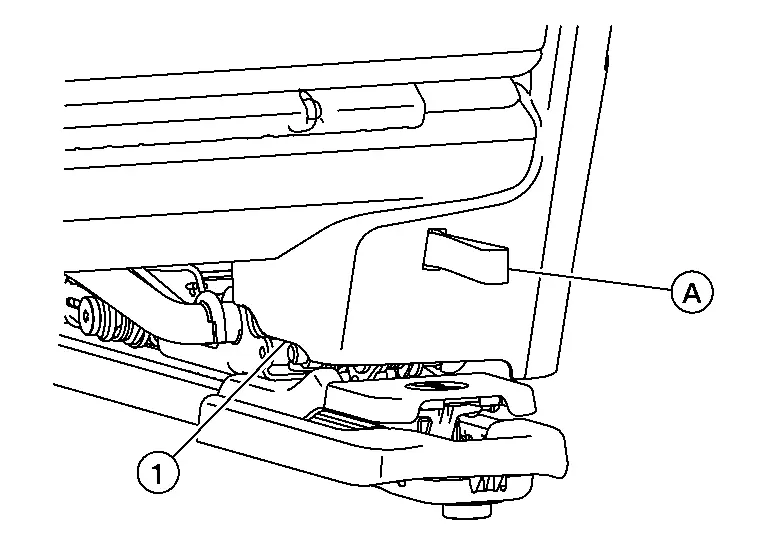
Make sure the recline release cable assembly strap (A) is routed through the seat cushion inner finisher (1).
 NOTE:
NOTE:
Seat RH shown; captain seat LH and bench seat LH similar.
Crash Zone Sensor Nissan Pathfinder
Exploded View
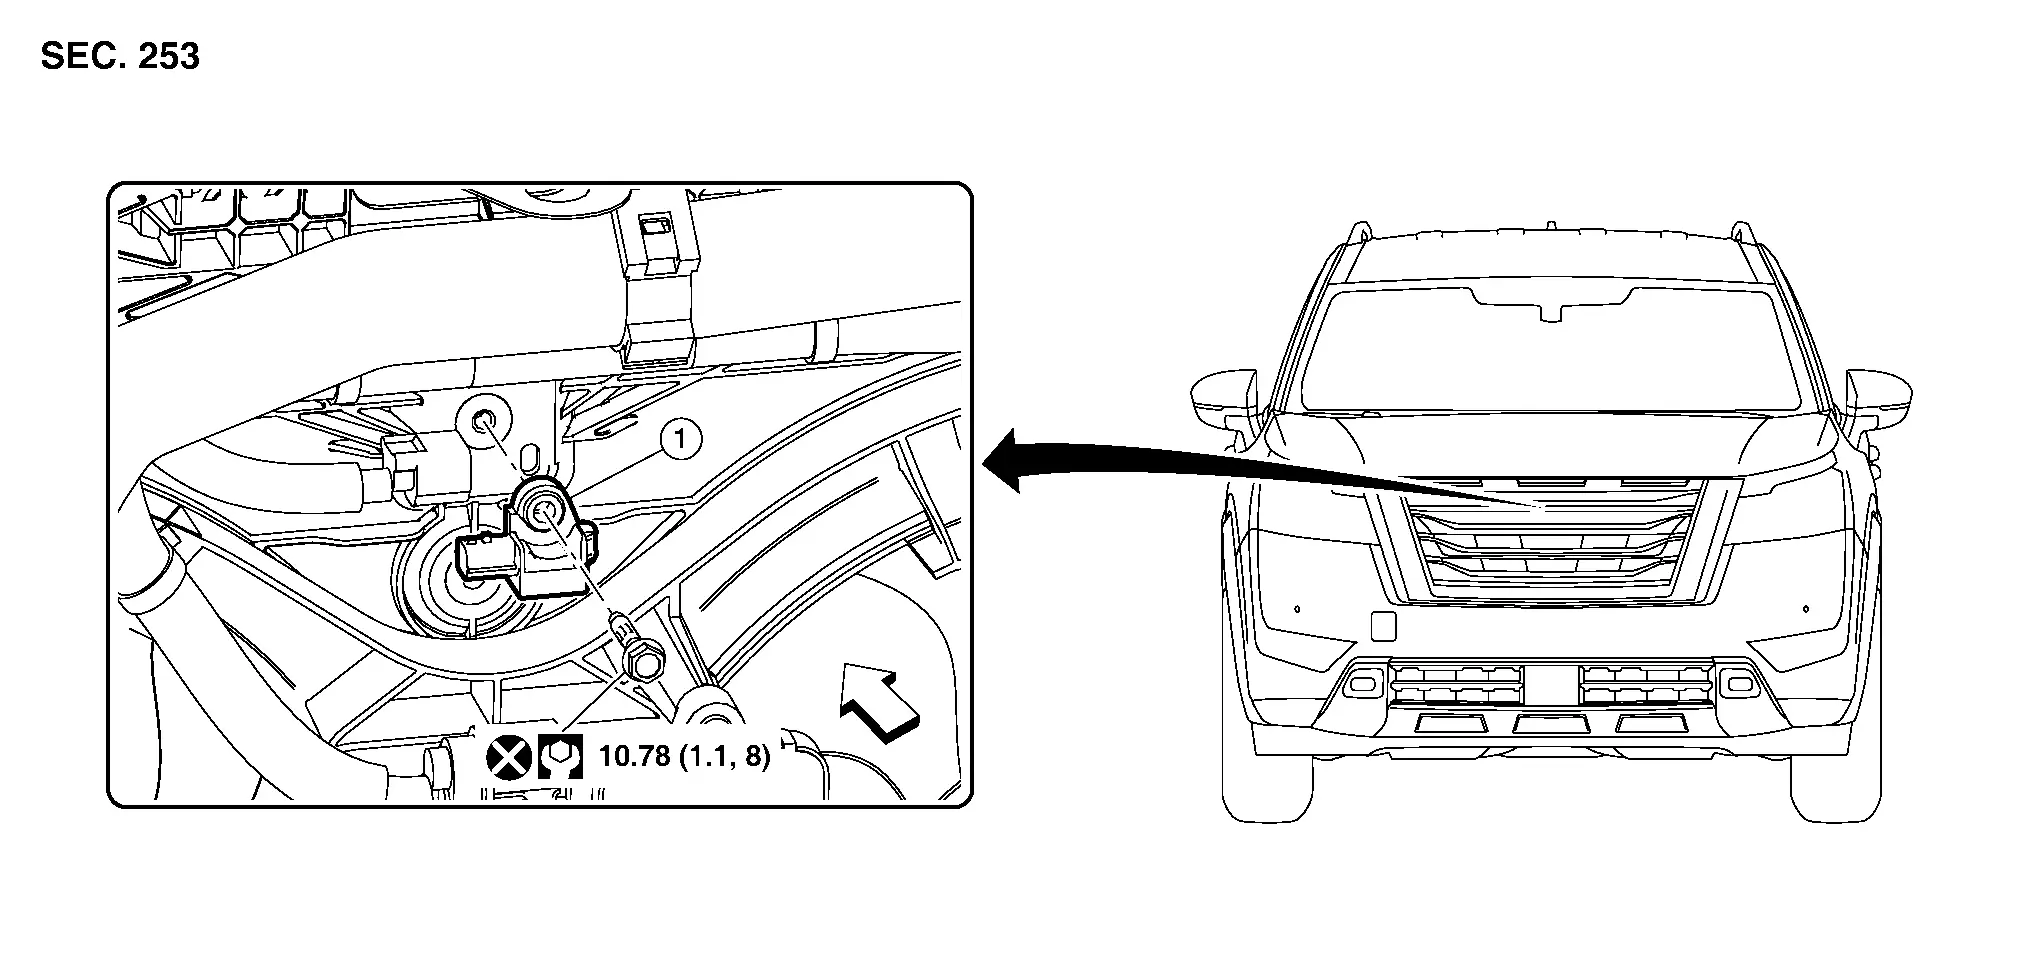
| 1. | Crash zone sensor |
 |
Front |
Removal and Installation
WARNING:
-
Before servicing, place the ignition switch in the OFF position, disconnect main battery negative terminal and wait for 3 minutes or more (discharges electricity held in the additional power supply circuit of the air bag diagnosis sensor unit).
-
Do not use air tools or electric tools for servicing.
REMOVAL
Disconnect negative battery terminals, then wait at least three minutes. Refer to Battery Disconnect.
Remove the front air duct. Refer to Removal and Installation.
Disconnect the harness connector from the crash zone sensor.
Remove the crash zone sensor bolt.
CAUTION:
Do not reuse the crash zone sensor bolt.
Remove the crash zone sensor.
CAUTION:
-
Replace the crash zone sensor if it has been dropped or sustained an impact.
-
Do not strike the crash zone sensor.
-
Replace the crash zone sensor if either the driver air bag or the front passenger air bag has been deployed.
INSTALLATION
Installation is in the reverse order of removal.
CAUTION:
-
Do not reuse the crash zone sensor bolt.
-
Do not damage the harness connector during installation.
-
After installation is complete, check that no system malfunction is detected causing the air bag warning lamp to illuminate.
-
If a malfunction is indicated by the air bag warning lamp after repair or replacement of the malfunctioning parts, perform the SRS final check. Refer to SRS Final Check.
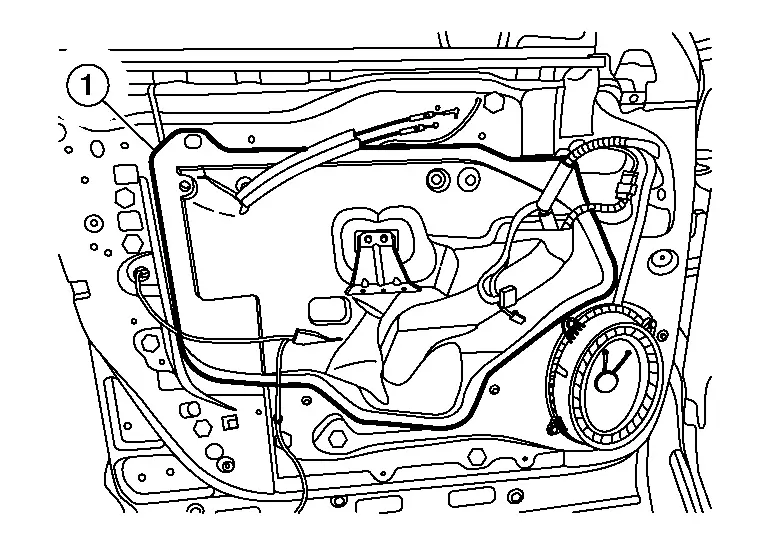
Front Door Satellite Sensor Nissan Pathfinder Fifth generation
Exploded View
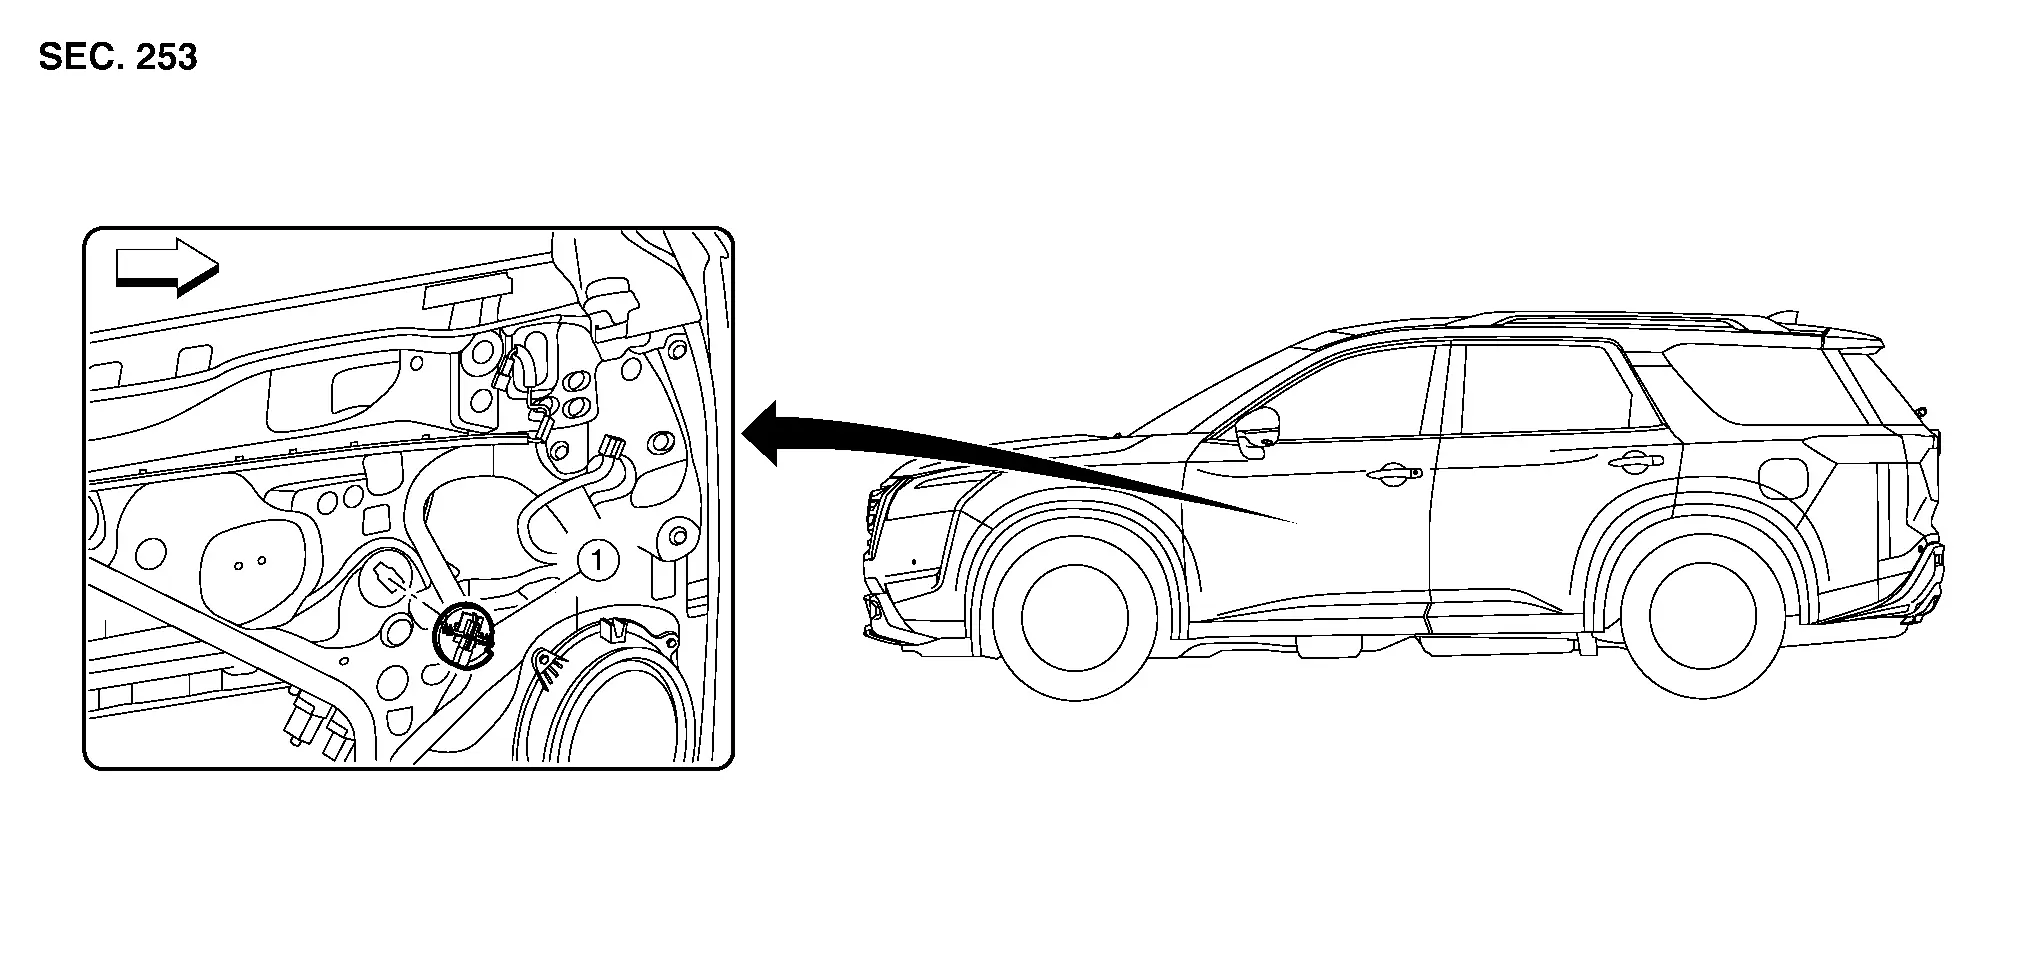
| 1. | Front door air bag satellite sensor |
 |
Front |
 NOTE:
NOTE:
LH side shown; RH side similar
Removal and Installation
WARNING:
-
Before servicing, place the ignition switch in the OFF position, disconnect main battery negative terminal and wait for 3 minutes or more (discharges electricity held in the additional power supply circuit of the air bag diagnosis sensor unit).
-
Do not use air tools or electric tools for servicing the front door satellite sensor.
-
Do not strike the front door satellite sensor.
-
Replace the front door satellite sensor if it has been dropped or sustained an impact.
-
Replace the front door satellite sensor if either the front side air bag module, rear side air bag module, or side curtain air bag module has been deployed.
REMOVAL
Disconnect negative battery terminals, then wait at least three minutes. Refer to Battery Disconnect.
Remove the front door finisher. Refer to Removal and Installation.
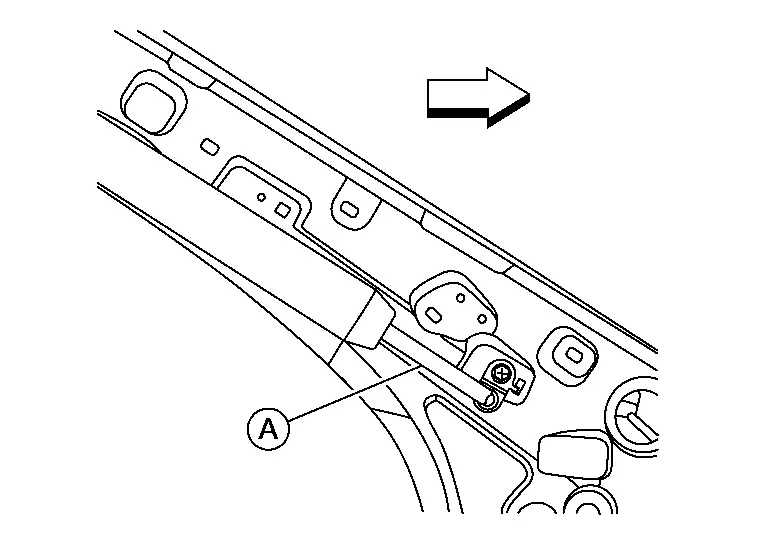
Remove the front door vapor barrier (1) to access the front door satellite sensor.
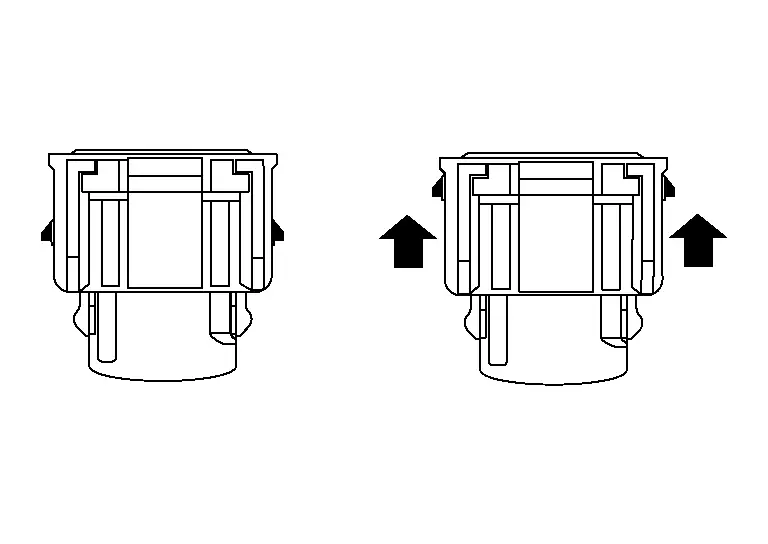
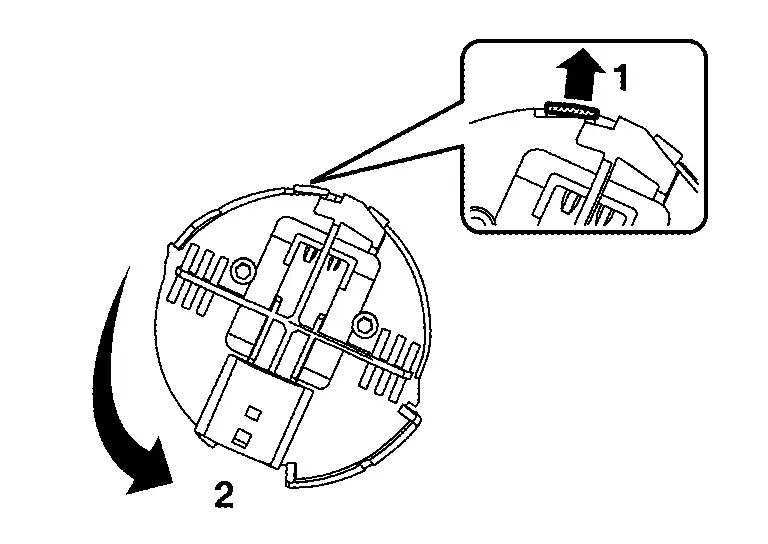
Disconnect the harness connector from the front door satellite sensor.
While pushing the lock pin, rotate the front door satellite sensor counter-clockwise in the direction shown and remove.
CAUTION:
-
Do not strike the front door satellite sensor.
-
Replace the front door satellite sensor if it has been dropped or sustained an impact.
INSTALLATION
Position the front door satellite sensor on the door with the connector surface in the 5 O’clock position.
 NOTE:
NOTE:
Make sure the front door satellite sensor is in the unlocked position before installing the front door satellite sensor to the door.
Rotate the front door satellite sensor clockwise.
 NOTE:
NOTE:
Verify the lock pin locked the front door satellite sensor with the connector surface in the 7 O’clock position.
Connect the harness connector to the front door satellite sensor.
CAUTION:
Do not allow foreign materials to come in contact with harness connector terminals.
Installation of the remaining components is in the reverse order of removal.
CAUTION:
-
Do not damage the harness connector during installation.
-
After installation is complete, check that no system malfunction is detected causing the air bag warning lamp to illuminate.
-
If a malfunction is indicated by the air bag warning lamp after repair or replacement of the malfunctioning parts, perform the SRS final check. Refer to SRS Final Check.
Rear Side Air Bag Satellite Sensor Nissan Pathfinder 2022
Exploded View
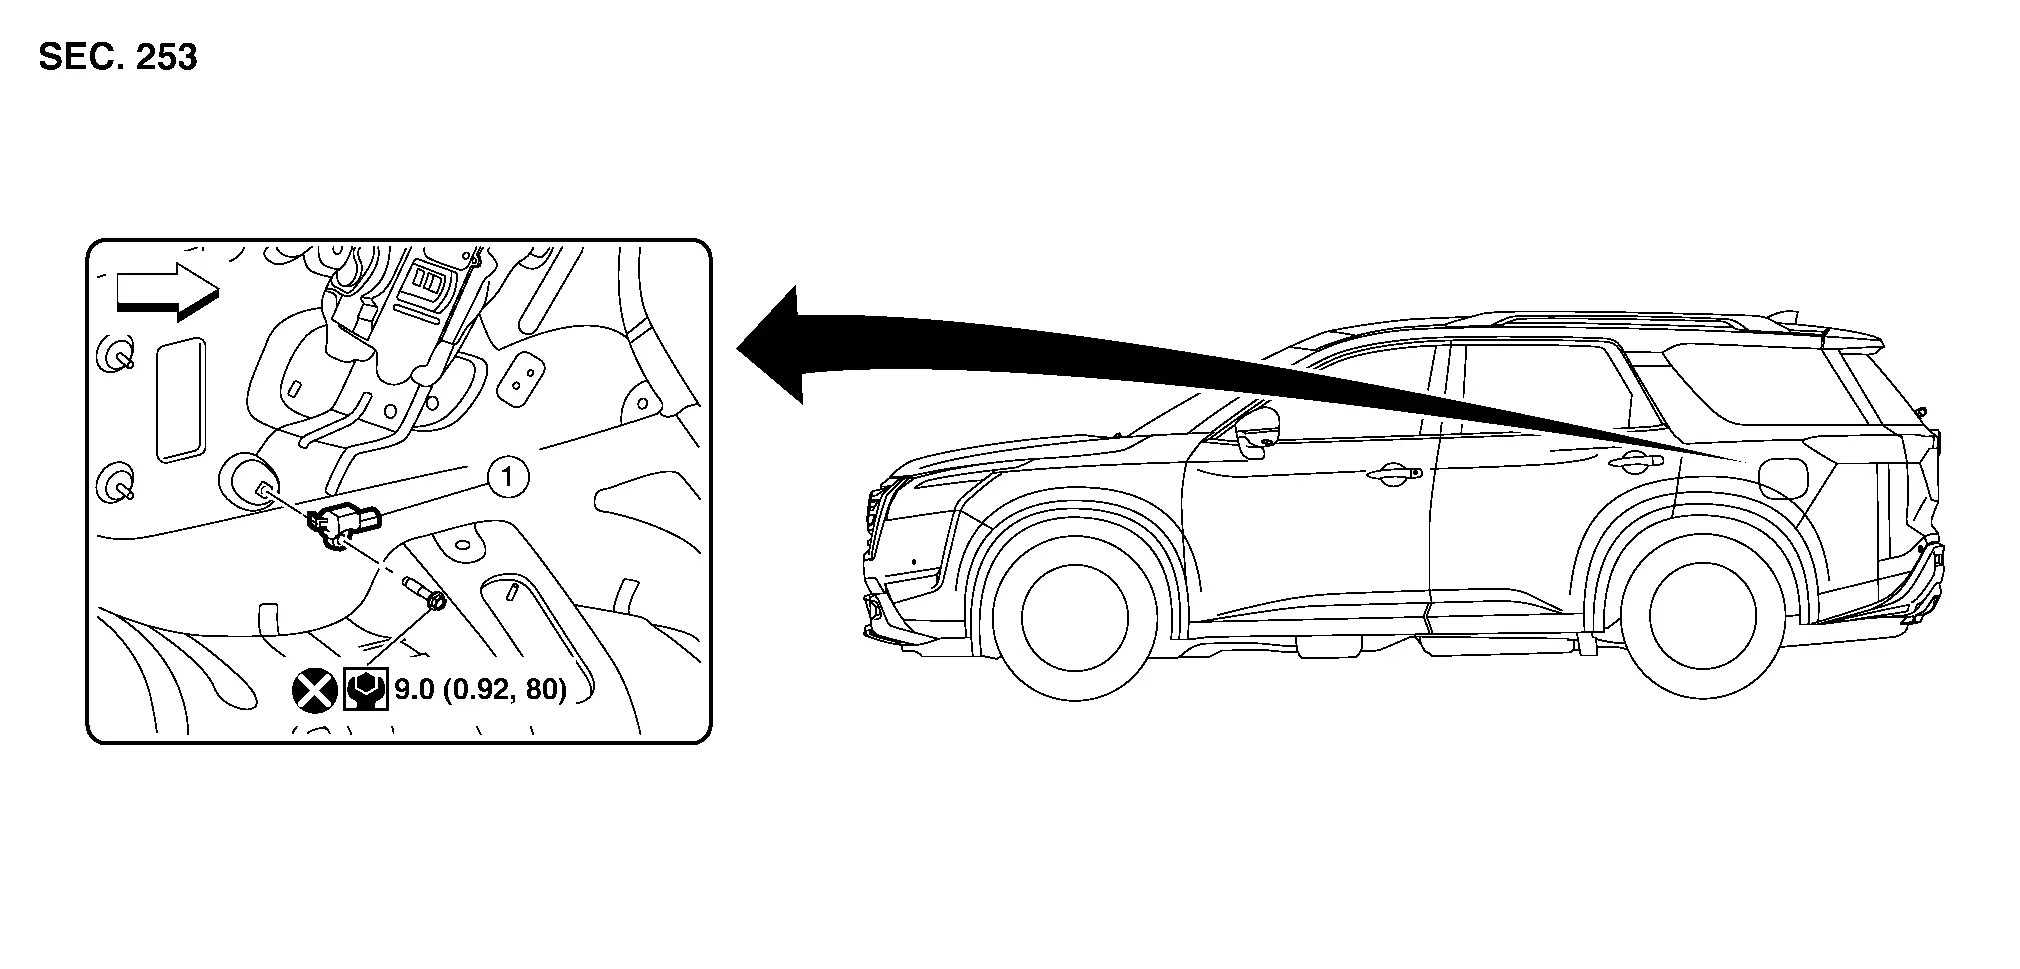
| 1. | Rear side air bag satellite sensor |
 |
Front |
 NOTE:
NOTE:
LH side shown; RH side similar
Removal and Installation
WARNING:
-
Before servicing, place the ignition switch in the OFF position, disconnect main battery negative terminal and wait for 3 minutes or more (discharges electricity held in the additional power supply circuit of the air bag diagnosis sensor unit).
-
Do not use air tools or electric tools for servicing.
REMOVAL
Disconnect negative battery terminals, then wait at least three minutes. Refer to Battery Disconnect.
Remove the luggage side lower finisher. Refer to Removal and Installation.
Remove the rear side air bag satellite sensor bolt.
CAUTION:
Do not reuse the rear side air bag satellite sensor bolt.
Disconnect the harness connector from the rear side air bag satellite sensor.
Remove the rear side air bag satellite sensor.
CAUTION:
-
Replace the rear side air bag satellite sensor if it has been dropped or sustained an impact.
-
Do not strike the rear side air bag satellite sensor.
INSTALLATION
Installation is in the reverse order of removal.
-
Position the rear side air bag satellite sensor using the pawl before tightening the bolt to specification.
CAUTION:
-
Do not reuse the rear side air bag satellite sensor bolt.
-
Do not damage the harness connector during installation.
-
After installation is complete, check that no system malfunction is detected causing the air bag warning lamp to illuminate.
-
If a malfunction is indicated by the air bag warning lamp after repair or replacement of the malfunctioning parts, perform the SRS final check. Refer to SRS Final Check.
Air Bag Diagnosis Sensor Unit Nissan Pathfinder
Exploded View
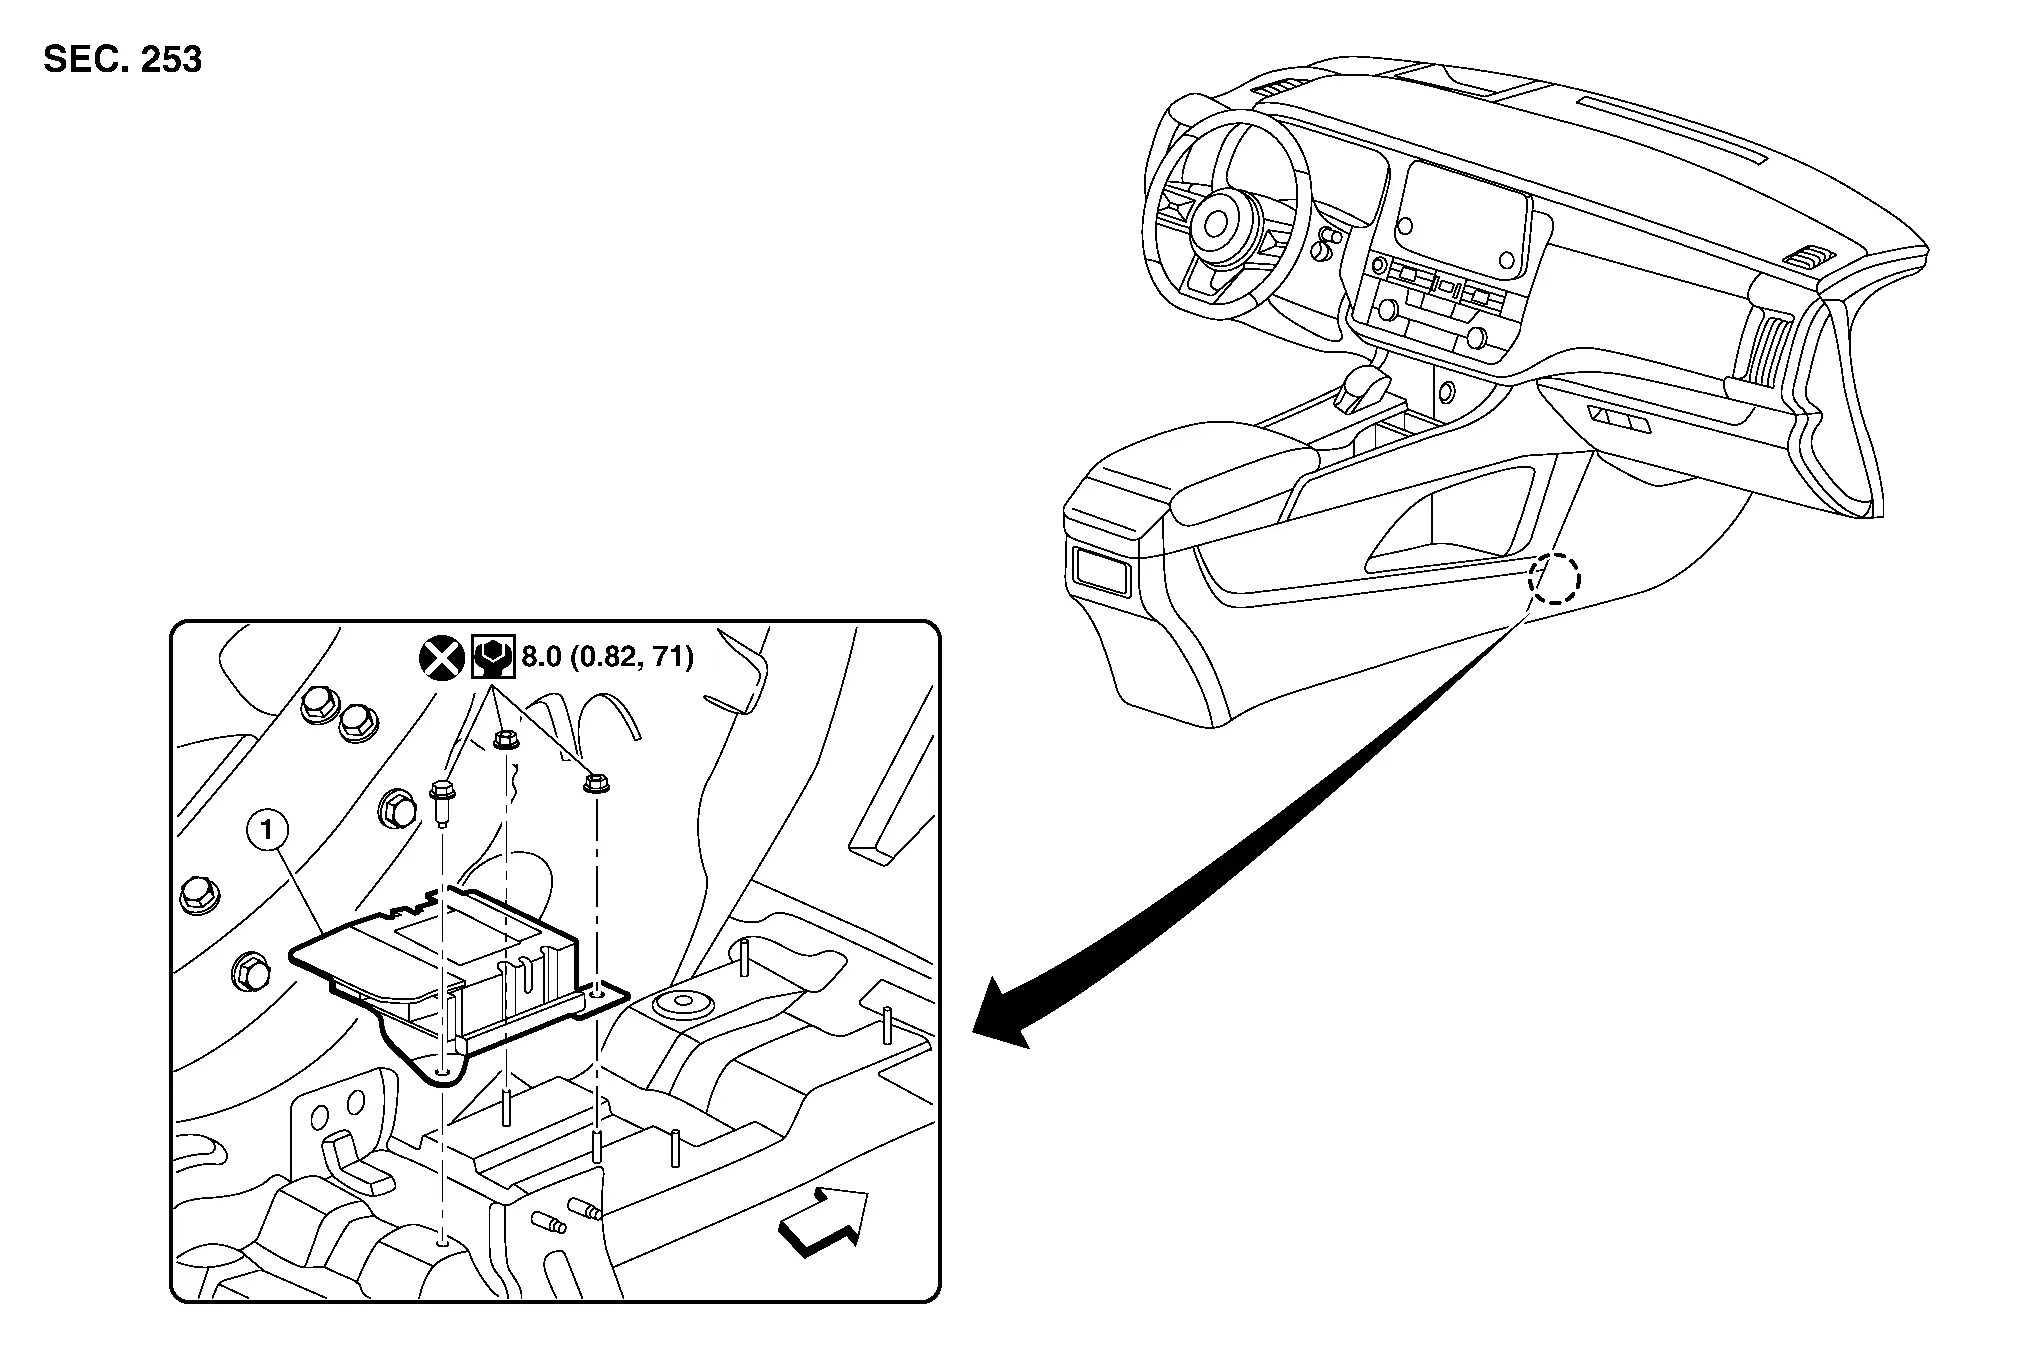
| 1. | Air bag diagnosis sensor unit |
 |
Front |
Removal and Installation
WARNING:
-
Before servicing the SRS, place ignition switch OFF, disconnect both battery terminals then wait at least three minutes.
-
Before disconnecting the air bag diagnosis sensor unit harness connectors, be sure to disconnect each harness connector of the side curtain air bag modules, front seat belt pre-tensioner, and front side air bag module, to prevent accidental air bag deployment by static electricity and seat belt pre-tensioner operation.
-
Do not use the air tools or electric tools for servicing.
-
When replacing the air bag diagnosis sensor unit, always check with the parts department for the latest parts information. Installing an incorrect air bag diagnosis sensor unit may or may not cause the air bag warning lamp to illuminate and may cause incorrect deployment of the supplemental air bags and seat belt pre-tensioners in a collision resulting in serious personal injury or death.
CAUTION:
When replacing air bag diagnosis sensor unit, perform "ADDITIONAL SERVICE WHEN REPLACING CONTROL UNIT". Refer to Description.
REMOVAL
Always check the air bag diagnosis sensor unit ECU discriminated number (identification number) or part number using CONSULT.
Disconnect negative and positive battery terminals, then wait at least three minutes. Refer to Battery Disconnect.
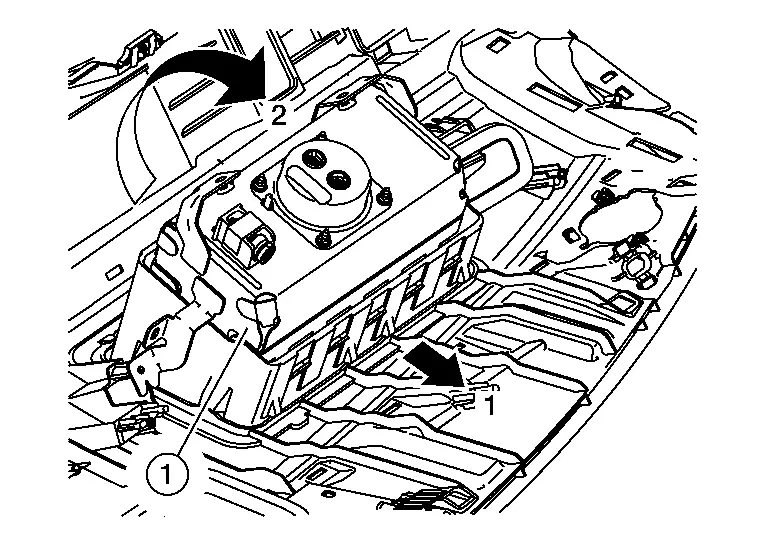
Remove the center console assembly. Refer to Removal and Installation.
Remove the air bag diagnosis sensor unit nuts and bolt.
Disconnect the harness connectors from the air bag diagnosis sensor unit and remove.
CAUTION:
-
Do not reuse the air bag diagnosis sensor unit bolts.
-
Replace the air bag diagnosis sensor unit if any SRS air bag has been deployed or if any front seat belt pre-tensioner has been deployed.
-
Replace the air bag diagnosis sensor unit if it has been dropped or sustained an impact.
-
Do not strike the air bag diagnosis sensor unit.
INSTALLATION
Installation is in the reverse order of removal.
CAUTION:
-
When replacing air bag diagnosis sensor unit, perform "ADDITIONAL SERVICE WHEN REPLACING CONTROL UNIT". Refer to Description.
-
Do not reuse the air bag diagnosis sensor unit nuts and bolt.
-
The air bag diagnosis sensor unit must always be installed with the label arrow mark "
 " pointing toward the front of the Nissan Pathfinder vehicle for proper operation.
 -
Do not damage the air bag diagnosis sensor unit harness connectors during installation.
-
After installation is complete, check that no system malfunction is detected causing the air bag warning lamp to illuminate.
-
If a malfunction is indicated by the air bag warning lamp after repair or replacement of the malfunctioning parts, perform the SRS final check. Refer to SRS Final Check.
-
After replacing the air bag diagnosis sensor unit, confirm using CONSULT that the ECU discriminated number (identification number) or part number of the new replacement air bag diagnosis sensor unit matches the ECU discriminated number (identification number) or part number of the replaced (old) air bag diagnosis sensor unit.
 NOTE:
NOTE:
If the ECU discriminated number or part number of the new replacement air bag diagnosis sensor unit differs from the ECU discriminated number or part number of the replaced air bag diagnosis sensor unit, reconfirm the parts information and verify that the correct air bag diagnosis sensor unit was installed.
Front Seat Belt Pre-Tensioner Nissan Pathfinder 5th Gen
Removal and Installation
The front seat belt pre-tensioner is serviced as part of the front seat belt retractor. For removal and installation of the front seat belt retractor, refer to Removal and Installation (for USA and Canada) or Removal and Installation (for Mexico).
Rear Seat Belt Pre-Tensioner Nissan Pathfinder SUV
Removal and Installation
The rear seat belt pre-tensioner is serviced as part of the second row seat belt retractor. For removal and installation of the second row seat belt retractor, refer to Removal and Installation.
Front Seat Belt Buckle Switch Nissan Pathfinder 2026
Removal and Installation
The front seat belt buckle switch is serviced as part of the front seat belt buckle. For removal and installation of the front seat belt buckle, refer to Removal and Installation.
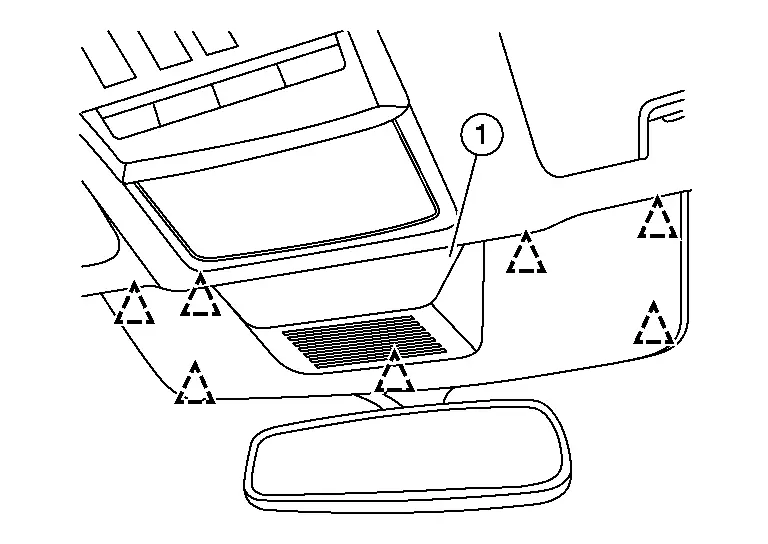
Front Passenger Air Bag Off Indicator Nissan Pathfinder 2022
Removal and Installation
REMOVAL
Using suitable tool, release clips and remove windshield glass finisher (1).
 |
: Front |
 |
: Clip |
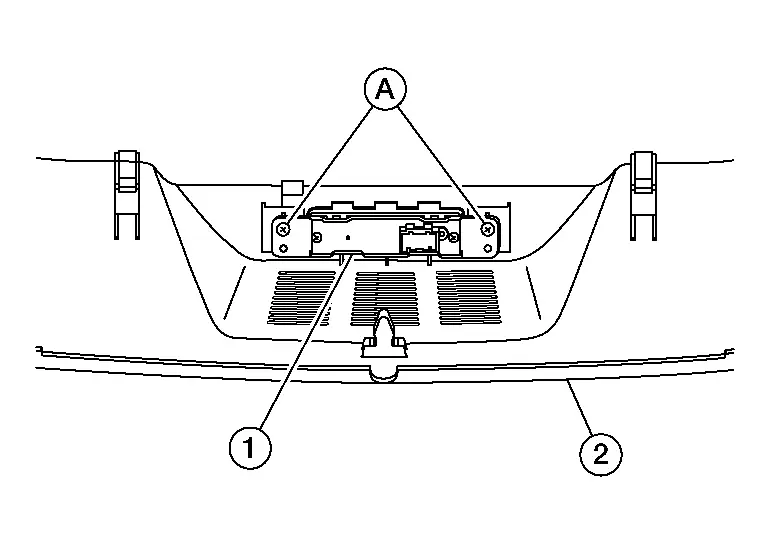
Remove screws (A) and remove the front passenger air bag OFF indicator (1) from the windshield glass finisher (2).
INSTALLATION
Installation is in the reverse order of removal.

Nissan Pathfinder (R53) 2022-2026 Service Manual
Removal and Installation
- Driver Air Bag Module
- Spiral Cable
- Front Passenger Air Bag Module
- Knee Air Bag Module Lh
- Side Curtain Air Bag Module
- Front Side Air Bag Module
- Rear Side Air Bag Module
- Crash Zone Sensor
- Front Door Satellite Sensor
- Rear Side Air Bag Satellite Sensor
- Air Bag Diagnosis Sensor Unit
- Front Seat Belt Pre-Tensioner
- Rear Seat Belt Pre-Tensioner
- Front Seat Belt Buckle Switch
- Front Passenger Air Bag Off Indicator
Contact Us
Nissan Pathfinder Info Center
Email: info@nipathfinder.com
Phone: +1 (800) 123-4567
Address: 123 Pathfinder Blvd, Nashville, TN 37214, USA
Working Hours: Mon–Fri, 9:00 AM – 5:00 PM (EST)
