Nissan Pathfinder: Engine Lubrication System - Periodic Maintenance
Engine Oil Nissan Pathfinder SUV
Inspection
ENGINE OIL LEVEL
 NOTE:
NOTE:
-
Before starting engine, place vehicle on a level surface and check the engine oil level. If engine has already been started, stop it and allow 10 minutes before checking.
Remove oil level gauge and wipe it clean.
Insert oil level gauge and check that the engine oil level is within the range (A) shown.
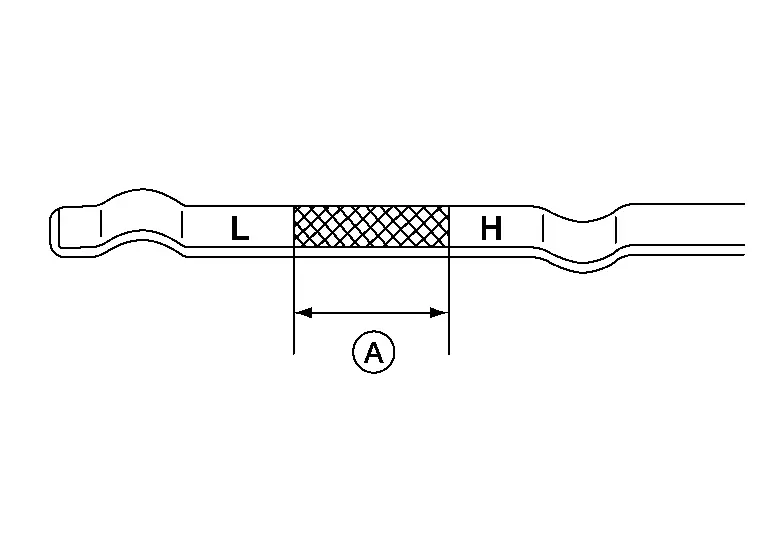
If engine oil level is out of range, add oil as necessary until oil level gauge indicates the correct level.
CAUTION:
Do not overfill the engine with oil.
 NOTE:
NOTE:
It is normal to add some oil between oil maintenance intervals or during the break-in period, depending on the severity of the operating conditions.
ENGINE OIL APPEARANCE
-
Check engine oil for white milky appearance or excessive contamination.
-
If engine oil becomes milky, it is highly probable that it is contaminated with engine coolant. Repair or replace damaged parts.
ENGINE OIL LEAKS
Check for engine oil leaks around the following areas:
-
Oil pan (upper)
-
Oil pan (lower)
-
Oil pan drain plug
-
Engine oil pressure sensor
-
Engine oil temperature sensor
-
Oil filter
-
Oil cooler
-
Valve timing control cover
-
Exhaust valve timing control solenoid valve
-
Front timing chain case
-
Mating surface between rear timing chain case and cylinder head
-
Mating surface between rear timing chain case and cylinder block
-
Mating surface between rear timing chain case and oil pan (upper)
-
Mating surface between rear timing chain case and front timing chain case
-
Mating surface between cylinder block and cylinder head
-
Mating surface between cylinder head and rocker cover
-
Crank oil seal (front and rear)
-
Engine oil pressure control solenoid valve
-
Camshaft position sensor
-
Exhaust camshaft position sensor
-
Intake camshaft position sensor
-
High pressure fuel pump
Draining
WARNING:
-
Be careful not to burn yourself, as the engine oil may be hot.
-
Prolonged and repeated contact with used engine oil may cause skin cancer; try to avoid direct skin contact with used engine oil. If skin contact is made, wash thoroughly with soap or hand cleaner as soon as possible.
Position the vehicle so it is level on the hoist.
Warm up the engine and check for engine oil leaks. Refer to Inspection.
Stop engine and wait for 10 minutes.
Remove the front under cover. Refer to Removal and Installation.
Loosen oil filler cap.
Remove the oil pan drain plug and drain the engine oil.
Refilling
Install drain plug with new drain plug washer.
CAUTION:
-
Do not reuse drain plug washer.
-
Be sure to clean drain plug and install with new drain plug washer.
| Tightening torque | : Refer to Exploded View. |
Refill with new engine oil.
CAUTION:
-
The refill capacity depends on the engine oil temperature and drain time. Use these specifications for reference only.
-
Always use oil level gauge to determine the proper amount of engine oil in the engine.
| Engine oil specification and capacity | : Refer to Fluids and Lubricants. |
Warm up engine and check area around drain plug and oil filter for engine oil leaks.
Install front under cover. Refer to Removal and Installation.
Stop engine and wait 10 minutes.
Check engine oil level. Refer to Inspection.
Oil Filter Nissan Pathfinder R53
Removal and Installation
REMOVAL
Drain engine oil. Refer to Draining.
Remove front fender protector side cover (RH). Refer to Exploded View.
Remove the oil filter using suitable tool.
WARNING:
Be careful not to get burned; the engine oil may be hot.
CAUTION:
-
Position a shop cloth to absorb any oil leaks or spills.
-
Do not allow engine oil to contact the drive belts.
-
Completely wipe off any oil that contacts to the engine or the Nissan Pathfinder vehicle.
-
The oil filter is provided with a relief valve.
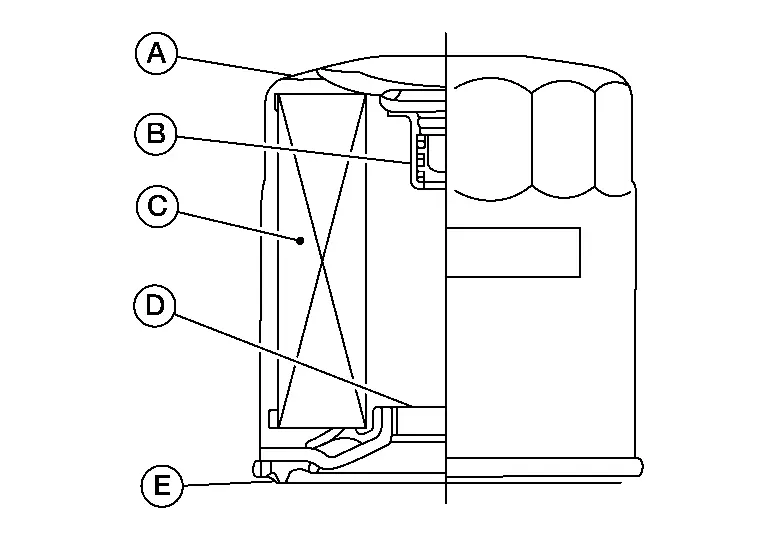
(A) : Oil filter body (B) : Relief valve (C) : Filtering paper (D) : Screw (E) : Packing
 NOTE:
NOTE:
It is recommended to use a Genuine NISSAN oil filter or equivalent. The use of parts that do not meet or exceed NISSAN specifications may cause damage to the Nissan Pathfinder vehicle, and have an effect on warranty coverage. Always check with the Parts Department for the latest parts information.
INSTALLATION
Remove foreign materials adhering to the oil filter installation surface.
Apply clean engine oil to the oil seal contact surface of the new oil filter.
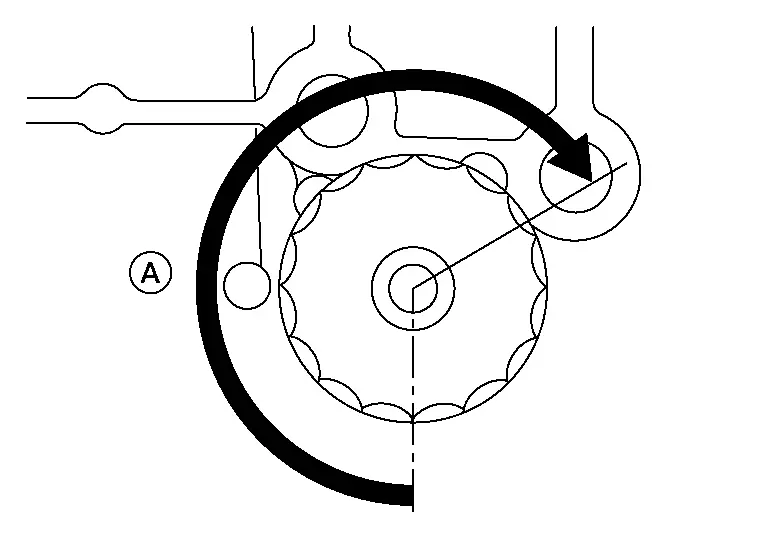
Screw the oil filter manually until it touches the installation surface, then tighten it by turning another 2/3 turn (A), or tighten to specification using a suitable tool.
| Oil filter | : 18.0 N·m (1.8 kg-m, 13 ft-lb) |
Refill the engine with new engine oil. Refer to Refilling.
Check the oil level and add engine oil as necessary. Refer to Inspection.
After warming up the engine, check for engine oil leaks.
Install front fender protector side cover (RH). Refer to Exploded View.

Nissan Pathfinder (R53) 2022-2026 Service Manual
Periodic Maintenance
Contact Us
Nissan Pathfinder Info Center
Email: info@nipathfinder.com
Phone: +1 (800) 123-4567
Address: 123 Pathfinder Blvd, Nashville, TN 37214, USA
Working Hours: Mon–Fri, 9:00 AM – 5:00 PM (EST)
