Nissan Pathfinder: Removal and Installation - Front Brake Caliper Assembly ++
Exploded View
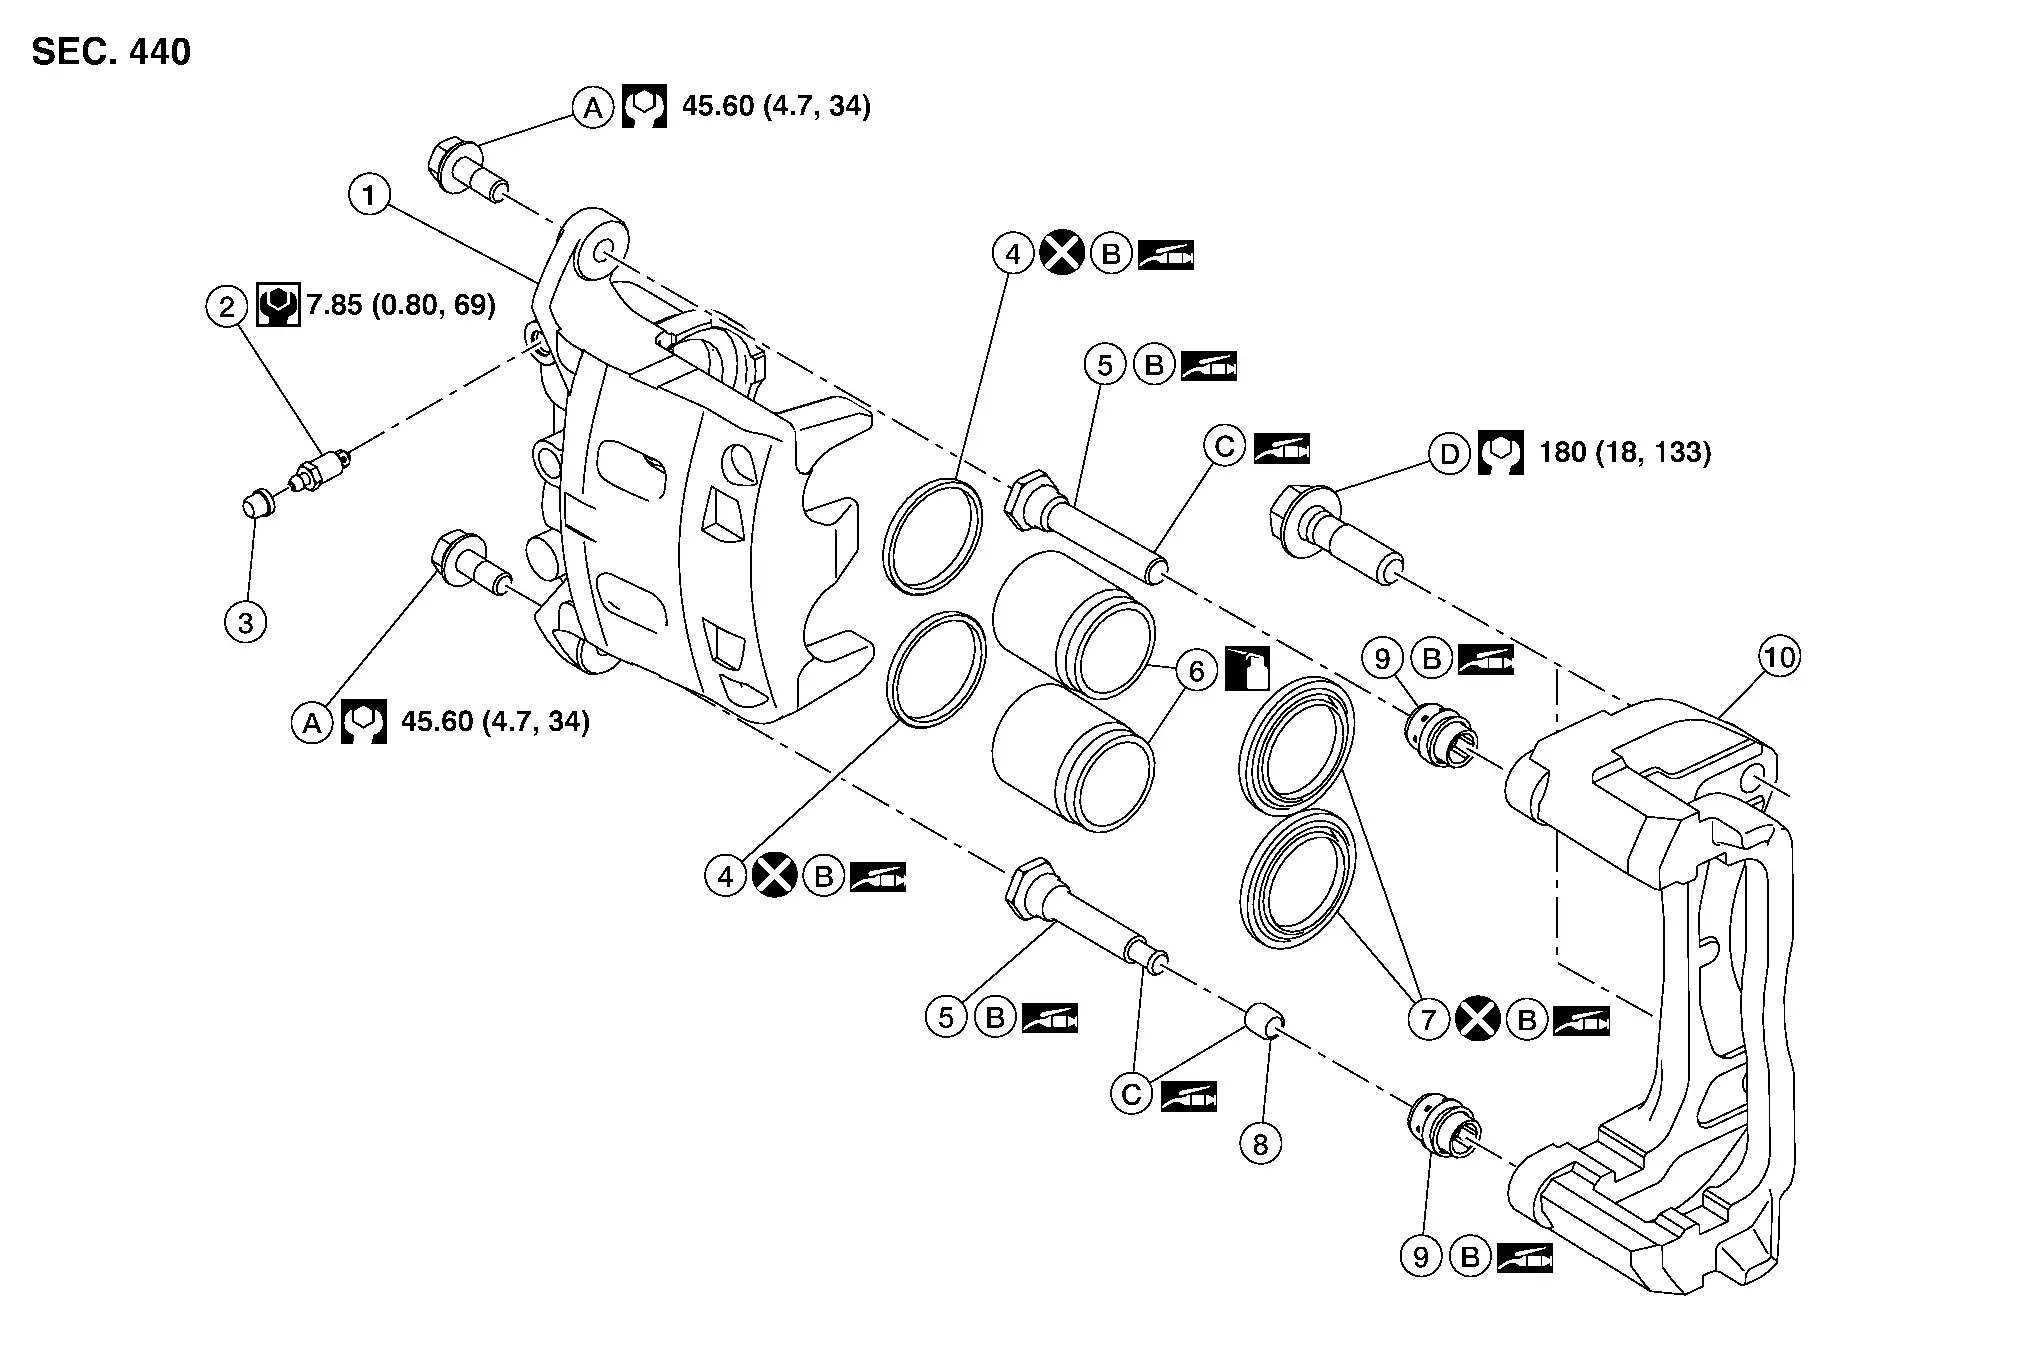
| 1. | Brake caliper body | 2. | Bleeder valve | 3. | Bleeder cap |
| 4. | Piston seal | 5. | Slide pin | 6. | Piston |
| 7. | Piston boot | 8. | Bushing | 9. | Slide pin boot |
| 10. | Torque member | A. | Slide pin bolt | B. | Rubber grease |
| C. | Niglube RX-2 | D. | Torque member bolt |  |
Brake fluid |
Removal and Installation
WARNING:
Clean dust on the brake caliper and the brake pads using a vacuum dust collector to minimize the hazards of airborne particles or other material.
CAUTION:
-
Do not depress the brake pedal.
-
Do not spill or splash brake fluid on painted surfaces. Brake fluid may seriously damage paint. Wipe it off immediately and wash with water if it gets on a painted surface.
-
Do not bend, twist, or pull the brake hoses and piping.
-
Do not reuse drained brake fluid.
 NOTE:
NOTE:
When removing components such as hoses, tubes/lines, etc., cap or plug openings to prevent fluid from spilling.
REMOVAL
Remove the reservoir tank cap.
Remove the front wheel and tire using power tool. Refer to Removal and Installation.
Secure the disc brake rotor using wheel nuts.
Remove the union bolt, the copper sealing washers, and disconnect the brake hose from the brake caliper. Discard the copper sealing washers. Refer to Exploded View.
CAUTION:
Do not reuse copper sealing washers.
Remove the slide pin bolts. Refer to Exploded View.
Remove the brake caliper from the torque member.
CAUTION:
Do not drop the brake pads, the shims, or the brake caliper.
Remove the slide pins from the torque member.
Remove the brake pads, shims, and pad retainers from the torque member. Refer to Exploded View.
CAUTION:
-
Do not damage the pad retainers or the piston boots.
-
Do not drop the brake pads, shims, or pad retainers.
-
Note the position of components during removal to aid with installation.
Remove the bolts and the torque member.
INSTALLATION
Install the torque member and the torque member bolts. Tighten the torque member bolts to the specified torque. Refer to Exploded View.
Apply Niglube RX-2 grease to the slide pins.
Install the slide pins to the torque member.
Install the brake pads, shims, and pad retainers to the torque member. Refer to Exploded View.
CAUTION:
Do not drop the brake pads, shims, or pad retainers.
Install the brake caliper to the torque member.
Install the slide pin bolts. Tighten the slide pin bolts to the specified torque.
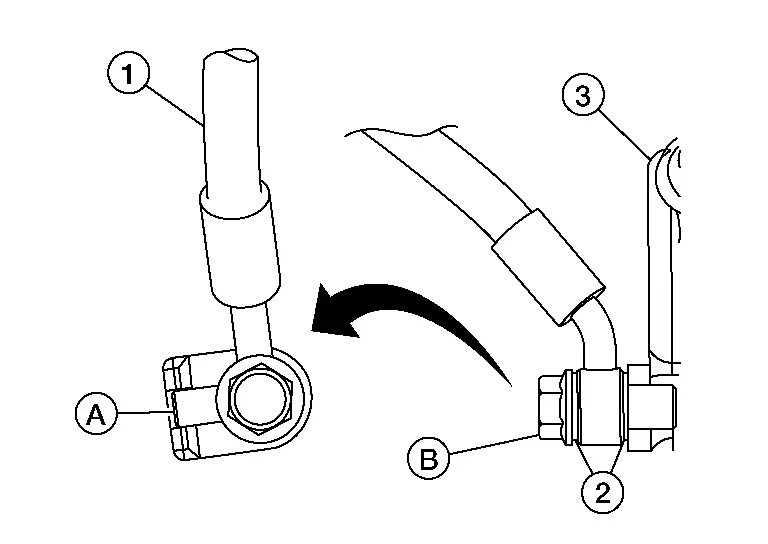
Assemble the union bolt (B) and the new copper sealing washers (2) to the brake hose (1) and install it as an assembly to the brake caliper (3). Align the brake hose part (A) with the brake caliper assembly projection, and tighten the union bolt to the specified torque. Refer to Exploded View.
CAUTION:
Do not reuse copper sealing washers.
Refill with new brake fluid and bleed air from the brake system. Refer to Bleeding Brake System.
CAUTION:
-
Do not reuse drained brake fluid.
-
Do not spill or splash brake fluid on the disc brake rotor.
Install the reservoir tank cap.
Depress the brake pedal several times and perform the inspection after installation.
Install the front wheel and tire. Refer to Removal and Installation.
INSPECTION AFTER INSTALLATION
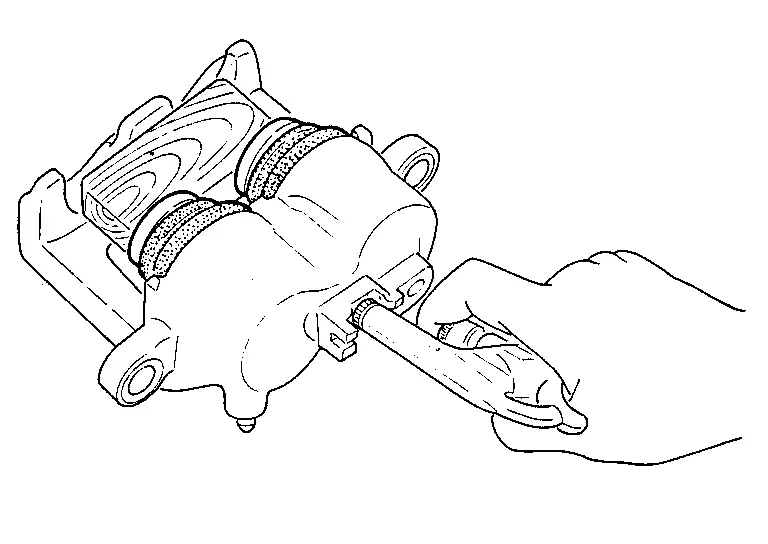
Check the drag of the front disc brake. If any drag is found, perform the following procedure:Remove the brake pads. Refer to Removal and Installation. Using a suitable tool, press the pistons into the brake caliper body.
CAUTION:
Do not damage the piston boots.
Install the brake pads. Depress the brake pedal several times. Check the drag of the front disc brake again. If any drag is found, disassemble the brake caliper body. Refer to Disassembly and Assembly.
Burnish contact surfaces after replacing the brake caliper or if a soft pedal occurs at very low mileage. Refer to Periodic Maintenance Operation.
Disassembly and Assembly
WARNING:
Clean dust on the brake caliper using a vacuum dust collector to minimize the hazards of airborne particles or other material.
CAUTION:
-
Do not reuse drained brake fluid.
-
Do not damage the piston boots.
DISASSEMBLY
Remove the brake caliper from the vehicle. Refer to Removal and Installation.
Remove the slide pin boots from the torque member. Refer to Exploded View.
Remove the bushing from the slide pin.
Remove the bleeder valve and cap.
Place a wooden block in the brake caliper body and blow air from the union bolt hole to remove the pistons and piston boots.
WARNING:
Do not get fingers caught between the pistons and the brake caliper body.
CAUTION:
Do not reuse piston boots.
Remove the piston seals from the brake caliper body using a suitable tool.
CAUTION:
-
Do not damage cylinder inner walls.
-
Do not reuse piston seals.
Perform the inspection after disassembly.
INSPECTION AFTER DISASSEMBLY
Brake Caliper Body
Check the inner walls of the brake caliper body for rust, wear, cracks, and damage. Replace the brake caliper if any abnormal condition is detected.
CAUTION:
Clean the brake caliper using new brake fluid. Do not use mineral oils such as gasoline or kerosene.
Torque Member
Check the torque member for rust, wear, cracks, and damage. Replace the brake caliper if any abnormal condition is detected.
Pistons
Check the surface of each piston for rust, wear, cracks or damage. Replace a piston if any abnormal condition is detected.
CAUTION:
The piston sliding surface is plated. Do not polish with sandpaper.
Slide Pins and Bolts
Check the slide pins and bolts for rust, wear, cracks or damage. Replace the parts if any abnormal condition is detected.
ASSEMBLY
Install the bleeder valve and cap. Refer to Exploded View.
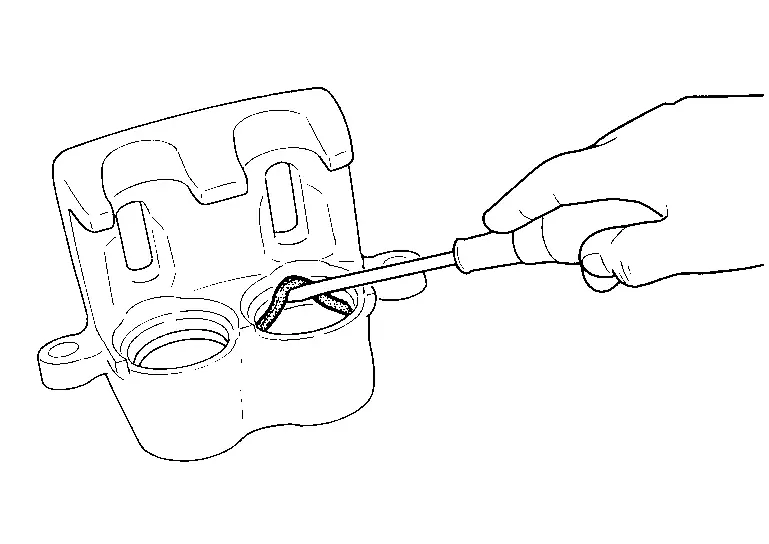
Apply rubber grease to new piston seals (1), and install them to the brake caliper body.
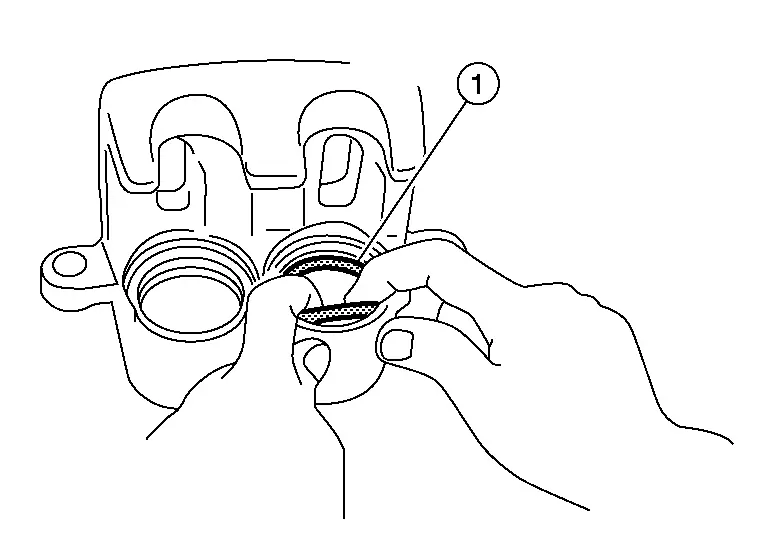
CAUTION:
Do not reuse piston seals.
Apply rubber grease to the new piston boots (1). Apply brake fluid to each piston (2). Cover each piston end with a new piston boot, and then install the cylinder side lip on each new piston boot securely into each groove on the brake caliper body.
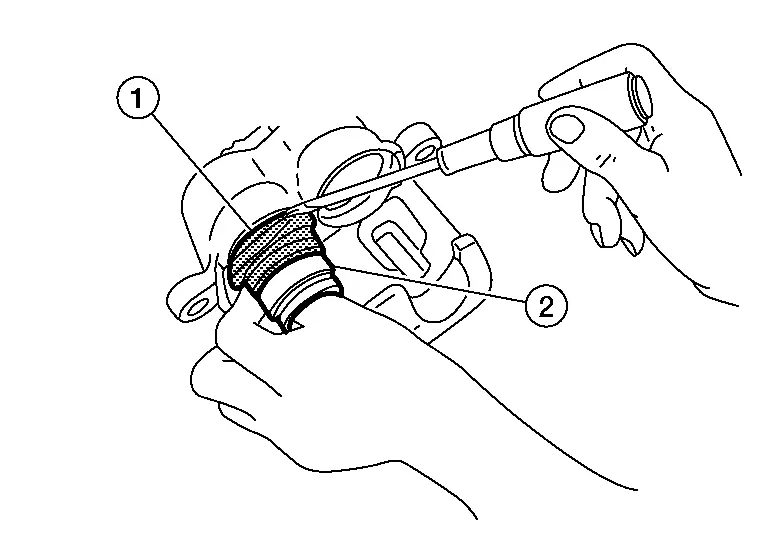
CAUTION:
Do not reuse piston boots.
Push each piston (1) into the brake caliper body by hand and push each piston boot (2) piston-side lip into each piston groove.

CAUTION:
Press each piston evenly and vary the pressing point to prevent cylinder inner wall from being rubbed.
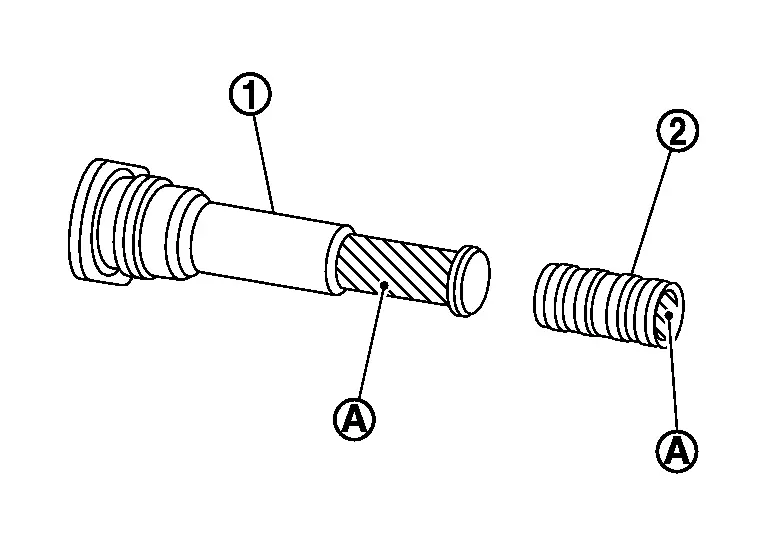
Apply Niglube RX-2 grease to the matching surfaces (A) of the slide pin (1) and the bushing (2).
Install the bushing to the slide pin.
Apply Niglube RX-2 grease to the matching surfaces (A) of the slide pins (1) and the torque member (3). Apply rubber grease to the matching surfaces of the slide pins and the slide pin boots (2).
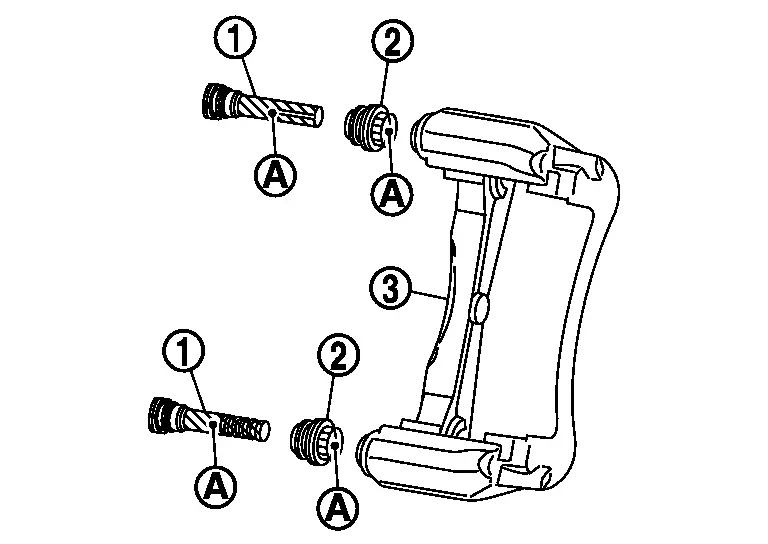
Install the slide pins and slide pin boots to the torque member.
Install the brake caliper to the Nissan Pathfinder vehicle. Refer to Removal and Installation.

Nissan Pathfinder (R53) 2022-2026 Service Manual
Contact Us
Nissan Pathfinder Info Center
Email: info@nipathfinder.com
Phone: +1 (800) 123-4567
Address: 123 Pathfinder Blvd, Nashville, TN 37214, USA
Working Hours: Mon–Fri, 9:00 AM – 5:00 PM (EST)
