Nissan Pathfinder: Seat Belt - Front Seat Belt
Exploded View
FOR USA AND CANADA
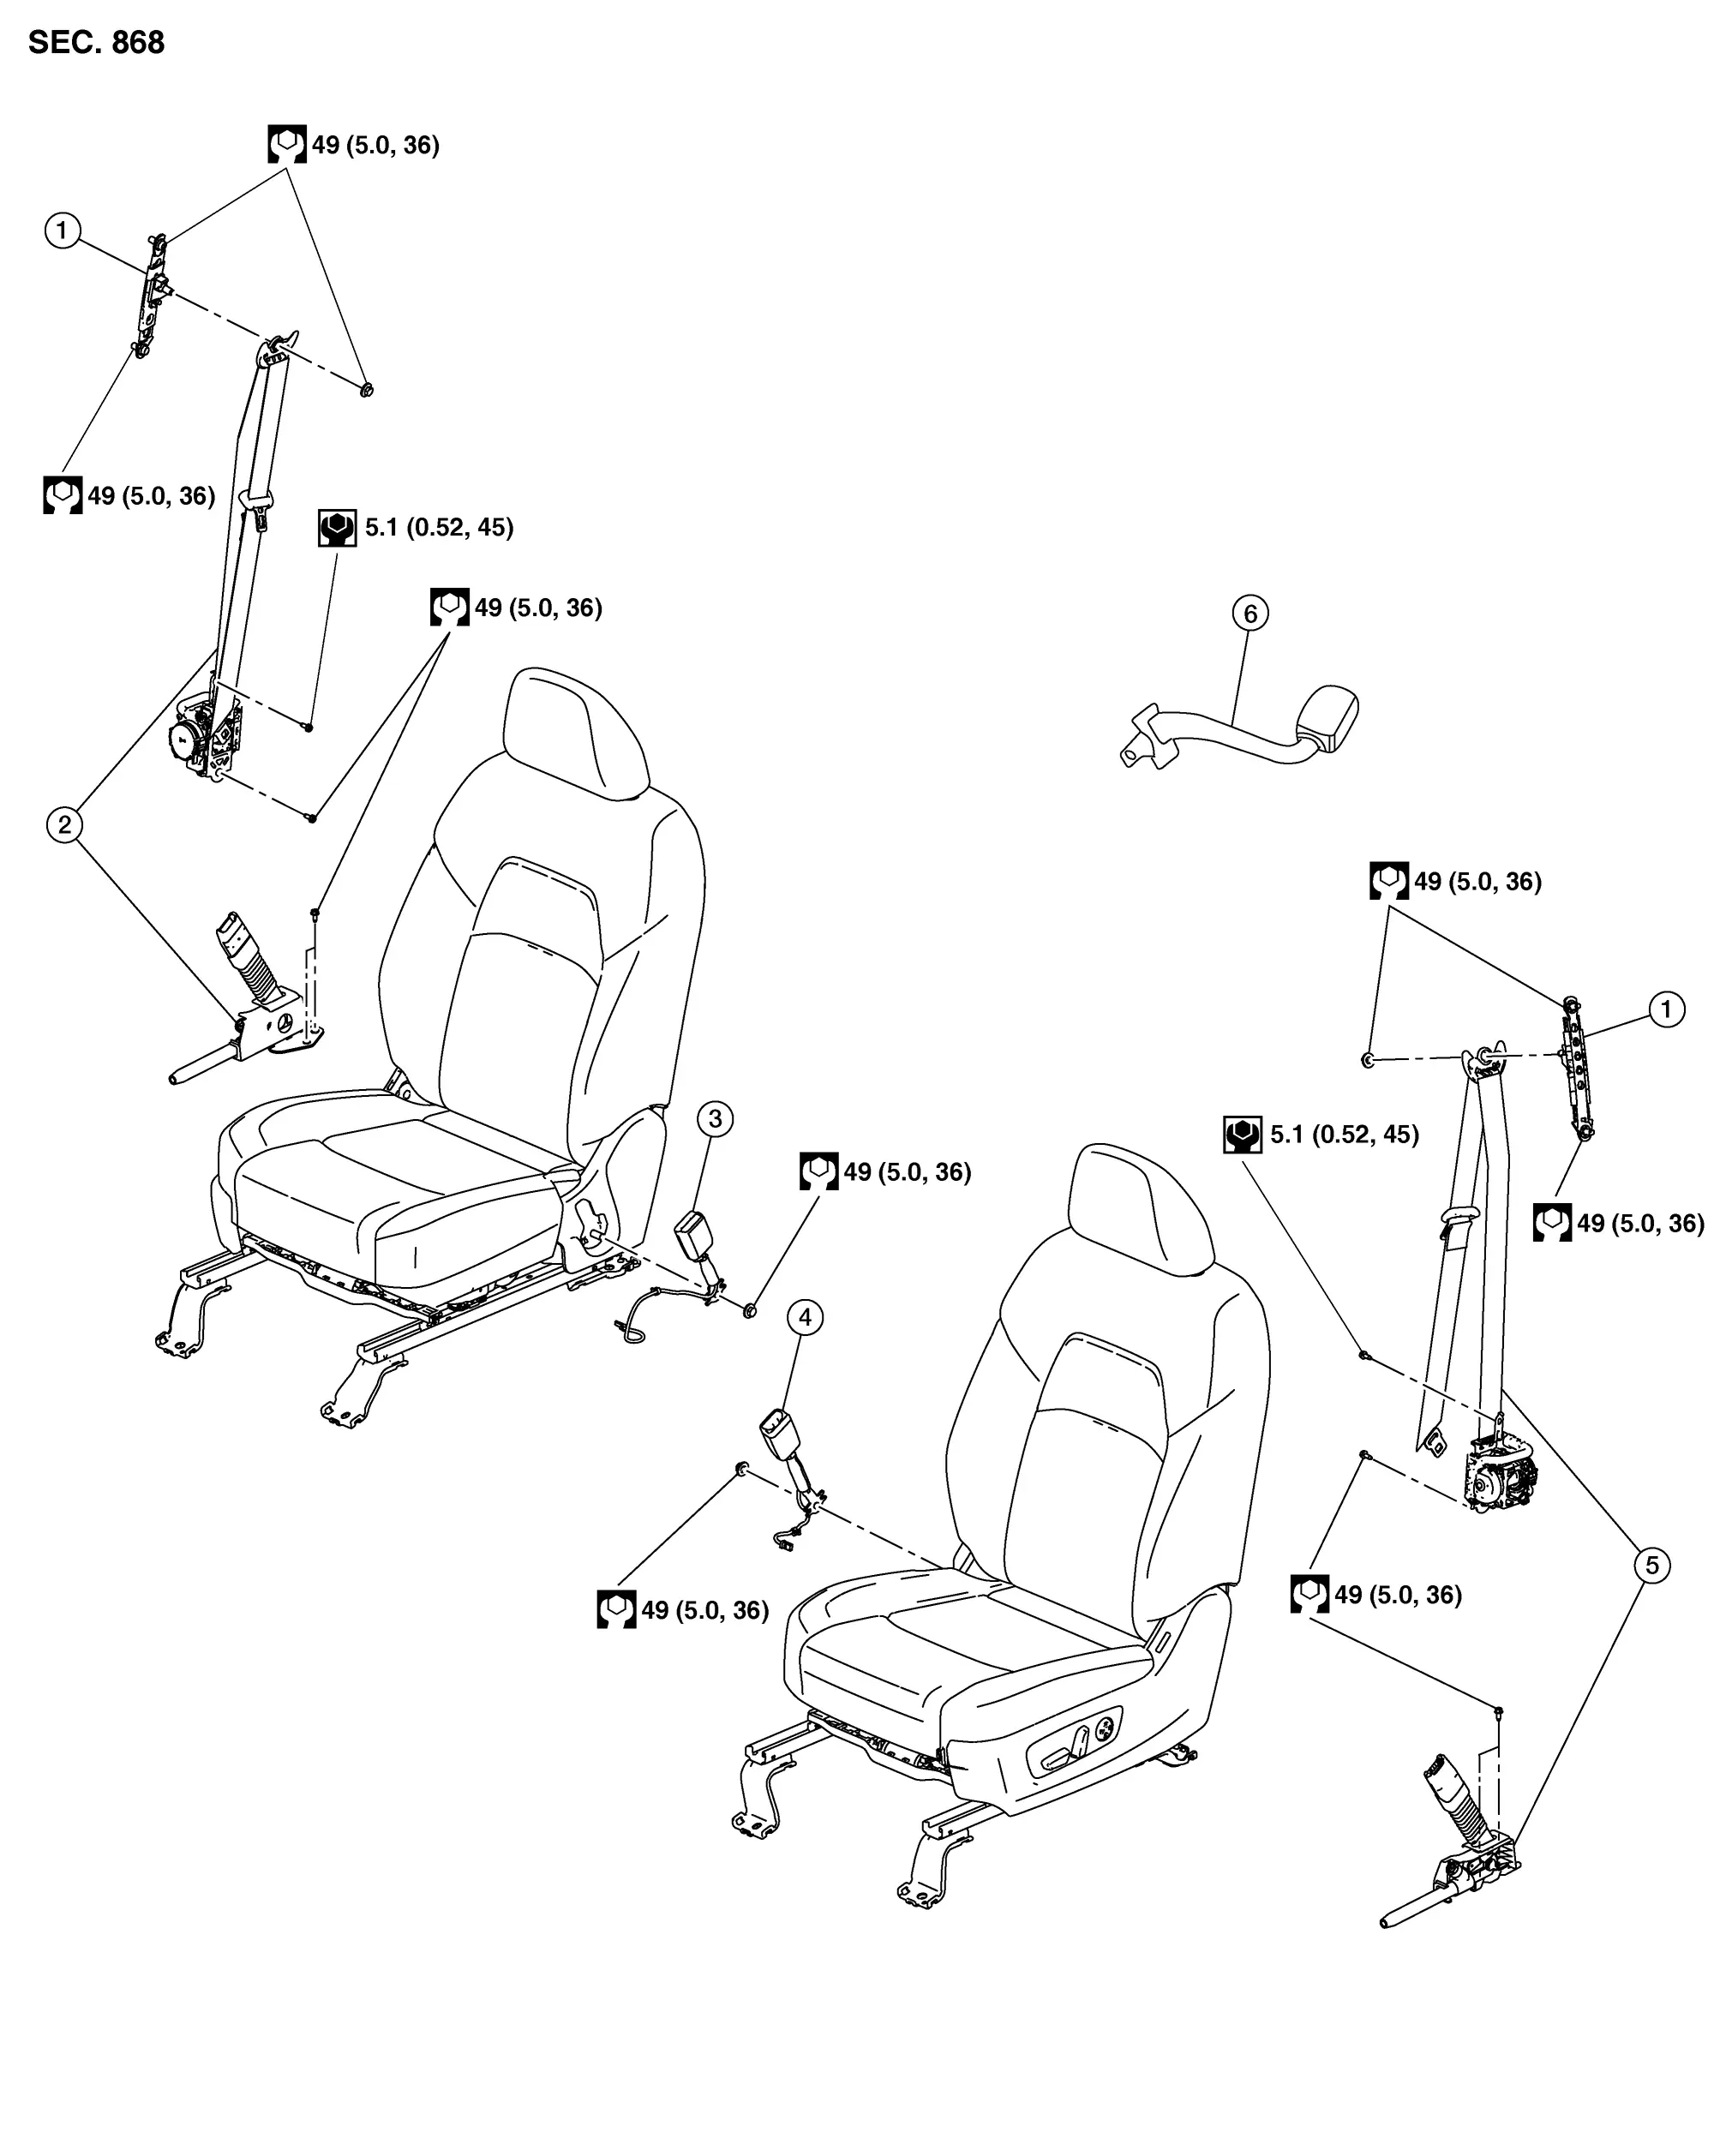
| 1. | Seat belt height adjuster (LH/RH) | 2. | Seat belt retractor (RH) | 3. | Seat belt buckle (RH) |
| 4. | Seat belt buckle (LH) | 5. | Seat belt retractor (LH) | 6. | Seat belt extender |
FOR MEXICO
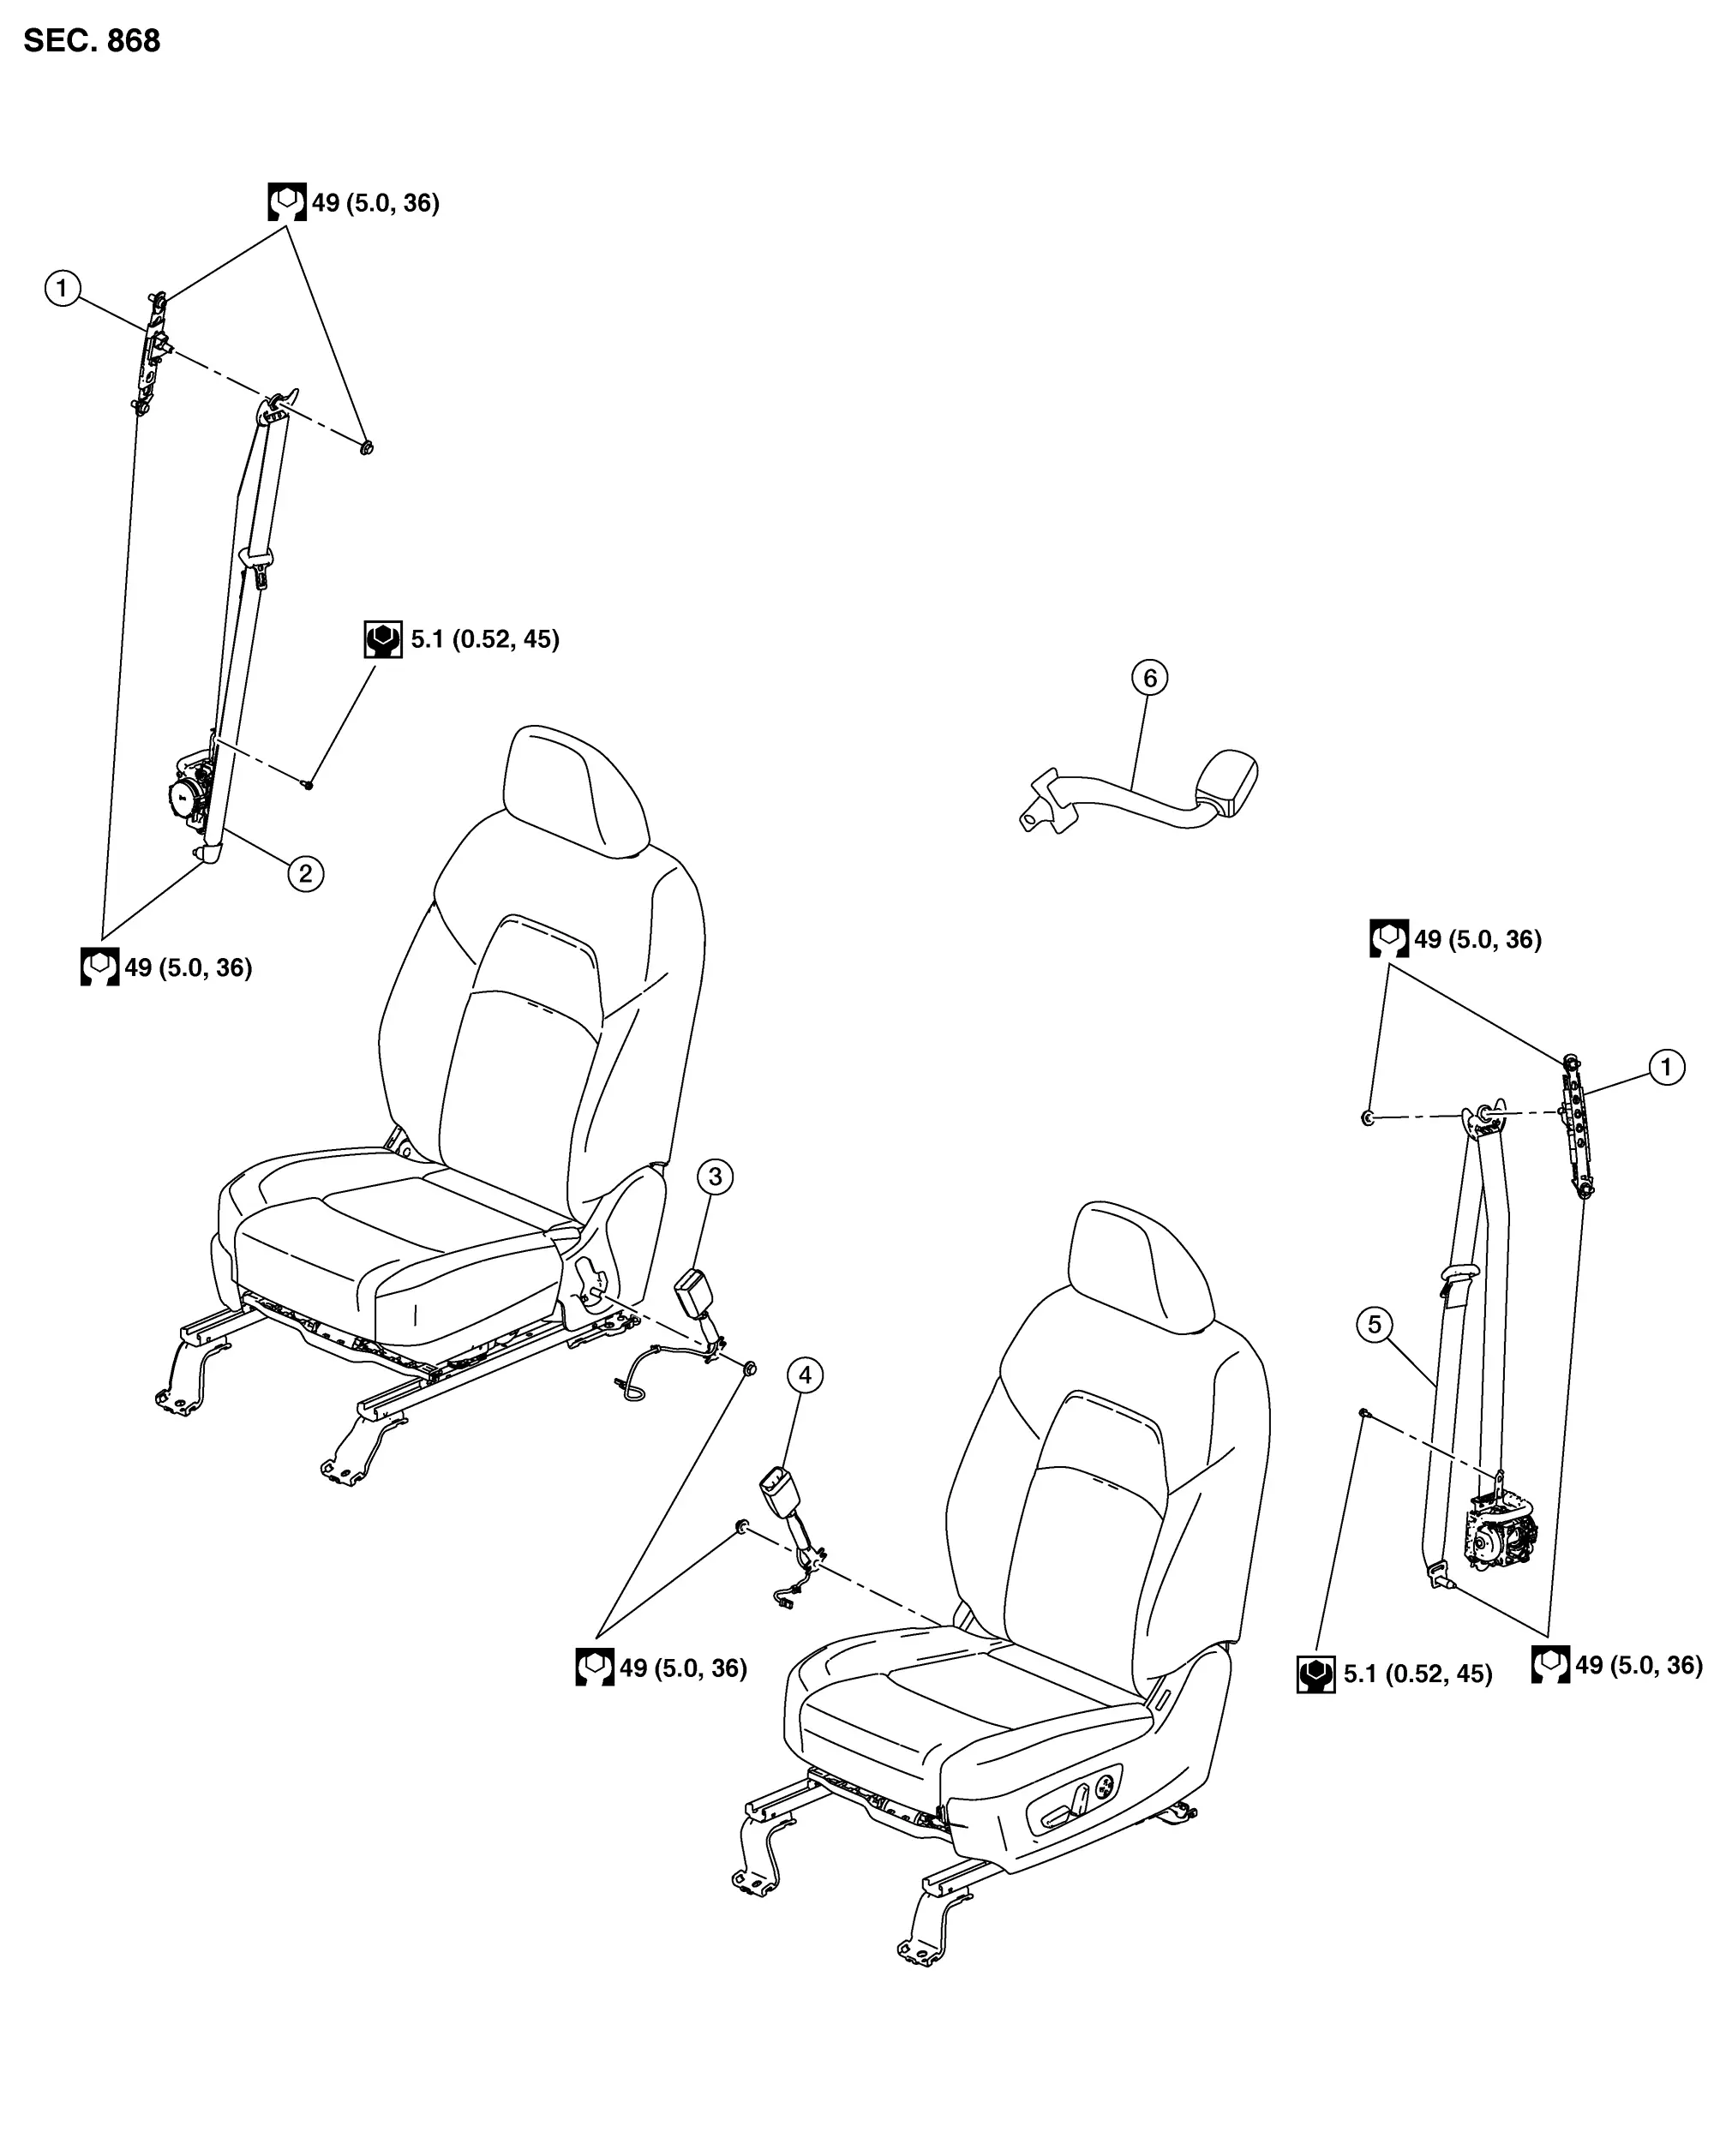
| 1. | Seat belt height adjuster (LH/RH) | 2. | Seat belt retractor (RH) | 3. | Seat belt buckle (RH) |
| 4. | Seat belt buckle (LH) | 5. | Seat belt retractor (LH) | 6. | Seat belt extender |
Seat Belt Retractor Nissan Pathfinder 5th Gen
For Usa and Canada
Removal and Installation
FRONT SEAT BELT PRE-TENSIONER (SHOULDER BELT)
REMOVAL
WARNING:
-
Before servicing the SRS, place ignition switch in the OFF position, disconnect both battery terminals then wait at least three minutes.
-
Do not drop the seat belt retractor. Always handle it with care.
-
Always point pre-tensioner cylinder away from body when handling.
Disconnect negative and positive battery terminals, then wait at least three minutes. Refer to Battery Disconnect.
Slide front seat to the full forward position.
Remove the center pillar upper finisher. Refer to Removal and Installation.
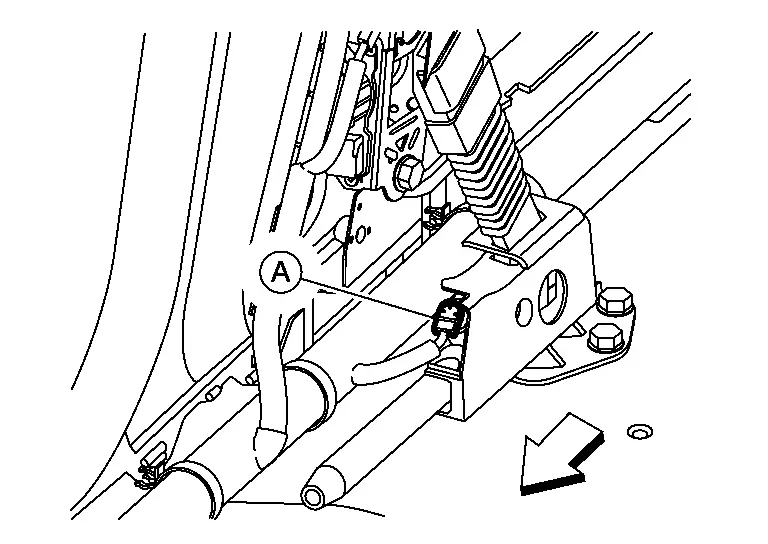
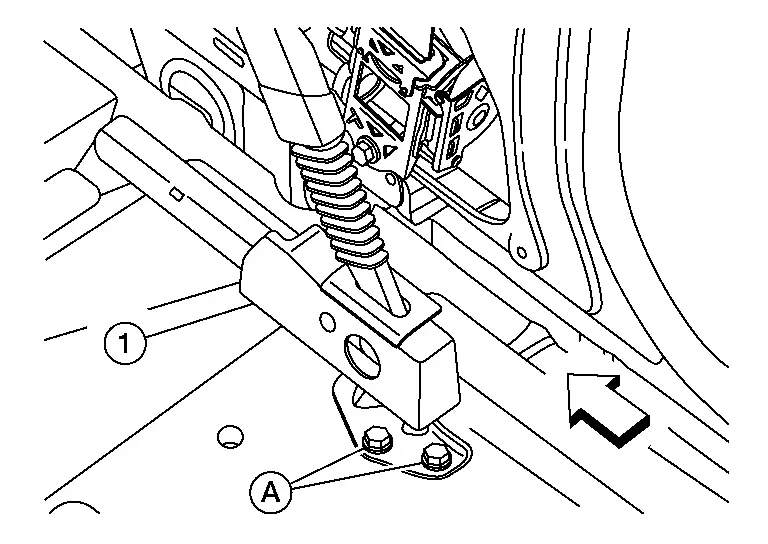
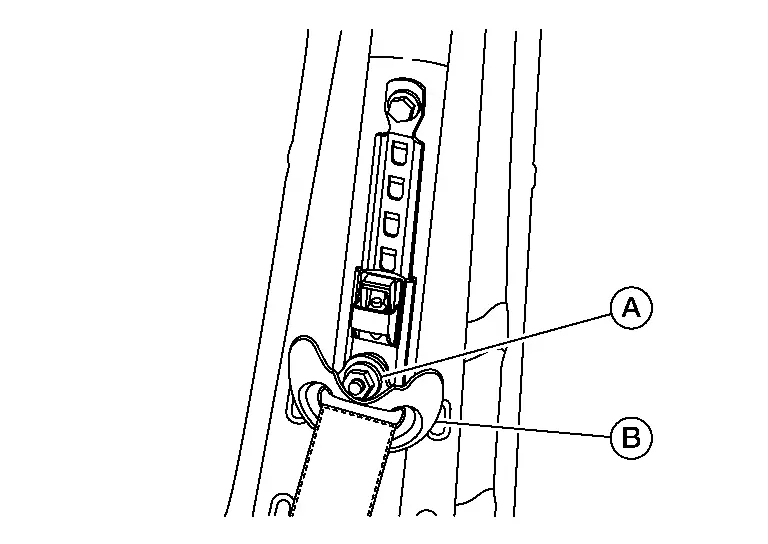
Remove nut (A) and remove D-ring anchor (B).

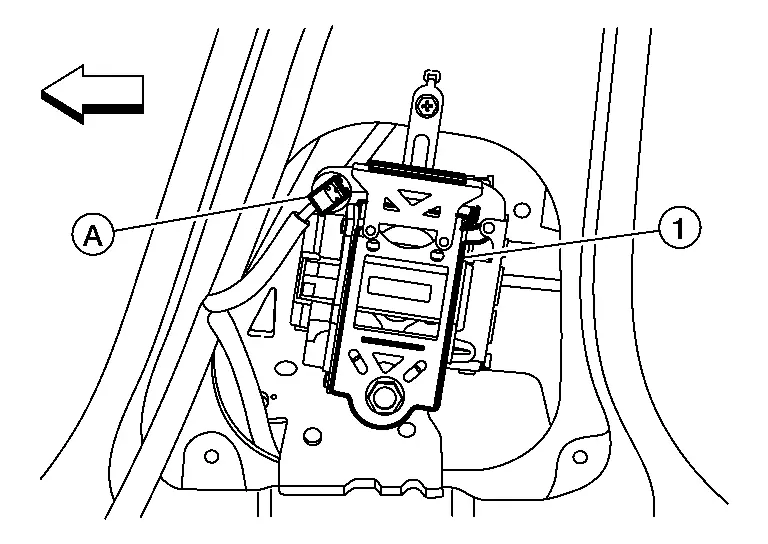
Disconnect the harness connector (A) from the front seat belt pre-tensioner [shoulder belt (1)].

 |
: Front |
CAUTION:
-
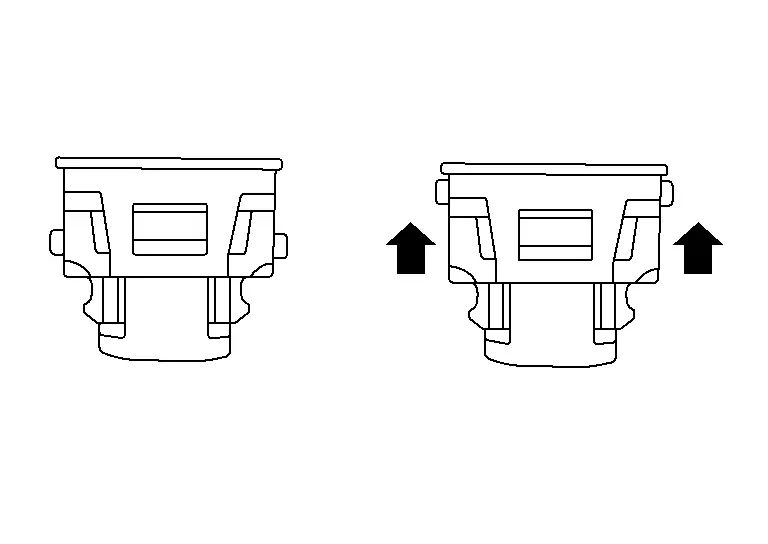
For removing the seat belt pre-tensioner harness connector, lift tabs to release the lock and remove the harness connector.

-
For installing the harness connector, align the connector to the connector housing, then press firmly on the connector until the locking tabs are engaged.
 |
: Front |
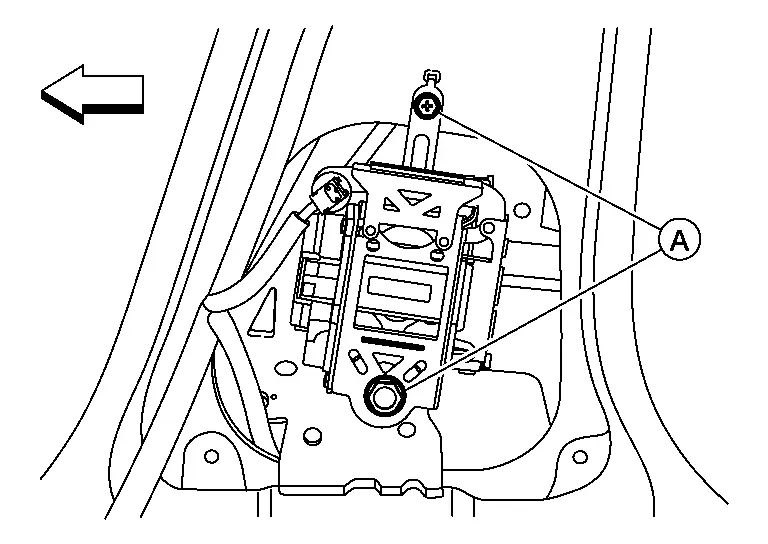
Remove bolts (A) and remove the front seat belt pre-tensioner (shoulder belt).

 |
: Front |
INSTALLATION
Installation is in the reverse order of removal.
-
Tighten the D-ring anchor nut and front seat belt pre-tensioner (shoulder belt) bolts to specification.
-
Make sure that the seat belt height adjuster is locked in the lowest position and is aligned with the finisher opening during installation.
-
Make sure both the D-ring anchor and seat belt height adjuster operate freely.
-
Always perform an inspection after repair to make sure the system is functioning within specifications. Refer to Inspection.
FRONT SEAT BELT PRE-TENSIONER (LAP BELT)
REMOVAL
WARNING:
-
Before servicing the SRS, place the ignition switch in the OFF position, disconnect both battery terminals then wait at least three minutes.
-
Do not drop seat belt retractor. Always handle it with care.
-
Always point pre-tensioner cylinder away from body when handling.
Disconnect negative and positive battery terminals, then wait at least three minutes. Refer to Battery Disconnect.
Remove front seat. Refer to Removal and Installation.
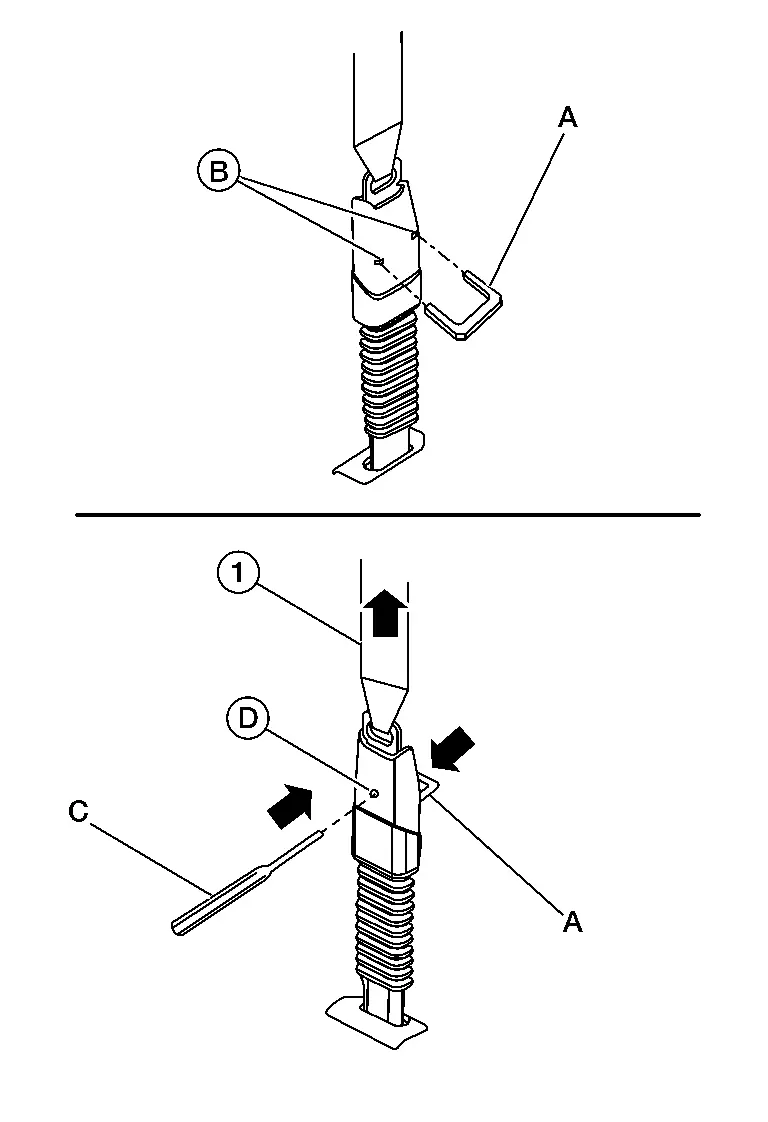
Release front seat belt pre-tensioner [shoulder belt (1)] from the front seat belt pre-tensioner (lap belt).
Remove the center pillar lower finisher. Refer to Removal and Installation.
Position floor trim aside and disconnect the harness connector (A) from the front seat belt pre-tensioner (lap belt).
 |
: Front |
CAUTION:
-
For removing the seat belt pre-tensioner harness connector, lift tabs to release the lock and remove the harness connector.

-
For installing the harness connector, align the connector to the connector housing, then press firmly on the connector until the locking tabs are engaged.
 |
: Front |
Remove bolts (A) and remove the front seat belt pre-tensioner [lap belt (1)].
 |
: Front |
INSTALLATION
Installation is in the reverse order of removal.
-
Tighten the front seat belt pre–tensioner (lap belt) bolts to specification.
-
Always perform an inspection after repair to make sure the system is functioning within specifications. Refer to Inspection.
For Mexico
Removal and Installation
SEAT BELT RETRACTOR
Removal
WARNING:
-
Before servicing the SRS, place ignition switch in the OFF position, disconnect both battery terminals then wait at least three minutes.
-
Do not drop the seat belt retractor. Always handle it with care.
-
Always point pretensioner cylinder away from body when handling.
Disconnect negative and positive battery terminals, then wait at least three minutes. Refer to Battery Disconnect.
Slide front seat to the full forward position.
Remove the center pillar upper finisher. Refer to Removal and Installation.
Remove nut (A) and remove D-ring anchor (B).

Disconnect the harness connector (A) from the front seat belt pre-tensioner (1).
 |
: Front |
CAUTION:
-
For removing the seat belt pre-tensioner harness connector, lift tabs to release the lock and remove the harness connector.
-
For installing the harness connector, align the connector to the connector housing, then press firmly on the connector until the locking tabs are engaged.
 |
: Front |
Remove bolts (A) and remove the front seat belt retractor.
 |
: Front |
Installation
Installation is in the reverse order of removal.
-
Tighten the D-ring anchor nut and seat belt retractor bolts to specification.
-
Make sure that the seat belt height adjuster is locked in the lowest position and is aligned with the finisher opening during installation.
-
Make sure both the D-ring anchor and seat belt height adjuster operate freely.
-
Always perform an inspection after repair to make sure the system is functioning within specifications. Refer to Inspection.
Seat Belt Height Adjuster Nissan Pathfinder 2026
Removal and Installation
REMOVAL
Slide front seat to the full forward position.
Remove the center pillar upper finisher. Refer to Removal and Installation.
Remove nut (A) and remove D-ring anchor (B).
Remove the seat belt height adjuster bolts (A) and the seat belt height adjuster (1).

INSTALLATION
Installation is in the reverse order of removal.
-
Make sure that the seat belt height adjuster is locked in the lowest position and is aligned with the finisher opening during installation.
-
Tighten the D-ring anchor nut and seat belt height adjuster bolts to specification. Refer to Exploded View.
-
Make sure both the D-ring anchor and seat belt height adjuster operate freely.
-
Always perform an inspection after repair to make sure the system is functioning within specifications. Refer to Inspection.
Seat Belt Buckle Nissan Pathfinder Fifth generation
Removal and Installation
REMOVAL
Remove the front seat. Refer to Removal and Installation.
Disconnect the harness connector from seat belt buckle.
Using suitable tool, release the harness retainers from the seat.
 NOTE:
NOTE:
Take note of harness routing and attachment location for correct installation.
Remove the seat belt buckle anchor bolt and the front seat belt buckle.
INSTALLATION
Installation is in the reverse order of removal.
-
Tighten the seat belt buckle anchor bolt to specification. Refer to Exploded View.
-
Always perform an inspection after repair to make sure the system is functioning within specifications. Refer to Inspection.

Nissan Pathfinder (R53) 2022-2026 Service Manual
Front Seat Belt
Contact Us
Nissan Pathfinder Info Center
Email: info@nipathfinder.com
Phone: +1 (800) 123-4567
Address: 123 Pathfinder Blvd, Nashville, TN 37214, USA
Working Hours: Mon–Fri, 9:00 AM – 5:00 PM (EST)
