Nissan Pathfinder: Srs Air Bag - Occupant Classification System
Occupant Classification System Control Unit Nissan Pathfinder Fifth generation
Removal and Installation
WARNING:
-
Before servicing, place the ignition switch in the OFF position, disconnect main battery negative terminal and wait for 3 minutes or more (discharges electricity held in the additional power supply circuit of the air bag diagnosis sensor unit).
-
Do not use air tools or electric tools for servicing.
Removal
Remove the front passenger seat assembly. Refer to Removal and Installation.
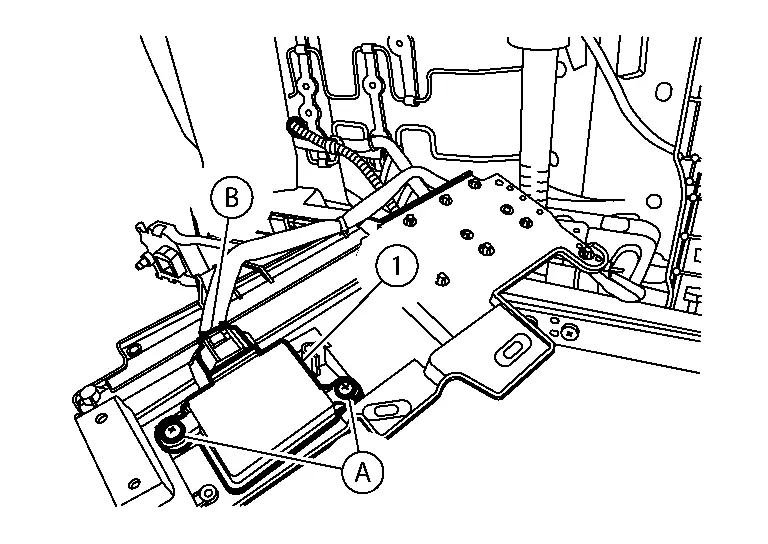
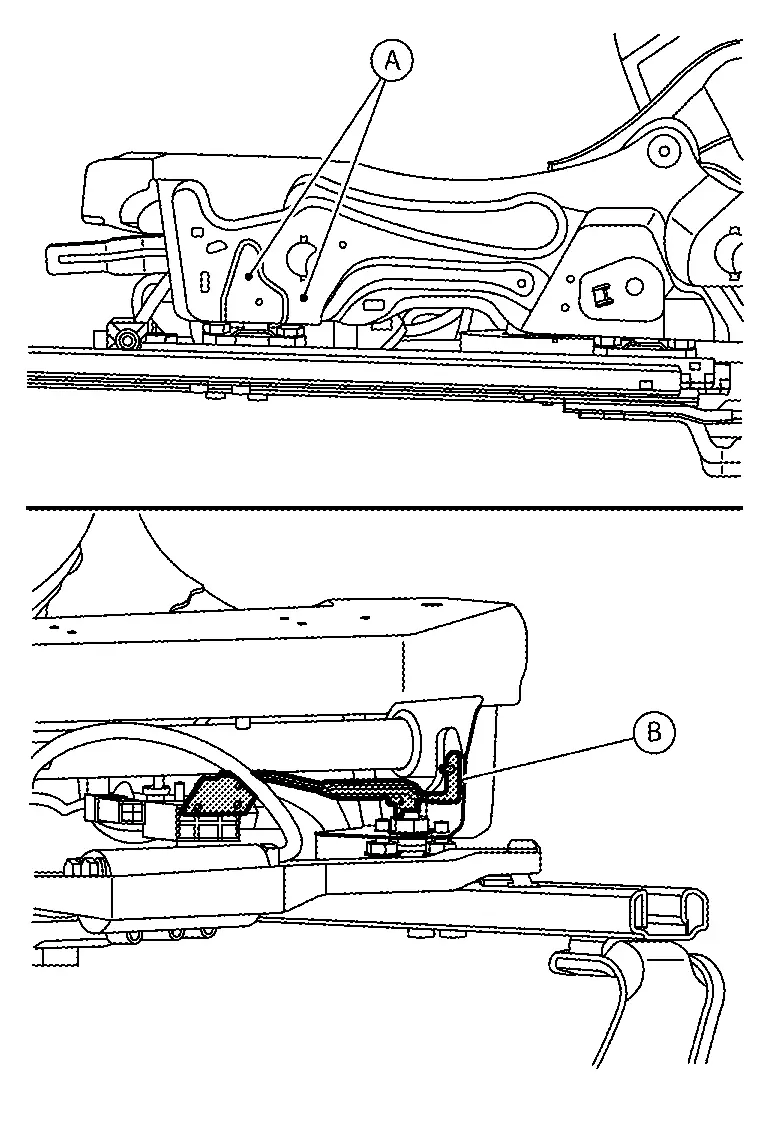
Remove screws (A) and position the center cushion bracket (B) aside to access the occupant classification system control unit.

Remove occupant classification system control unit screws (A), then disconnect the harness connector (B), and remove the occupant classification control unit (1).
CAUTION:
-
Replace the occupant classification control unit if it has been dropped or sustained an impact.
-
Do not strike the occupant classification control unit.
Installation
Installation is in the reverse order of removal.
CAUTION:
-
Do not damage the harness connector during installation.
-
After installation is complete, check that no system malfunction is detected causing the air bag warning lamp to illuminate.
-
If a malfunction is indicated by the air bag warning lamp after repair or replacement of the malfunctioning parts, perform the SRS final check. Refer to SRS Final Check.
Occupant Classification System Sensor Nissan Pathfinder 2026
Removal and Installation
WARNING:
-
When working near the occupant classification system sensor or other air bag system sensors with the ignition switch ON or engine running, DO NOT use air or electric power tools or strike near the sensors with a hammer. Heavy vibration could activate the sensor(s) and deploy the air bag(s), possibly causing serious injury.
-
Before servicing, place the ignition switch in the OFF position, disconnect main battery negative terminal and wait for 3 minutes or more (discharges electricity held in the additional power supply circuit of the air bag diagnosis sensor unit).
-
Do not use air tools or electric tools for servicing the occupant classification system sensor.
-
Do not cause impact to the occupant classification system sensor by dropping, etc. Replace the occupant classification system sensor if it has been dropped or sustained an impact.
-
Do not allow oil, grease, detergent, or water to come in contact with the occupant classification system sensor.
CAUTION:
-
When working with the metal seat frame, use caution to avoid injury from sharp edges.
-
When removing or installing the seat trim, handle it carefully to keep dirt out and to avoid damage.
-
When removing or installing the seat, use shop cloths to protect components from damage.
-
When disconnecting or connecting the harness and harness connectors, handle them carefully to avoid damage.
REMOVAL
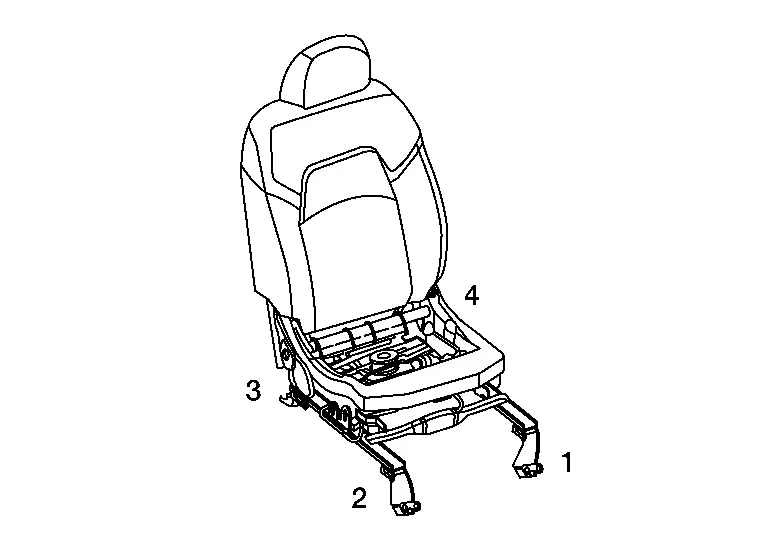
Remove the passenger seat cushion. Refer to Seat Cushion.
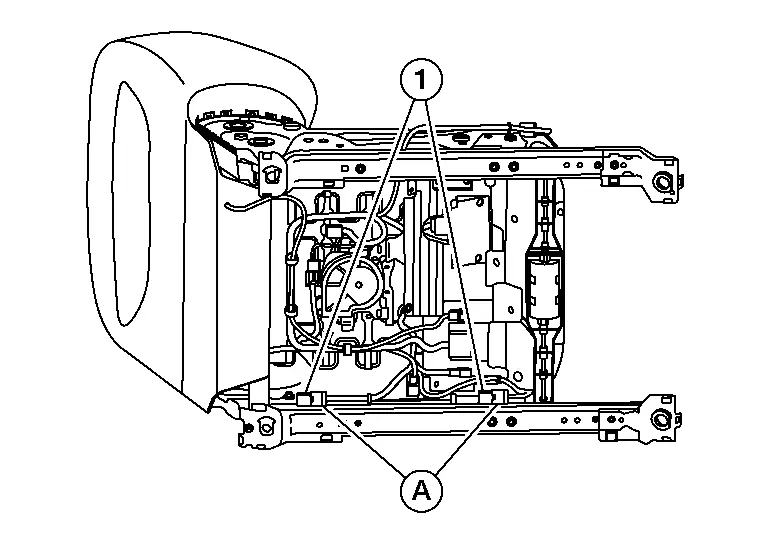
Disconnect the harness connectors (A) from the occupant classification system sensors (1).
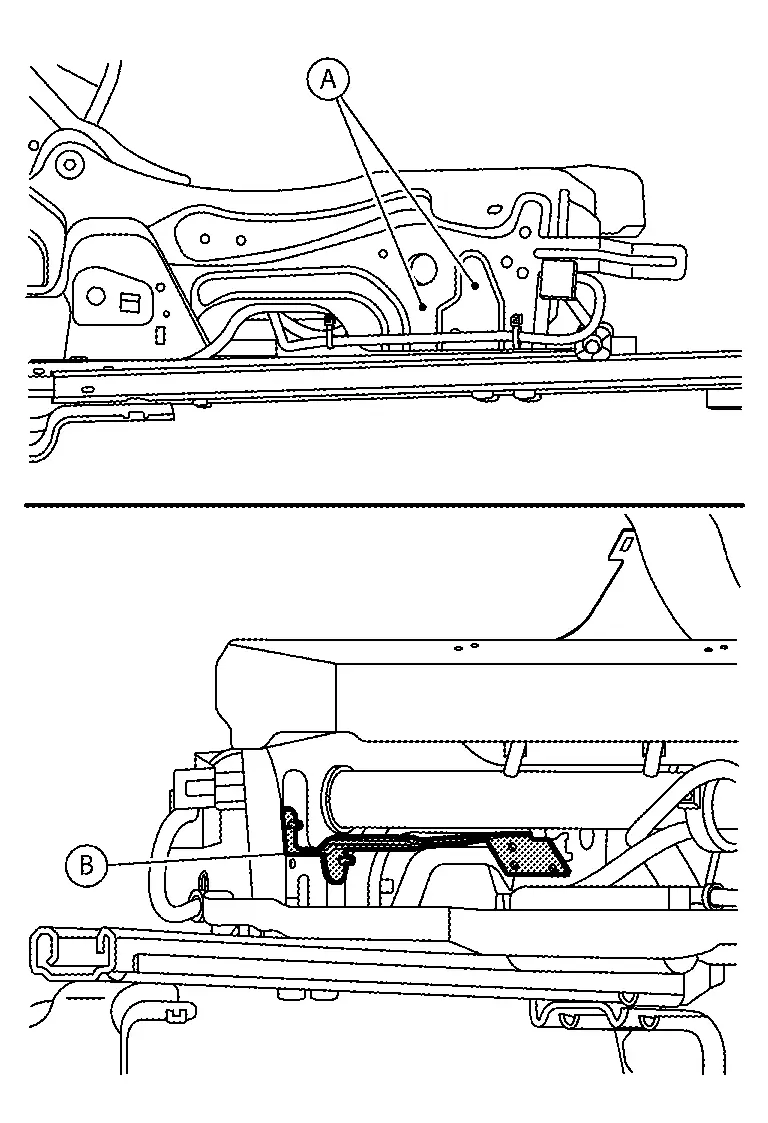
Remove screw (A), release harness retainer, and position the seat cushion inner finisher [LH (1)] aside.

Remove screws (A) and position the center cushion bracket (B) aside.
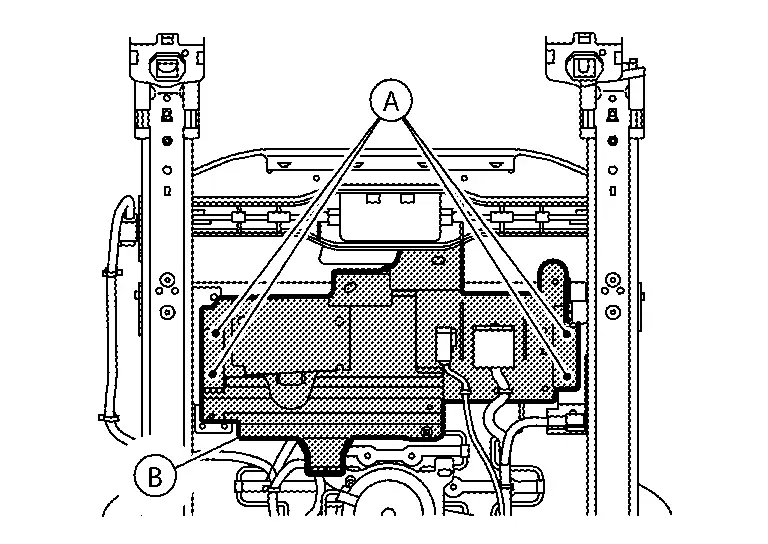
Remove bolts (A) and remove the seat cushion bracket [RH (B)].
Remove bolts (A) and remove the seat cushion bracket [LH (B)].
Install the passenger seat to the Nissan Pathfinder vehicle and tighten bolts to specification in the order shown:
| Passenger seat bolts | : 45 N·m (4.6 kg-m, 33 ft-lb) |
CAUTION:
Do not pinch or damage the harnesses while installing the passenger seat.
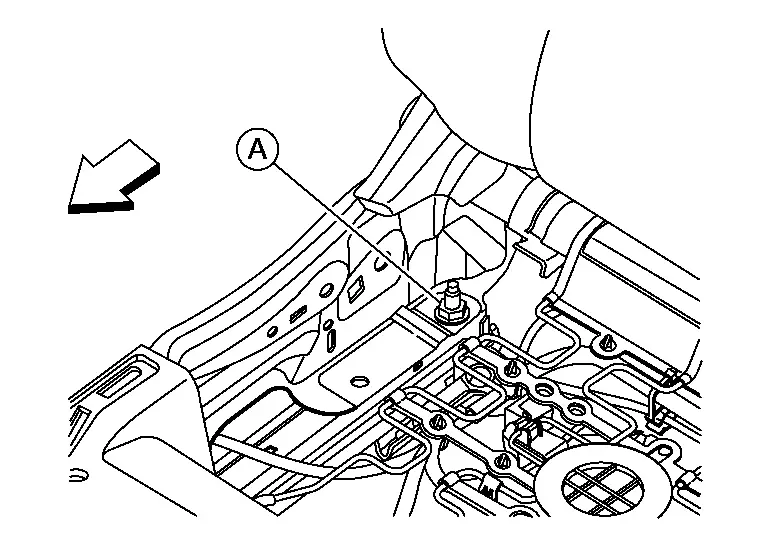
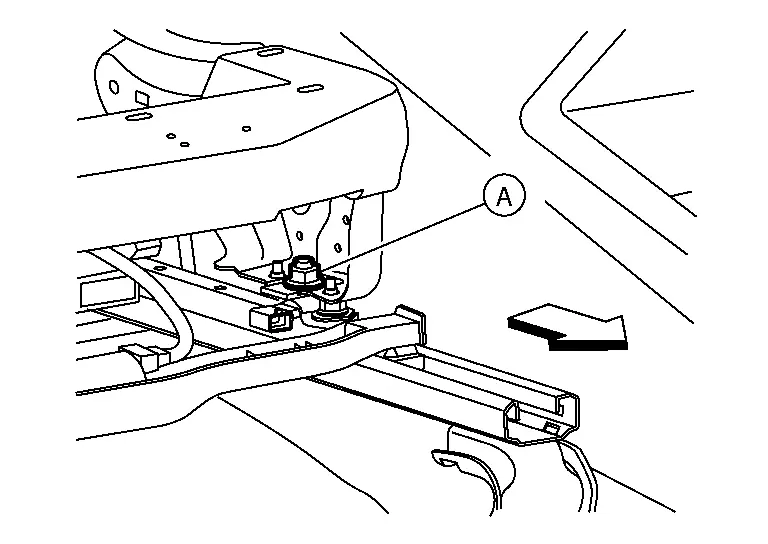
Remove the passenger seat frame assembly from the seat track using the following procedure:Remove nut (A) from the LH (inboard) rear of the seat frame assembly.

 |
: Front |
CAUTION:
Do not reuse nut (A).
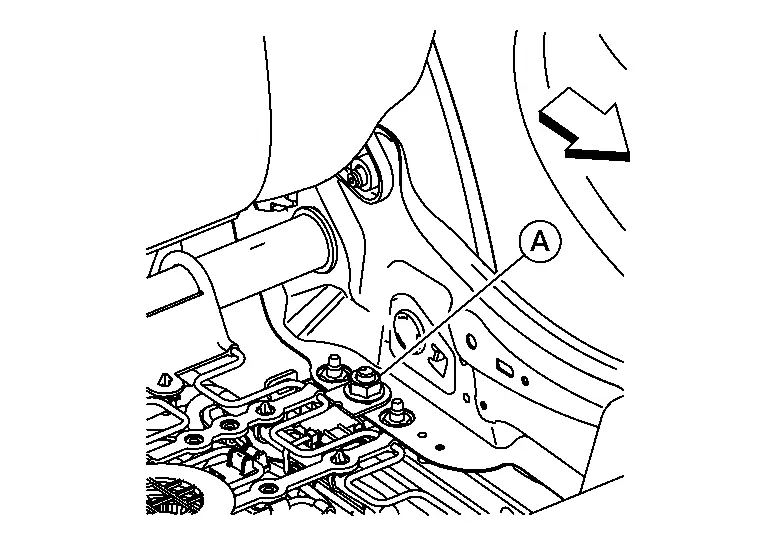
Remove nut (A) from the RH (outboard) rear of the seat frame assembly.
 |
: Front |
CAUTION:
Do not reuse nut (A).
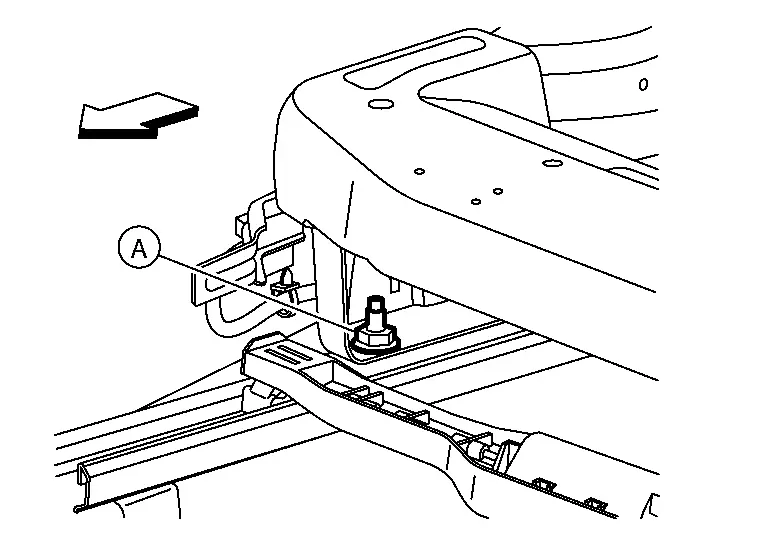
Remove nut (A) from the RH (outboard) front of the seat frame assembly.
 |
: Front |
CAUTION:
Do not reuse nut (A).
Remove nut (A) from the LH (inboard) front of the seat frame assembly.

 |
: Front |
CAUTION:
Do not reuse nut (A).
Separate the seat frame assembly from the seat track and remove the seat frame assembly from Nissan Pathfinder vehicle.Remove nuts (A) and remove the occupant classification system sensors (1) from the seat track.

 |
: Front |
CAUTION:
Do not reuse nut (A).
INSTALLATION
CAUTION:
-
Do not damage the occupant classification system sensor during installation.
-
Do not damage occupant classification system sensor harness during installation.
-
After installation is complete, check that no system malfunction is detected causing the air bag warning lamp to illuminate.
-
If a malfunction is indicated by the air bag warning lamp after repair or replacement of the malfunctioning parts, perform the SRS final check. Refer to SRS Final Check.
-
Perform zero point reset function after the front passenger seat is installed in the Nissan Pathfinder vehicle and all bolts are tightened to specification. Refer to Special Repair Requirement.
Install the occupant classification system sensor (1) to the seat track and tighten nuts (A) to specification.

| Occupant classification system sensor nut | : 24 N·m (2.4 kg-m, 18 ft-lb) |
 |
: Front |
Install the passenger seat frame assembly to the seat track using the following procedure:Gently place the passenger seat frame assembly on the seat track.
CAUTION:
-
Do not cause impact to the occupant classification sensors when placing the seat frame assembly on the seat track.
-
Do not damage the occupant classification system sensor harness connectors.
-
Do not pinch or damage the harnesses while installing the passenger seat frame assembly.
| Seat frame assembly nut | : 45 N·m (4.6 kg-m, 33 ft-lb) |
 |
: Front |

| Seat frame assembly nut | : 45 N·m (4.6 kg-m, 33 ft-lb) |
 |
: Front |

| Seat frame assembly nut | : 45 N·m (4.6 kg-m, 33 ft-lb) |
 |
: Front |
| Seat frame assembly nut | : 45 N·m (4.6 kg-m, 33 ft-lb) |
 |
: Front |
Installation of the remaining components is in the reverse order of removal.

Nissan Pathfinder (R53) 2022-2026 Service Manual
Occupant Classification System
Contact Us
Nissan Pathfinder Info Center
Email: info@nipathfinder.com
Phone: +1 (800) 123-4567
Address: 123 Pathfinder Blvd, Nashville, TN 37214, USA
Working Hours: Mon–Fri, 9:00 AM – 5:00 PM (EST)
