Nissan Pathfinder: Ventilation System - Ducts
Exploded View
Front
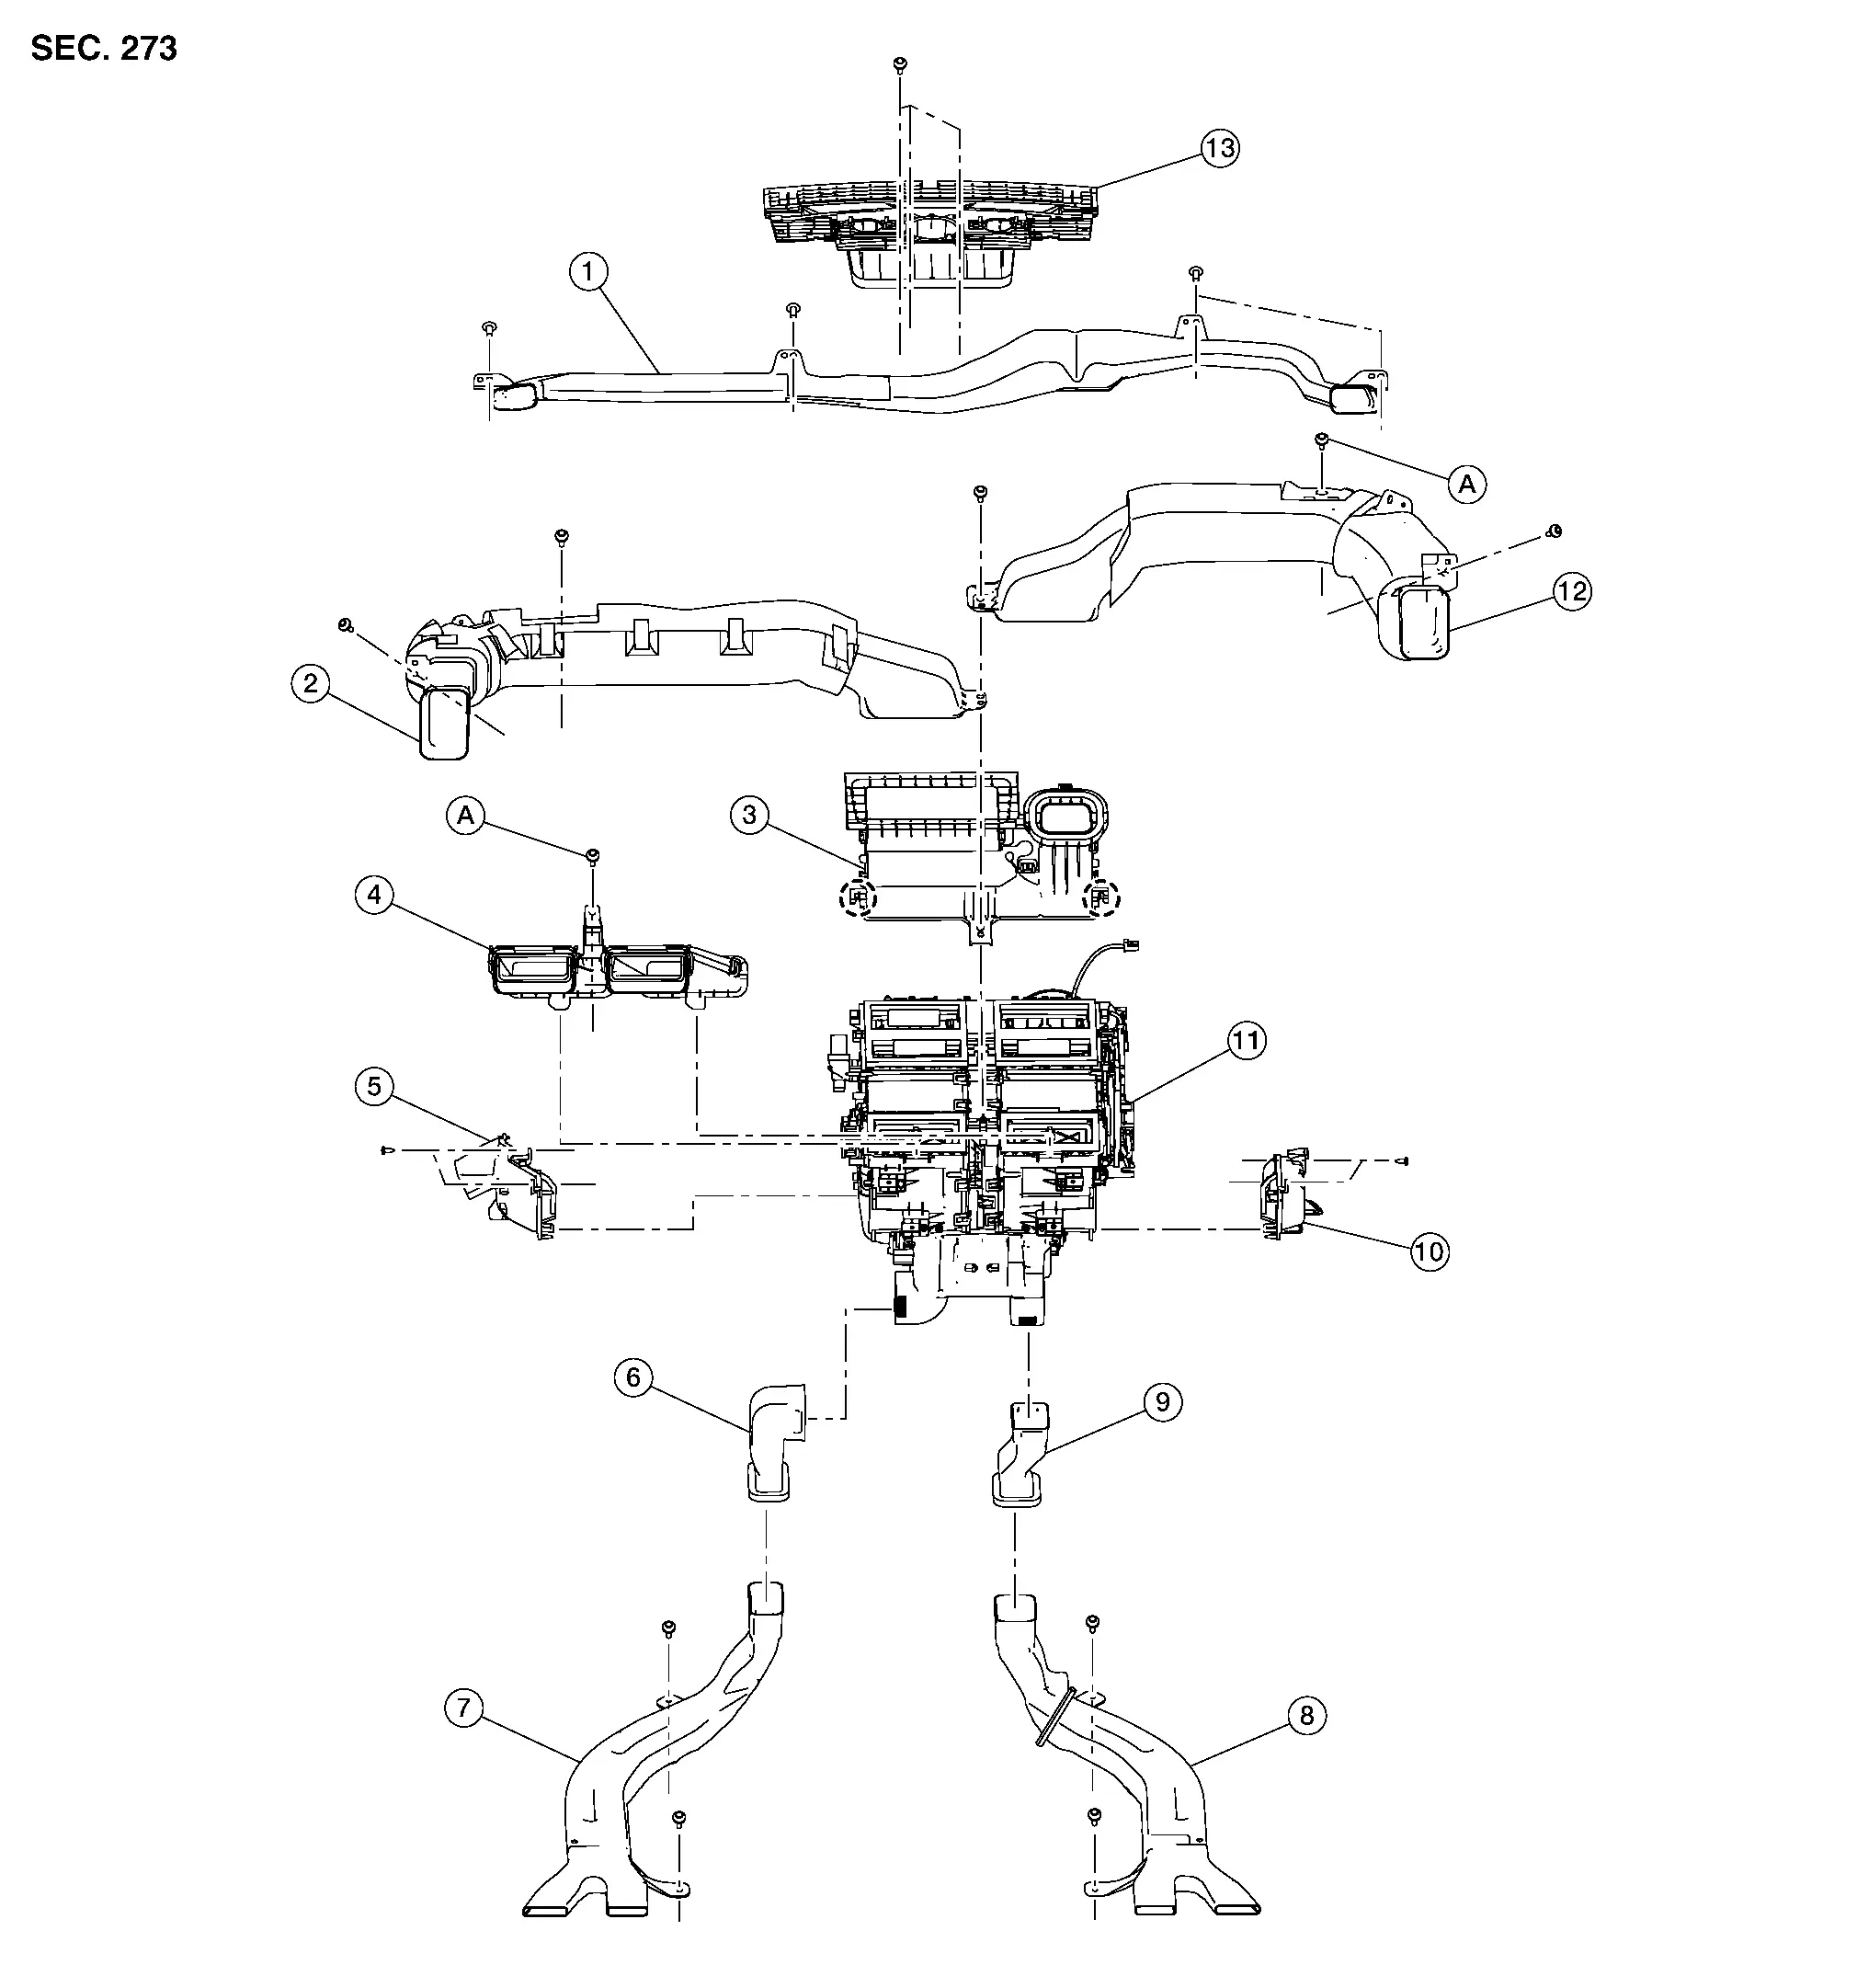
| 1. | Side defroster duct | 2. | Front side ventilator duct (LH) | 3. | Adaptor duct |
| 4. | Center ventilator duct | 5. | Foot duct (LH) | 6. | Front floor connecting duct (LH) |
| 7. | Front floor duct (LH) | 8. | Front floor duct (RH) | 9. | Front floor connecting duct (RH) |
| 10. | Foot duct (RH) | 11. | Front heating and cooling unit assembly | 12. | Front side ventilator duct (RH) |
| 13. | Defroster nozzle | A. | Screw |
 |
Pawl |
- Defroster Nozzle
- Side Defroster Duct
- Side Ventilator Duct
- Adaptor Duct
- Center Ventilator Duct
- Foot Duct
- Front Floor Duct
- Rear Ventilator Duct Lower
- Rear Ventilator Connecting Duct
- Rear Ventilator Duct Upper Center
- Rear Ventilator Duct Upper
Defroster Nozzle Nissan Pathfinder R53
Removal and Installation
Remove instrument panel assembly. Refer to Removal and Installation.
Remove defroster nozzle screws. Refer to Exploded View.
Remove defroster nozzle.
INSTALLATION
Installation is in the reverse order of removal.
Side Defroster Duct Nissan Pathfinder SUV
Removal and Installation
REMOVAL
Remove instrument panel assembly. Refer to Removal and Installation.
Remove screws retaining side defroster duct to instrument panel assembly. Refer to Exploded View.
Remove side defroster duct.
INSTALLATION
Installation is in the reverse order of removal.
Side Ventilator Duct Nissan Pathfinder Fifth generation
Removal and Installation (RH)
Remove instrument panel assembly. Refer to Removal and Installation.
Remove screw retaining side ventilator ducts and adaptor duct to front heating and cooling unit assembly. Refer to Exploded View.
Remove screws, then remove side ventilator duct (RH).
Removal and Installation (LH)
Remove side ventilator duct (RH). Refer to Removal and Installation (RH).
Remove screws, then remove side ventilator duct (LH).
Adaptor Duct Nissan Pathfinder
Removal and Installation
REMOVAL
Remove instrument panel assembly. Refer to Removal and Installation.
Remove front side ventilator duct (LH). Refer to Removal and Installation (LH).
Release pawls, then remove adaptor duct.
INSTALLATION
Installation is in the reverse order of removal.
Center Ventilator Duct Nissan Pathfinder Fifth generation
Removal and Installation
REMOVAL
Remove side ventilator duct (LH). Refer to Removal and Installation (LH).
Remove screw, then remove center ventilator duct.
INSTALLATION
Installation is in the reverse order of removal.
Foot Duct Nissan Pathfinder Fifth generation
Removal and Installation (RH)
Remove front heating and cooling unit assembly. Refer to Removal and Installation.
Remove foot duct (RH) screws. Refer to Exploded View.
Remove foot duct (RH).
INSTALLATION
Installation is in the reverse order of removal.
Removal and Installation (LH)
Remove knee air bag module LH. Refer to Removal and Installation.
Remove foot duct (LH) screws. Refer to Exploded View.
Remove foot duct (LH).
INSTALLATION
Installation is in the reverse order of removal.
Front Floor Duct Nissan Pathfinder 5th Gen
Removal and Installation - Front Floor Connecting Duct
REMOVAL
Remove center console side finisher. Refer to Exploded View.
Remove front floor connecting duct.
INSTALLATION
Installation is in the reverse order of removal.
Removal and Installation - Front Floor Duct
REMOVAL
Remove front floor trim. Refer to Removal and Installation.
Remove screws, then remove front floor duct.
INSTALLATION
Installation is in the reverse order of removal.
Exploded View
REAR
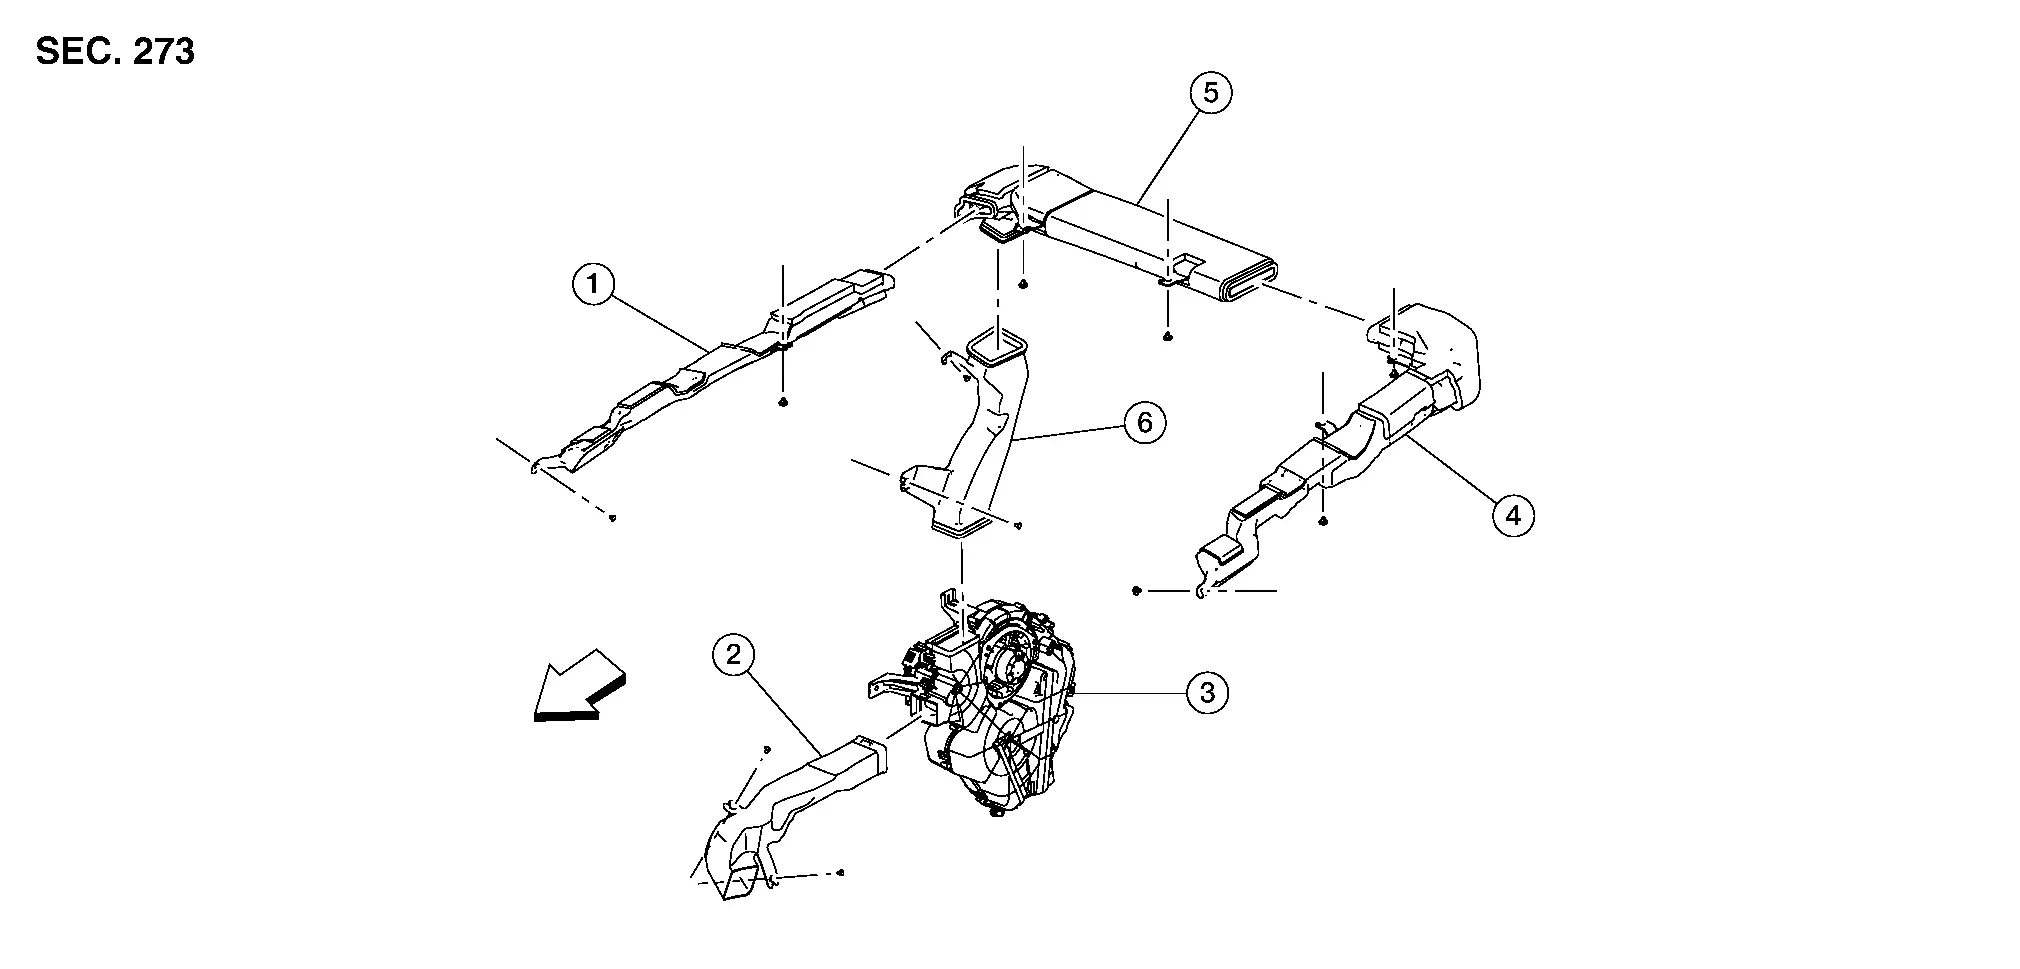
| 1. | Rear ventilator duct upper (RH) | 2. | Rear ventilator duct lower | 3. | Rear cooling unit assembly |
| 4. | Rear ventilator duct upper (LH) | 5. | Rear ventilator duct upper center | 6. | Rear ventilator connecting duct |
 |
Front |
Rear Ventilator Duct Lower Nissan Pathfinder R53
Removal and Installation
REMOVAL
Remove luggage side lower finisher (RH). Refer to Removal and Installation.
Remove clips, then remove rear ventilator duct lower.
INSTALLATION
Installation is in the reverse order of removal.
Rear Ventilator Connecting Duct Nissan Pathfinder 5th Gen
Removal and Installation
REMOVAL
Remove headlining. Refer to Removal and Installation.
Remove rear ventilator duct upper center. Refer to Removal and Installation.
Remove clips and remove rear ventilator connecting duct.
INSTALLATION
Installation is in the reverse order of removal.
Rear Ventilator Duct Upper Center Nissan Pathfinder 2022
Removal and Installation
REMOVAL
Remove headlining. Refer to Removal and Installation.
Remove clips, then remove rear ventilator duct upper center.
INSTALLATION
Installation is in the reverse order of removal.
Rear Ventilator Duct Upper Nissan Pathfinder R53
Removal and Installation (RH)
REMOVAL
Remove headlining. Refer to Removal and Installation.
Remove drain hose (B).
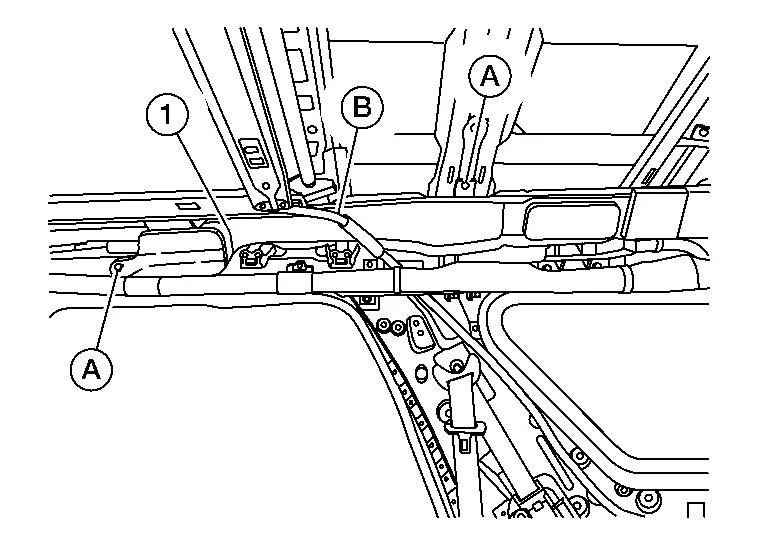
Remove clips (A), then remove rear ventilator duct upper (RH) (1).
INSTALLATION
Installation is in the reverse order of removal.
Removal and Installation (LH)
REMOVAL
Remove headlining. Refer to Removal and Installation.
Remove drain hose (B).
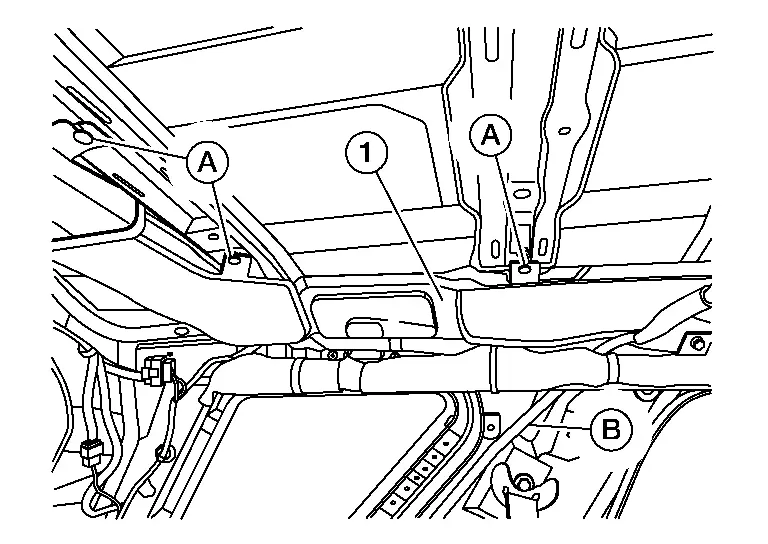
Remove clips (A), then remove rear ventilator duct upper (LH) (1).
INSTALLATION
Installation is in the reverse order of removal.

Nissan Pathfinder (R53) 2022-2026 Service Manual
Ducts
- Defroster Nozzle
- Side Defroster Duct
- Side Ventilator Duct
- Adaptor Duct
- Center Ventilator Duct
- Foot Duct
- Front Floor Duct
- Rear Ventilator Duct Lower
- Rear Ventilator Connecting Duct
- Rear Ventilator Duct Upper Center
- Rear Ventilator Duct Upper
Contact Us
Nissan Pathfinder Info Center
Email: info@nipathfinder.com
Phone: +1 (800) 123-4567
Address: 123 Pathfinder Blvd, Nashville, TN 37214, USA
Working Hours: Mon–Fri, 9:00 AM – 5:00 PM (EST)
