Nissan Pathfinder: Heater & Air Conditioning Control System - Removal and Installation
- Front A/c Switch Assembly
- Rear A/c Switch Assembly
- A/c Auto Amp.
- Ambient Sensor
- Front in-Vehicle Sensor
- Rear in-Vehicle Sensor
- Sunload Sensor
- Intake Sensor
- Door Motor
- Rear Blower Motor Resistor
Front A/c Switch Assembly Nissan Pathfinder 2022
Removal and Installation
REMOVAL
Remove cluster lid C. Refer to Removal and Installation.
Remove screws (A), release pawls, then remove front A/C switch assembly (1) from cluster lid C (2).
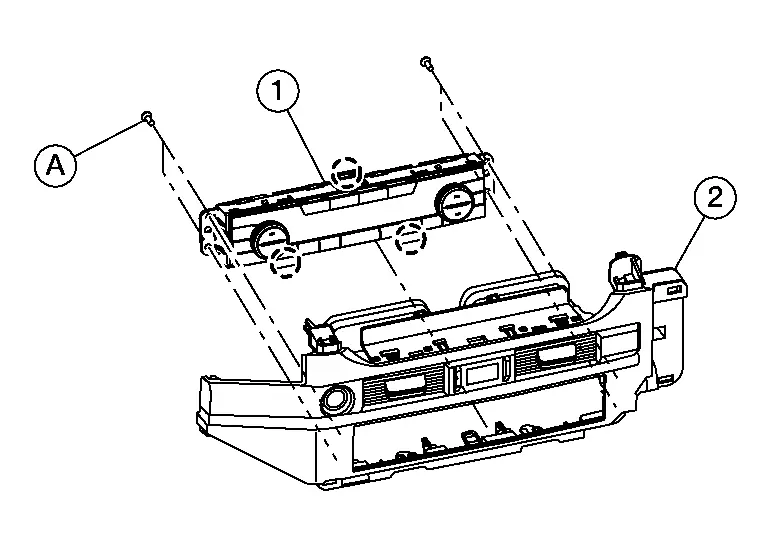
 |
: Pawl |
INSTALLATION
Installation is in the reverse order of removal.
Rear A/c Switch Assembly Nissan Pathfinder R53
Removal and Installation
REMOVAL
Using a suitable tool, release clips and remove center console rear finisher (1).
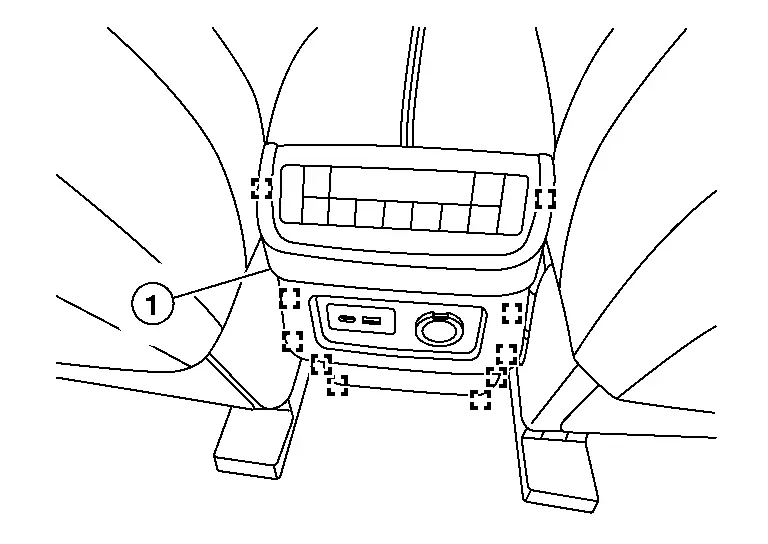
 |
: Metal clip |
Remove center console rear finisher switch carrier (A) from center console rear finisher (1).
Remove screws (B), then remove rear A/C switch assembly.
INSTALLATION
Installation is in the reverse order of removal.
A/c Auto Amp. Nissan Pathfinder 5th Gen
Exploded View
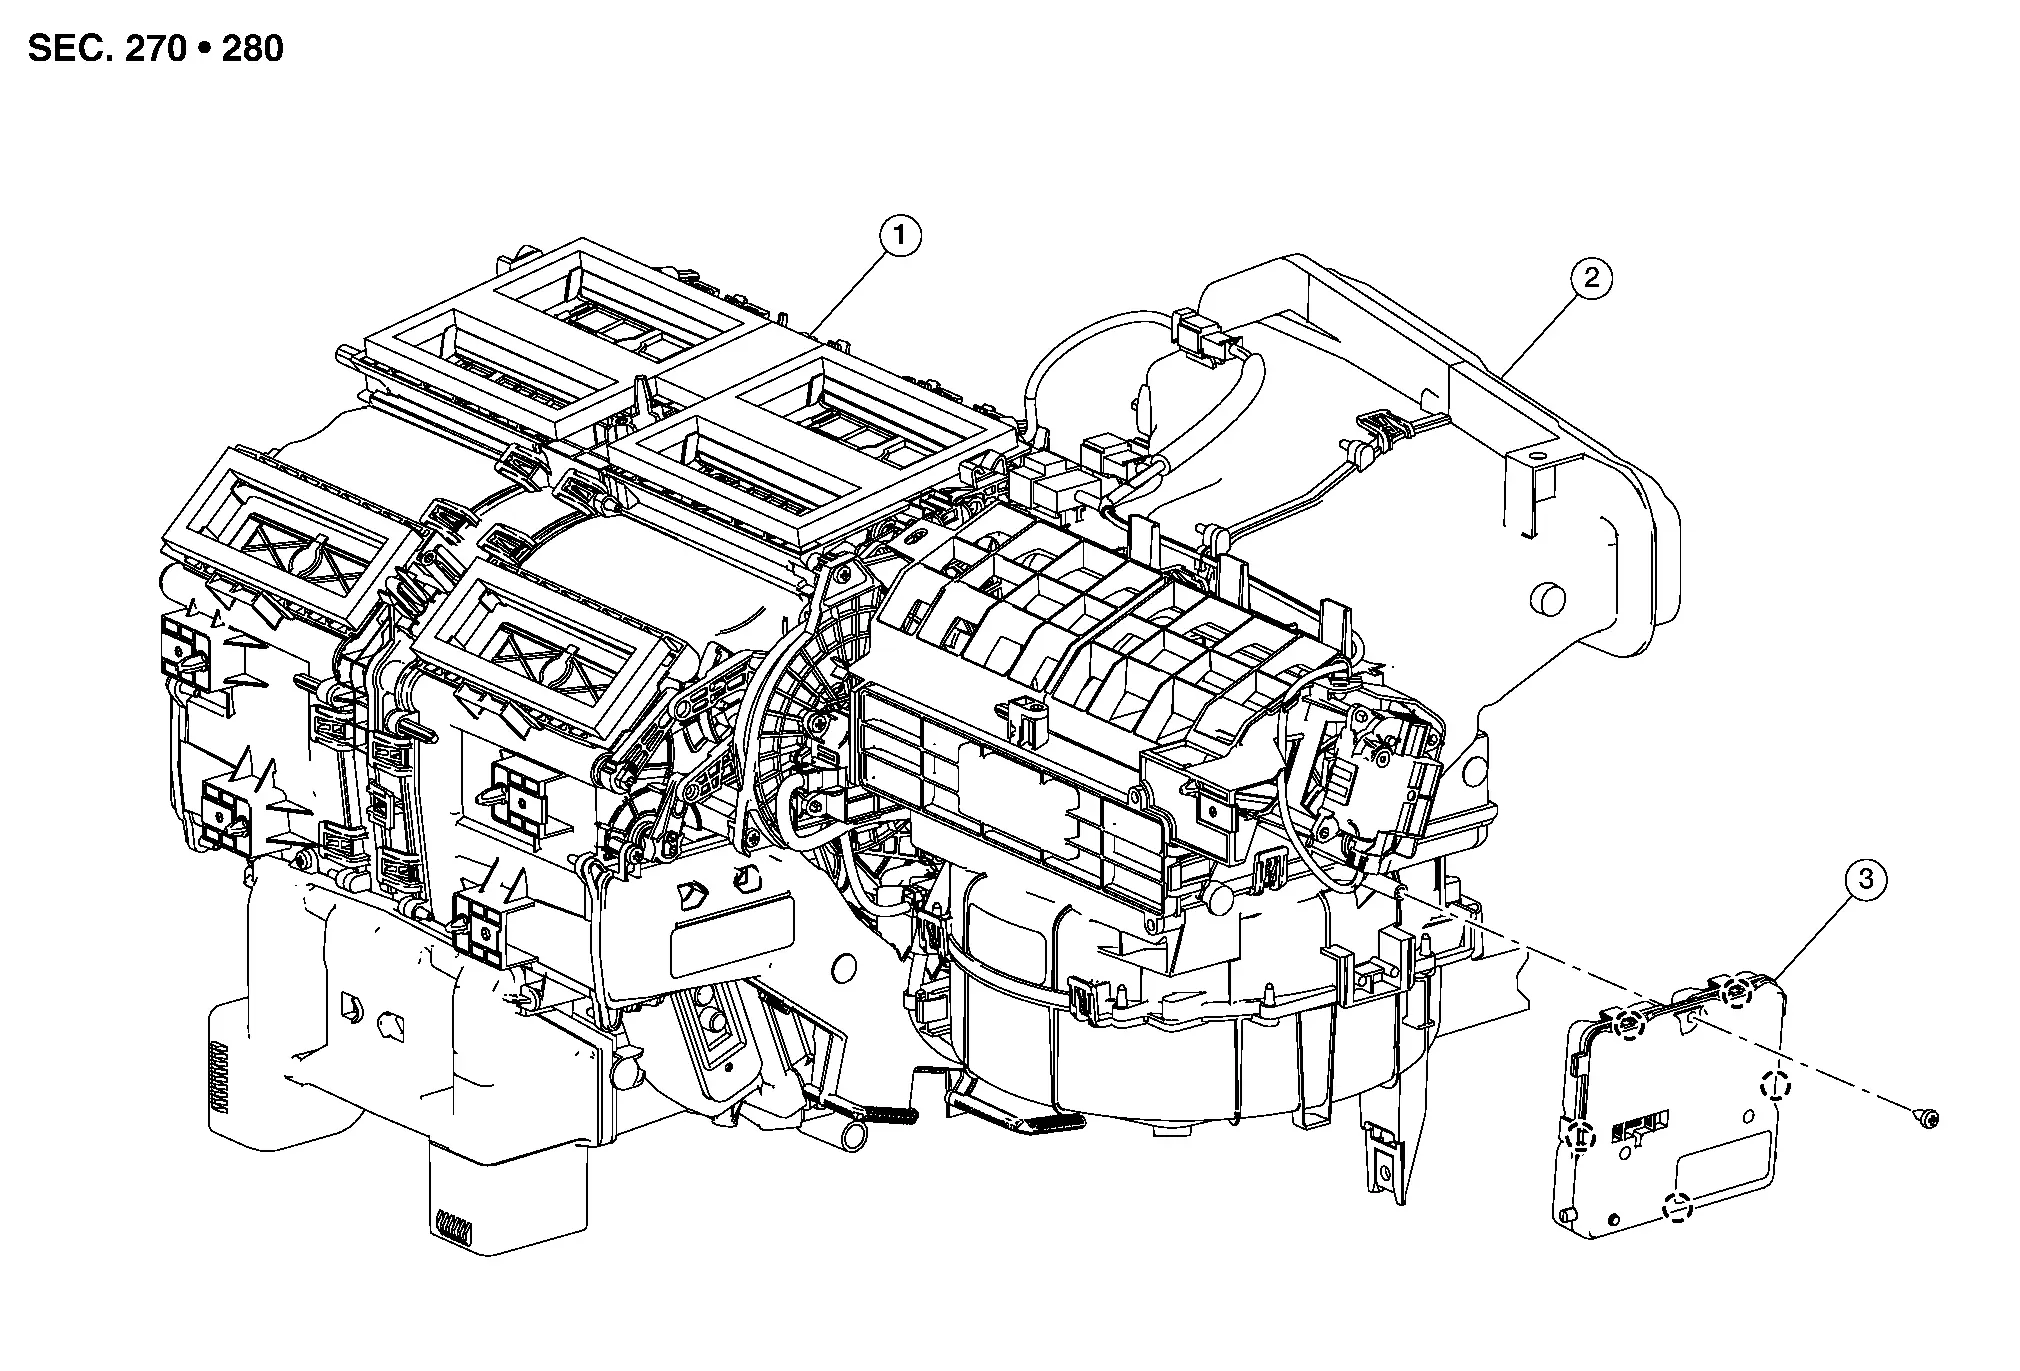
| 1. | Front heating and cooling unit | 2. | Front blower unit | 3. | A/C auto amp. |
 |
Pawl |
Removal and Installation
REMOVAL
CAUTION:
Perform "ADDITIONAL SERVICE WHEN REPLACING CONTROL UNIT". Refer to Description.
Remove glove box assembly. Refer to Removal and Installation.
Remove knee air bag module RH. Refer to Removal and Installation.
Disconnect harness connector from A/C auto amp.
Remove screw (A), release pawls, then remove A/C auto amp. (2) from front blower motor (1).
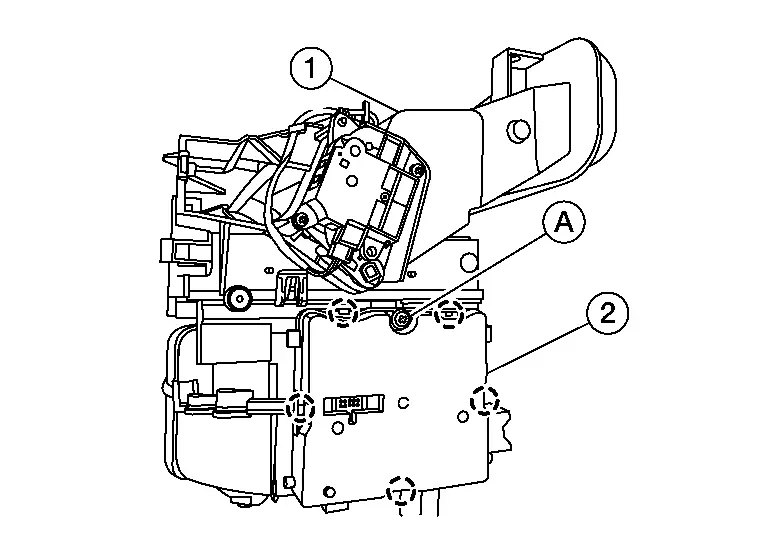
 |
: Pawl |
INSTALLATION
Installation is in the reverse order of removal.
CAUTION:
-
Perform "ADDITIONAL SERVICE WHEN REPLACING CONTROL UNIT". Refer to Description.
-
If “Before ECU Replacement” of “Nissan Pathfinder Vehicle CONFIGURATION” cannot be used, use the “Manual selection” after replacing A/C auto amp. to write Nissan Pathfinder vehicle specification. Refer to Work Procedure.
Ambient Sensor Nissan Pathfinder R53
Removal and Installation
REMOVAL
Remove front bumper fascia. Refer to Removal and Installation.
Disconnect harness connector from ambient sensor.
Release ambient sensor clip, then remove ambient sensor (1).
 |
: Clip |
INSTALLATION
Installation is in the reverse order of removal.
Front in-Vehicle Sensor Nissan Pathfinder Fifth generation
Removal and Installation
REMOVAL
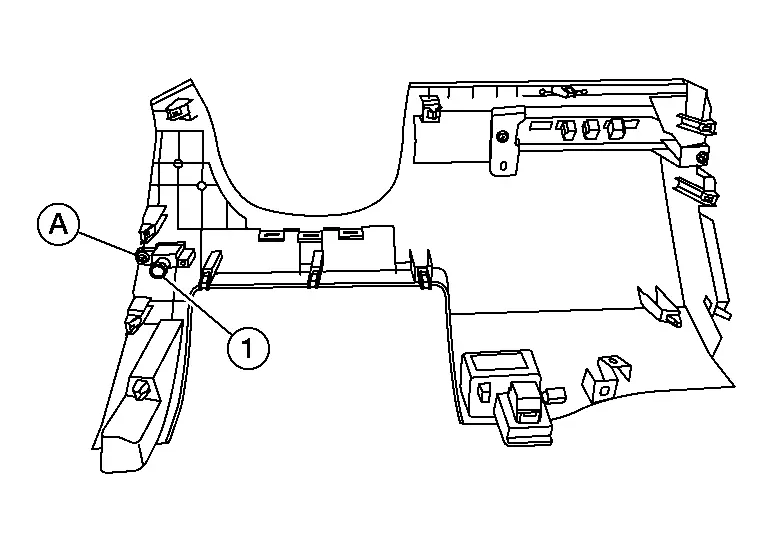
Remove instrument lower panel LH. Refer to Removal and Installation.
Remove screw (A), then remove front in-Nissan Pathfinder vehicle sensor (1).
INSTALLATION
Installation is in the reverse order of removal.
CAUTION:
Make sure that the aspirator hose is securely attached to the in-vehicle sensor when installing the instrument lower panel LH.
Rear in-Vehicle Sensor Nissan Pathfinder 2026
Removal and Installation
REMOVAL
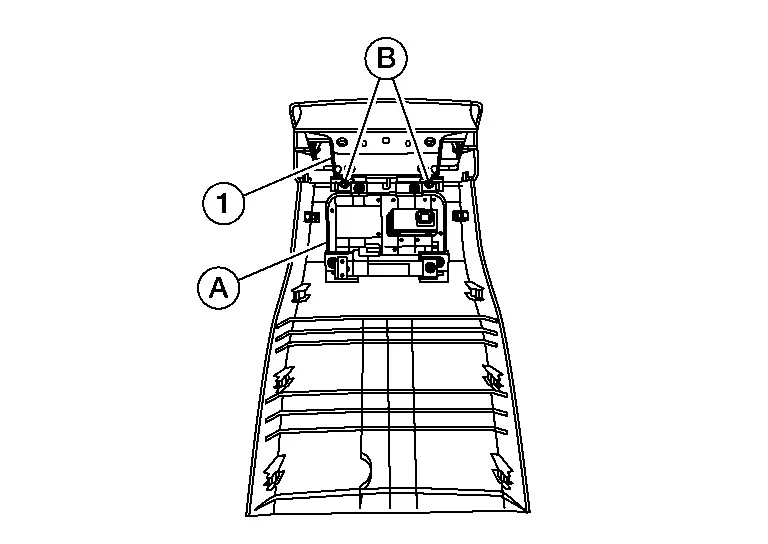
Remove luggage side lower finisher RH. Refer to Removal and Installation.
Disconnect harness connector from rear in-Nissan Pathfinder vehicle sensor (1).
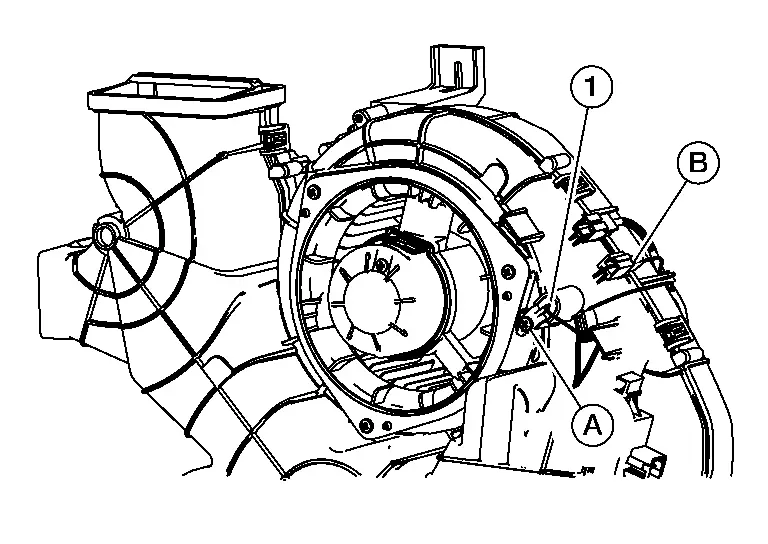
Disconnect harness connector (B) from rear heating and cooling unit assembly.
Remove screw (A), then remove rear in-Nissan Pathfinder vehicle sensor.
INSTALLATION
Installation is in the reverse order of removal.
Sunload Sensor Nissan Pathfinder SUV
Removal and Installation
REMOVAL
Remove defroster grille. Refer to Removal and Installation.
Disconnect harness connector from sunload sensor.
Disconnect harness connector from optical sensor.
Using a suitable tool, release pawls then remove sunload sensor (1) from defroster grille.

 |
: Pawl |
INSTALLATION
Installation is in the reverse order of removal.
Intake Sensor Nissan Pathfinder Fifth generation
Removal and Installation
REMOVAL
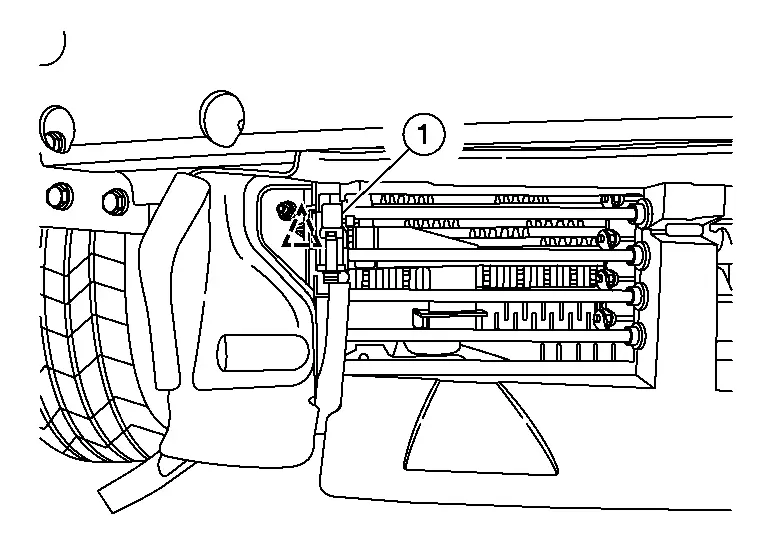
Remove front evaporator. Refer to Removal and Installation.
Remove intake sensor (1) from evaporator (2).
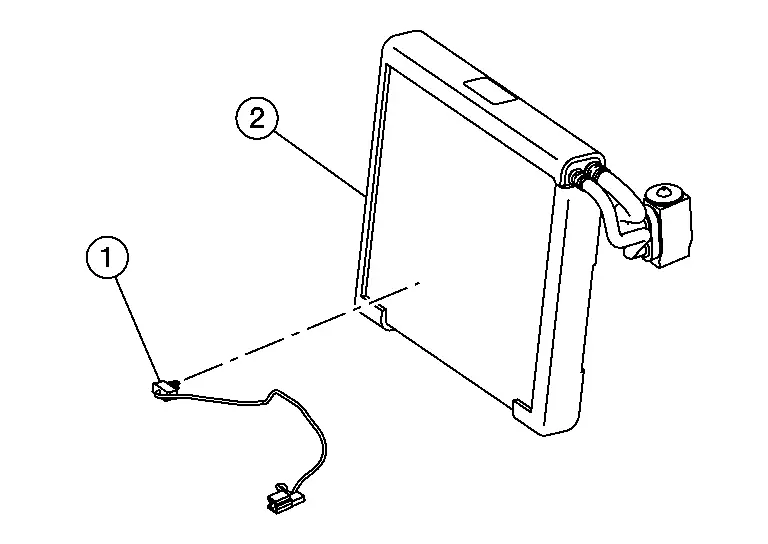
 NOTE:
NOTE:
Mark position of intake sensor for installation.
INSTALLATION
Installation is in the reverse order of removal.
Door Motor Nissan Pathfinder R53
Exploded View
Front Heating and Cooling Unit Door Motors
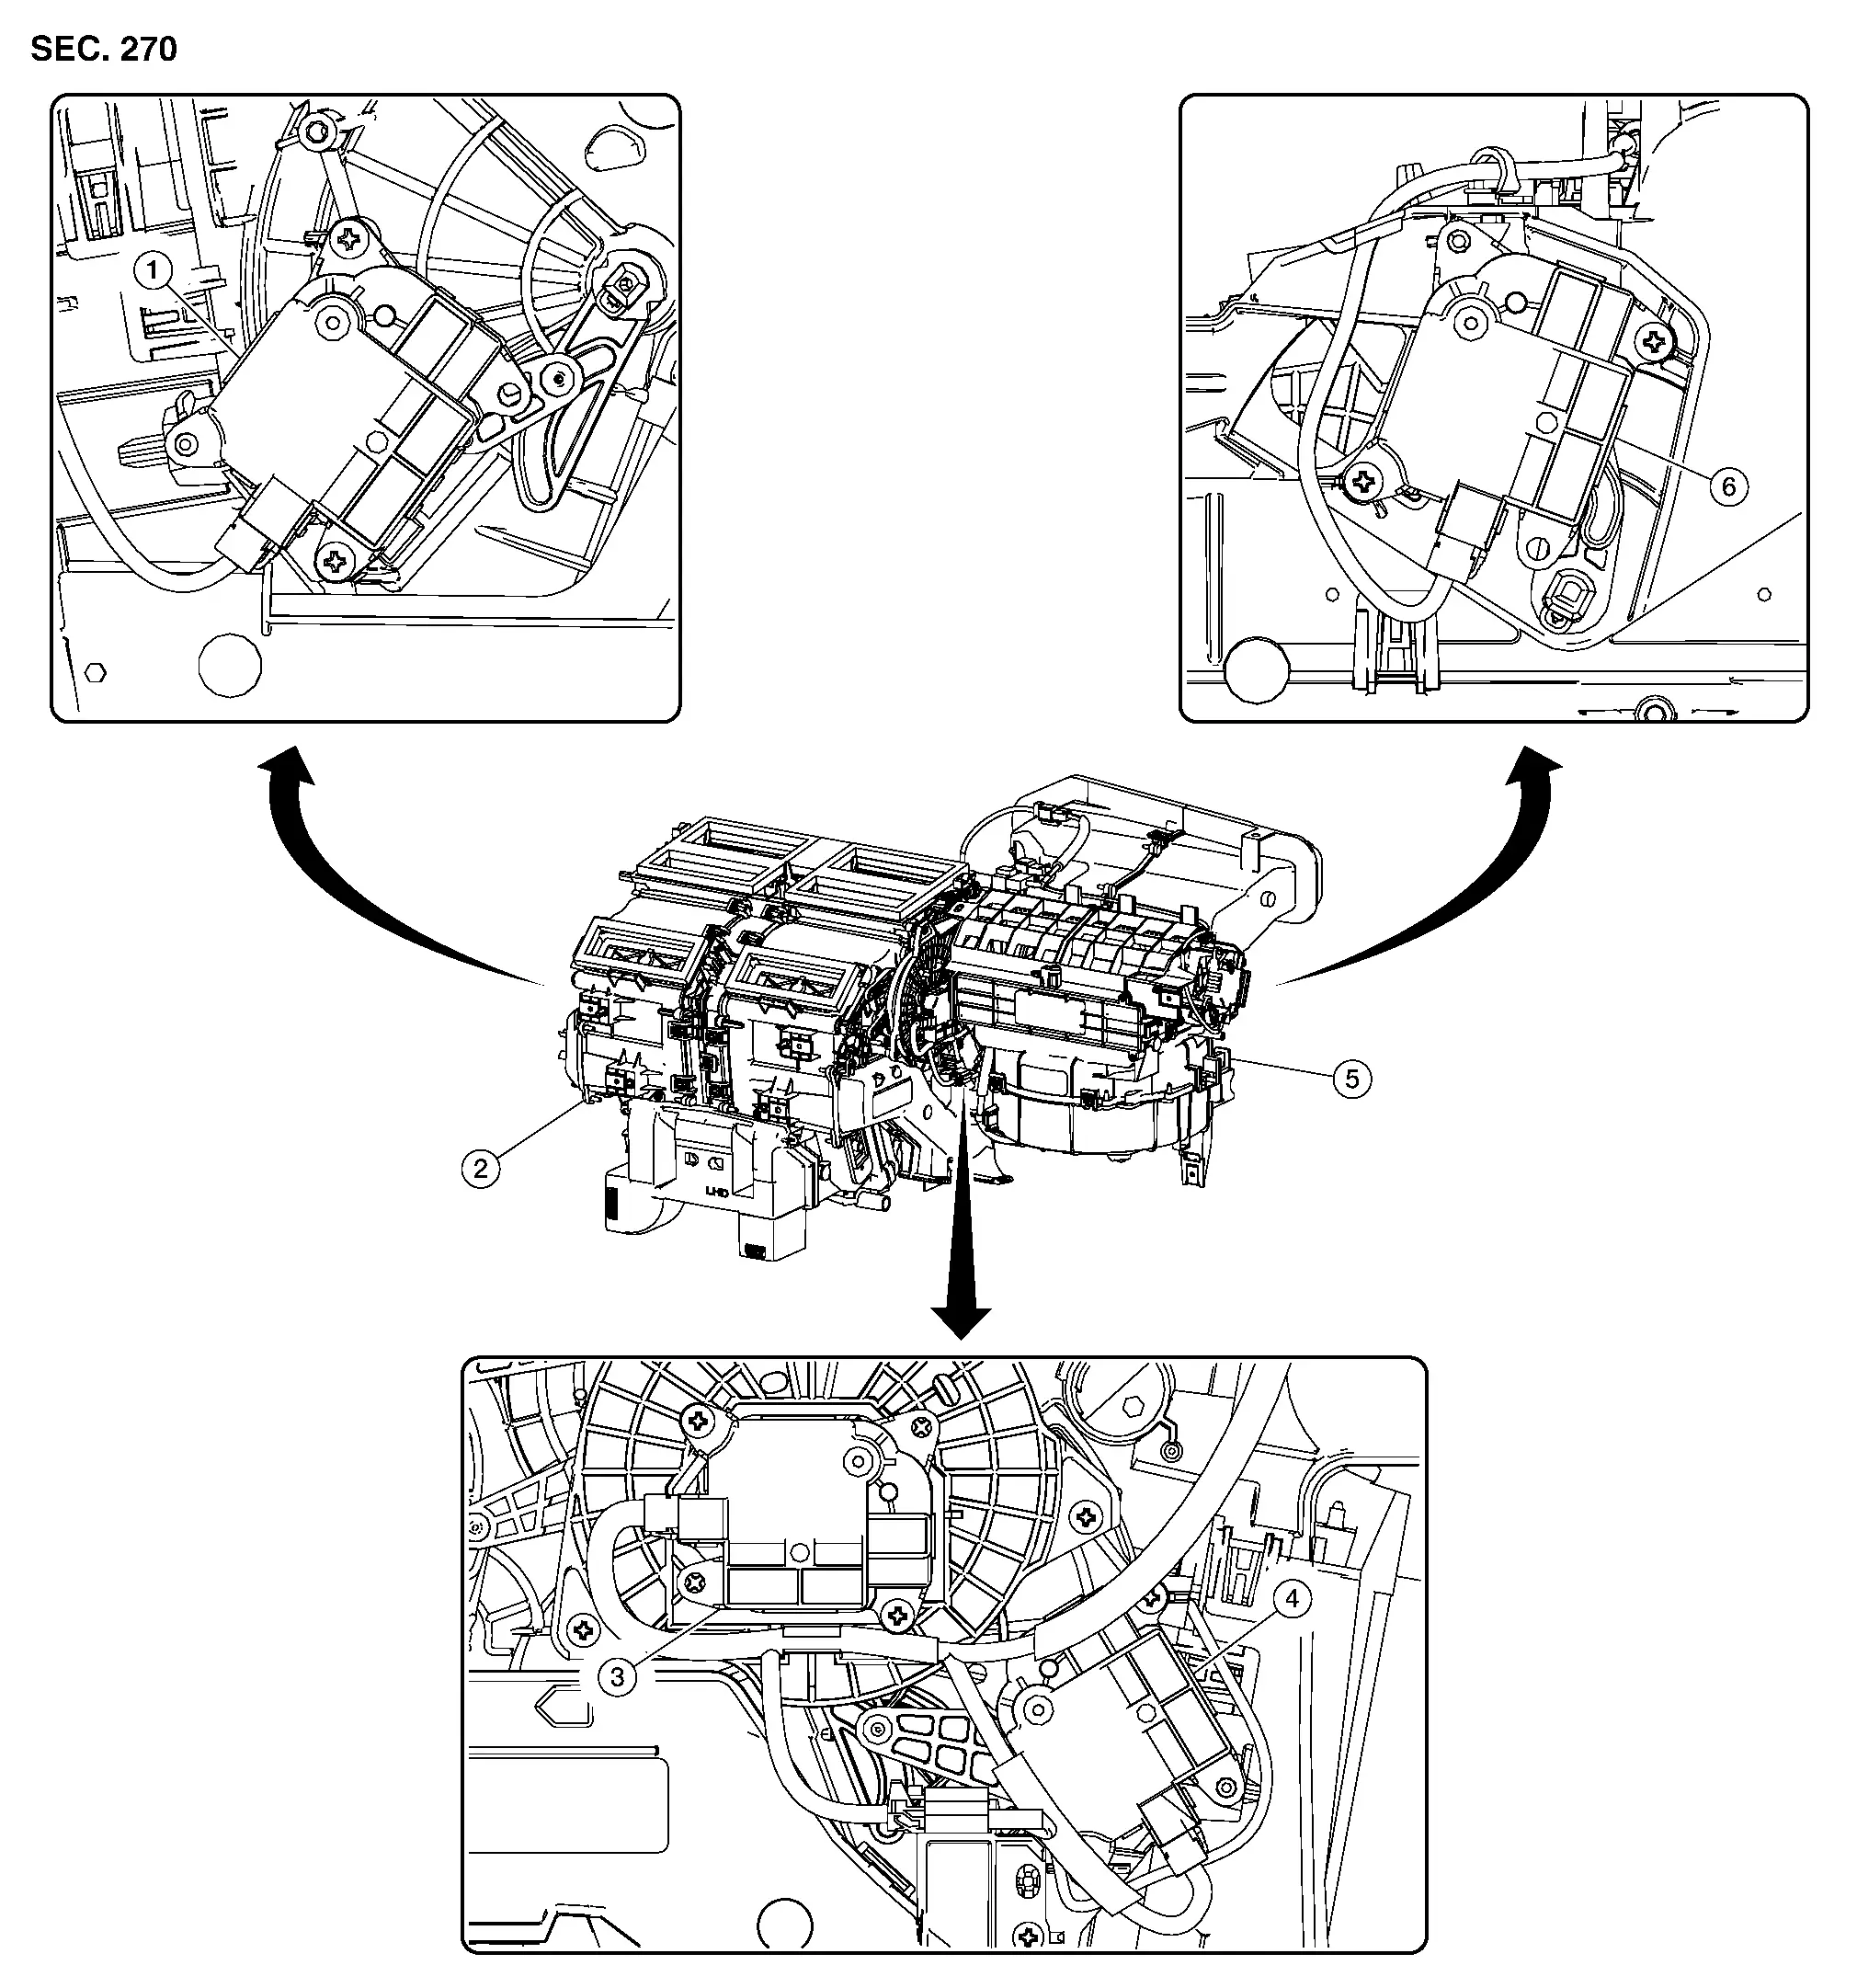
| 1. | Air mix door motor (LH) | 2. | Front heating and cooling unit assembly | 3. | Mode door motor (front) |
| 4. | Air mix door motor (RH) | 5. | Front blower motor | 6. | Intake door motor |
Rear Heating and Cooling Unit Door Motors
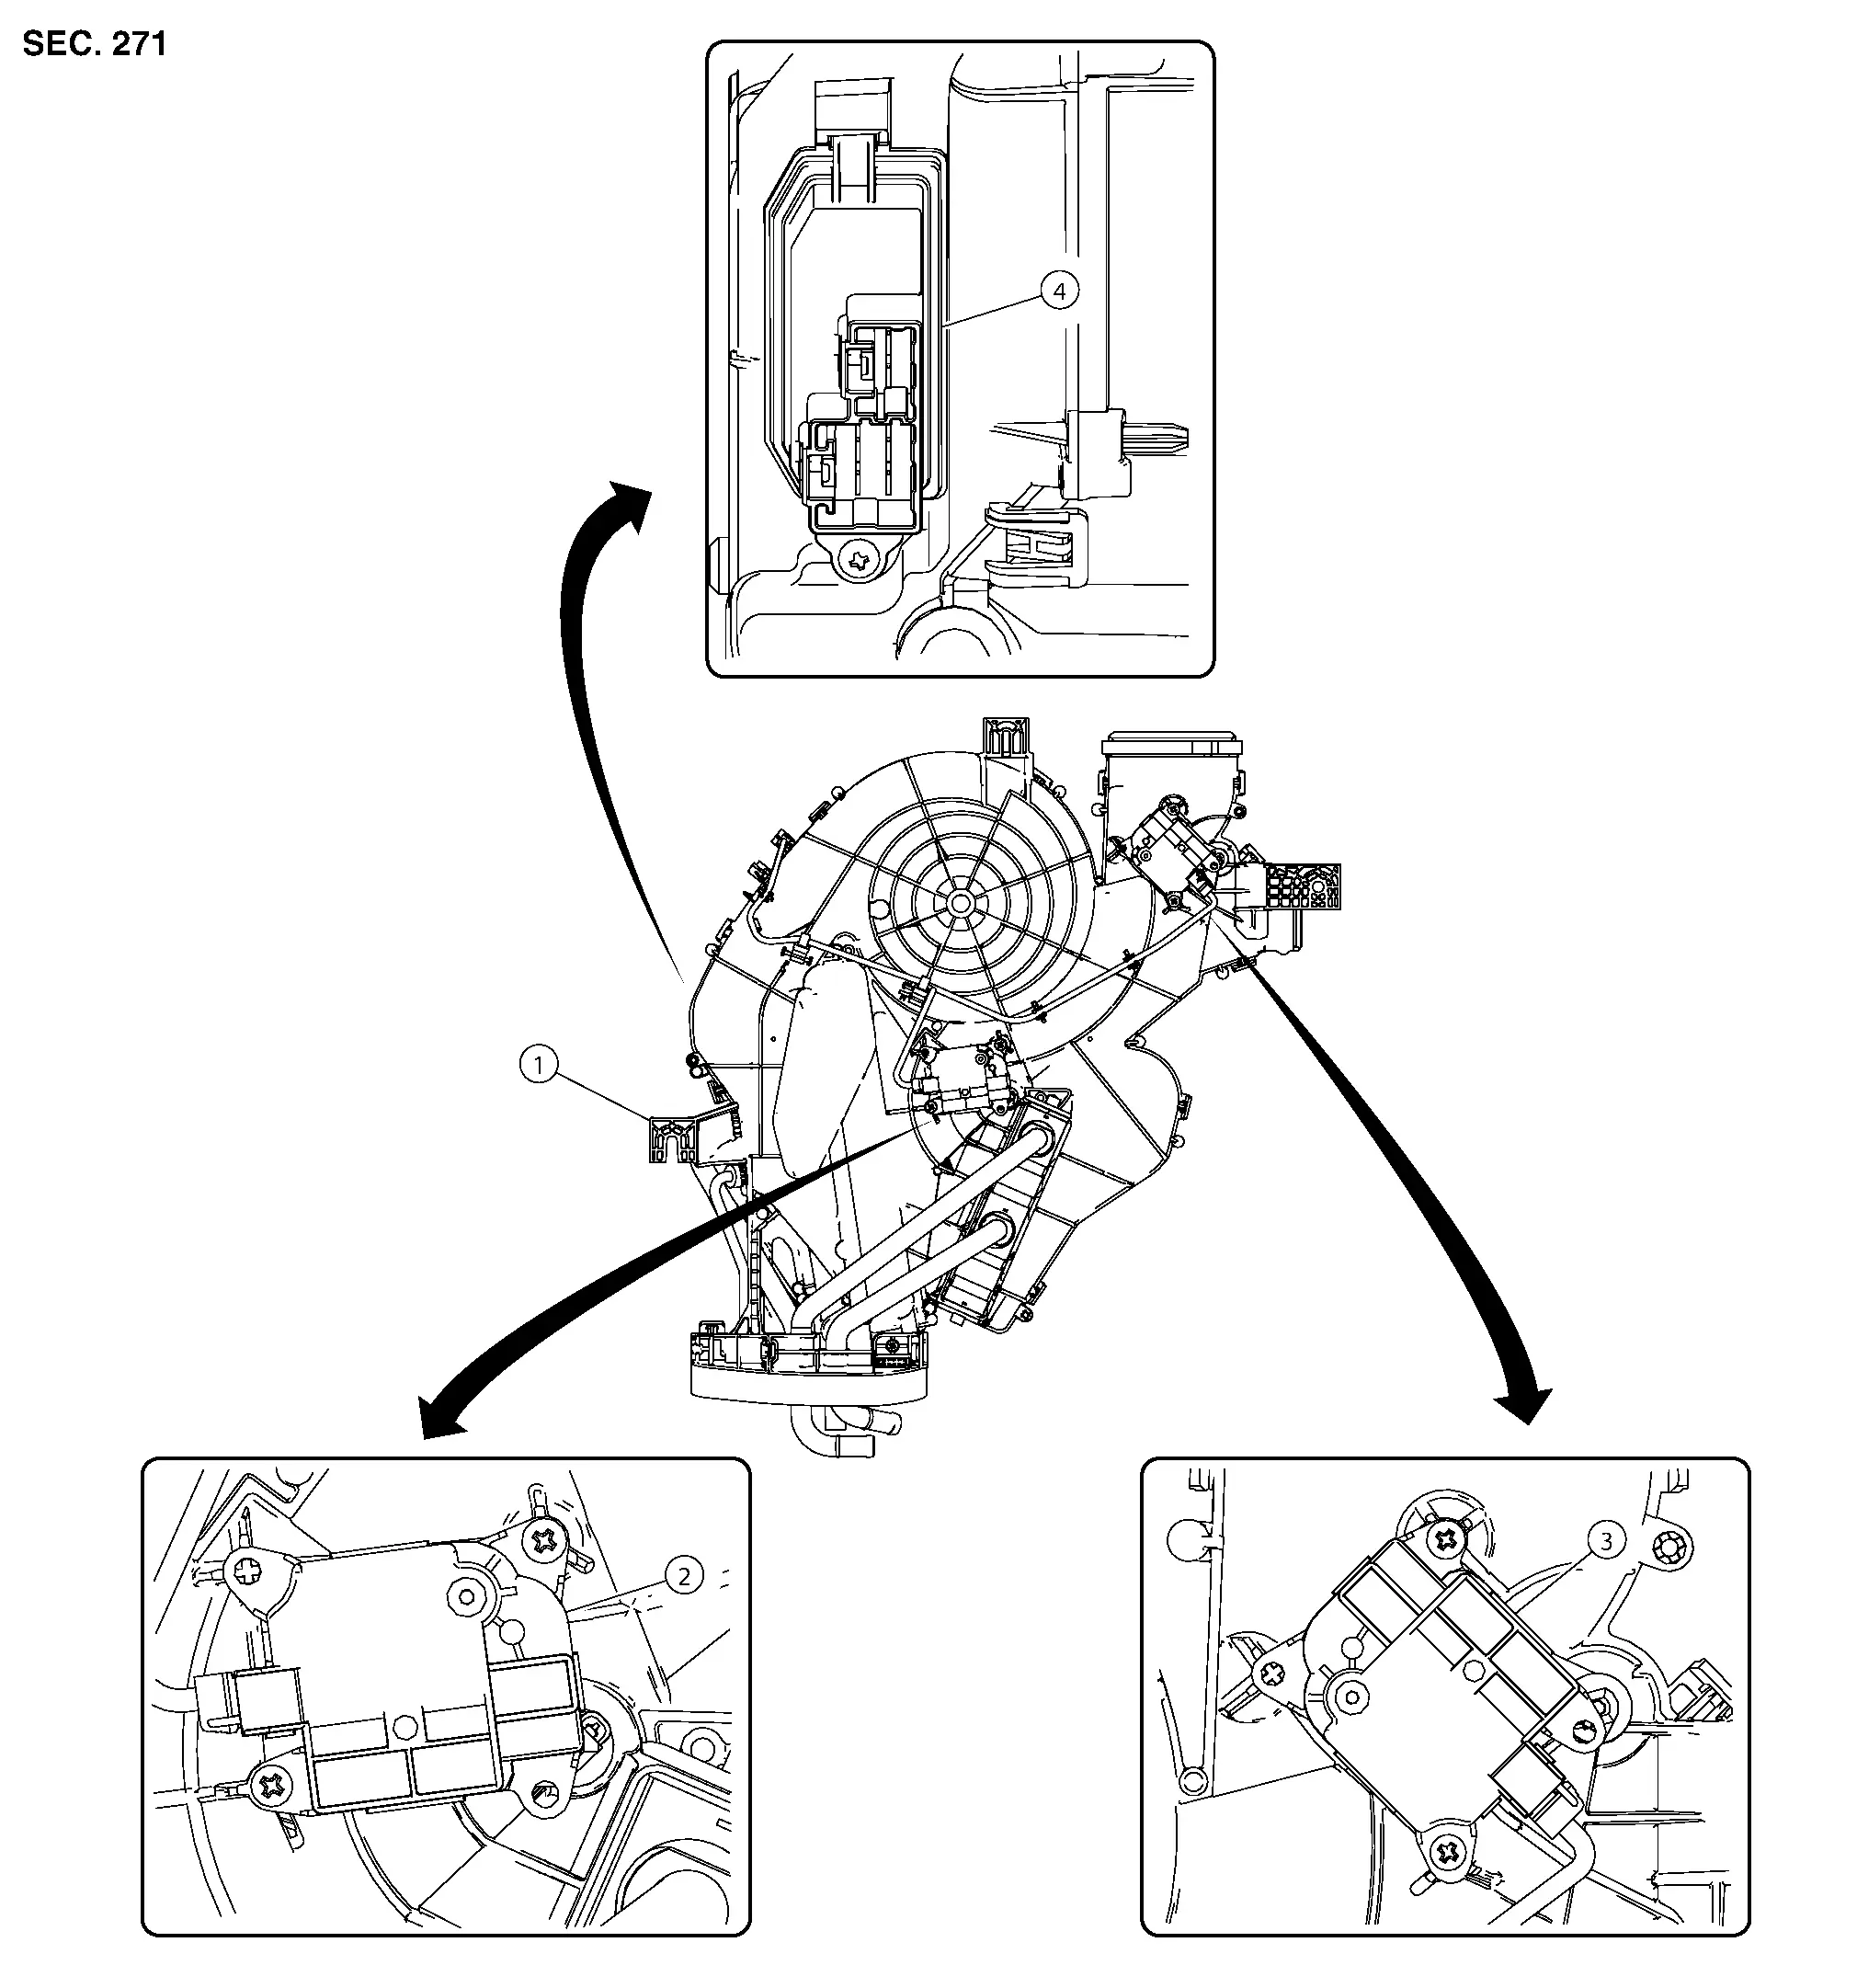
| 1. | Rear heating and cooling unit assembly | 2. | Air mix door motor (rear) | 3. | Mode door motor (rear) |
| 4. | Rear blower motor resistor |
Mode Door Motor
Removal and Installation - Mode Door Motor (Front)
REMOVAL
Separate front heating and cooling unit from front blower unit. Refer to Removal and Installation.
Disconnect harness connector from mode door motor (front).
Remove screws, then remove mode door motor (front).
INSTALLATION
Installation is in the reverse order of removal.
Removal and Installation - Mode Door Motor (Rear)
REMOVAL
Remove rear heating and cooling unit assembly. Refer to Removal and Installation.
Disconnect harness connector from mode door motor (rear).
Remove screws, then remove mode door motor (rear).
INSTALLATION
Installation is in the reverse order of removal.
Air Mix Door Motor
Removal and Installation - Air Mix Door Motor (LH)
REMOVAL
Remove knee air bag module LH. Refer to Removal and Installation.
Disconnect harness connector from air mix door motor (LH).
Remove screws, then remove air mix door motor (LH).
INSTALLATION
Installation is in the reverse order of removal.
Removal and Installation - Air Mix Door Motor (RH)
REMOVAL
Separate front heating and cooling unit from front blower unit. Refer to Removal and Installation.
Disconnect harness connector from air mix door motor (RH).
Remove screws, then remove air mix door motor (RH).
INSTALLATION
Installation is in the reverse order of removal.
Removal and Installation - Air Mix Door Motor (Rear)
REMOVAL
Remove rear heating and cooling unit assembly. Refer to Removal and Installation.
Disconnect harness connector from air mix door motor (rear).
Remove screws, then remove air mix door motor (rear).
INSTALLATION
Installation is in the reverse order of removal.
Intake Door Motor
Removal and Installation
REMOVAL
Remove front heating and cooling unit assembly. Refer to Removal and Installation.
Disconnect harness connector from intake door motor.
Remove screws, then remove intake door motor.
INSTALLATION
Installation is in the reverse order of removal.
Rear Blower Motor Resistor Nissan Pathfinder
Removal and Installation
REMOVAL
Remove luggage side lower finisher RH. Refer to Removal and Installation.
Disconnect harness connector from rear blower motor resistor.
Remove rear blower motor resistor screw. Refer to Exploded View.
Remove rear blower motor resistor.
INSTALLATION
Installation is in the reverse order of removal.

Nissan Pathfinder (R53) 2022-2026 Service Manual
Removal and Installation
- Front A/c Switch Assembly
- Rear A/c Switch Assembly
- A/c Auto Amp.
- Ambient Sensor
- Front in-Vehicle Sensor
- Rear in-Vehicle Sensor
- Sunload Sensor
- Intake Sensor
- Door Motor
- Rear Blower Motor Resistor
Contact Us
Nissan Pathfinder Info Center
Email: info@nipathfinder.com
Phone: +1 (800) 123-4567
Address: 123 Pathfinder Blvd, Nashville, TN 37214, USA
Working Hours: Mon–Fri, 9:00 AM – 5:00 PM (EST)
